Pages

Thursday, April 29, 2010

Beaded Spring Card

 by Lis Whiting

Beaded Spring Card

Materials

Instructions:

  • Fold the white cardstock in half to make the base for your card. The final measurement should be 5 1/2 x 4 1/4. Set it aside.

  • Cut one piece of the Graphic 45 Renaissance Faire cardstock to 5 1/2 x 4. I used a couple of different styles and you can see in the picture that these are double sided, giving you beautiful variety.


  • Select your punches. (I chose two flower designs by McGill’s Flower Series. I decided that I wanted a landscape card with two large flowers. I punched them out by flipping the punch over so that I could see where I was punching on the paper.)


  • I decided to hand cut the stems and leaves with an xacto blade so that I could add some of my own design work to it. (I did use the standard long xacto knife by fiskars as pictured but I am buying the fingertip knife. Ive tried it and it gives much better control for things like this. Look for it in one of my upcoming projects!)

    I have included a couple of examples of how you can punch and cut to create your spring flower scene.


  • Cut a piece of double sided tape sheet so that you can cover the entire front of your white cardstock card. I chose white as my base color to give the micro bead colors a brighter appearance.

    * BE VERY CAREFUL WHEN PLACING THIS DOWN! When it touches the paper, that’s it. It’s down. (This is good because we don’t want the micro beads to come off!)


  • Peel off the covering to expose the other side of the sticky glue.


  • Attach your punched and cut design paper onto the card front (again, be careful! Once it’s down, it’s down. You can always trim the edges if they aren’t exact.)


  • Decide which color micro beads will go where on your card. Using a plastic bead tray, hold your card in the tray and CAREFULLY pour the beads over the exposed sticky areas you want to cover.

    TIP: I mixed Martha Stewart’s colors to get the color I did; I used green, gold and a small sprinkle of black. This gave me a little more dimension in the stems than just the flat green.


  • When you are done with one color, be sure to pat the areas with your finger to help set the micro beads.


  • If you look closely at the above picture, you will see that I got green in the flower area and there are also beads along the bottom edge of my card. Here’s how I fixed that:

    • Take your thumb and forefinger and slide the card edge between them. You will be able to take off any excess beads quickly and without a mess. If some beads got in the wrong spot, don’t worry. Just use your xacto blade to gently scrape them out of the area. Now your card is clean and ready for the next step!

    • Always clean your tray of any leftover beads so that you don’t get the colors mixed. (This works very much like glitter.) You will find that the microbeads are a little staticy. I never get every last bead out of the tray. Once I have poured back most of the microbeads back into their container, I put the tray in the trash bag I always have handy and give it a couple of shakes and its clean. Easy!

  • Color your flowers, one at a time, (Unless you want both flowers the same color), using the same process as we did for the stems and leaves.


    • TIP: You can use this technique with glitter and flocking also. Just think of the punches that you have and the great fun you can have with them now that you know about this!

    • TIP: Try using your FINGERS to apply a different color just to the tips of the flowers. Let a few of the color beads dribble into the rest of the space. When you apply your second color, you will get a little of a fade effect.

  • Add some cream ribbon at the bottom of the card. I decided to use a second ribbon at an angle to add some interest.


  • Add the 3mm and 4mm ivory pearls to the flowers as shown in the picture.


  • Add the 3mm gold pearls to the ribbon as shown.


You’re done!

TIP: Think about applying microbeads (glitter or flocking) to the edge of your card. This is easy as all you need is a strip of double sided strong tape. Use the same technique as above and you will be amazed at the result.

TIP: Think about using multiple colors in a pattern such as an alternating stripe along the edge of your card.

The pictures don’t do this card justice. When you are done, the dimension of the microbeads makes the card look as if the beads were applied on top of the paper. It looks really pretty! I hope that you try this technique out; you won’t be disappointed.

Lis

Tuesday, April 27, 2010

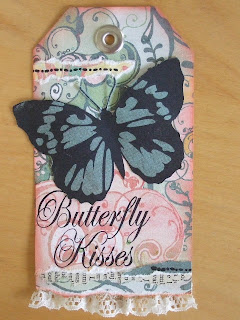
Butterfly Tag

Butterfly Tag

by Joanne Wardle

Materials

Instructions

  • • Cut a tag shape from the papers and tear the bottom, then edge with worn lipstick ink using cut’n’dry foam.

  • • Cut a swirly piece from a piece of the paper and stamp with the butterfly kisses from the springtime swirls set.

  • • Tear a couple of scraps from the paper and stamp with the dots from the springtime swirls.

  • • Stamp the butterfly from the garden delight set on another piece of the paper and cut out.

  • • Mount all the pieces on the tag, using adhesive of choice.

  • • Mount a scrap of lace to the back of the tag.

  • • Finish with the gromlet.


So glad to be able to share with you again. Thanks for coming by!

Joanne

Sunday, April 25, 2010

Sew Nice

  by Polinka

Sew Nice


Materials:

Instructions

    The page is about the crafty me, who likes sewing, cutting, etc… The multi-handed monster was pretty well suited for me, and the sewing-themed fabric chipboards were also perfect. These are ready-to-use embellies, so I just had to stick them on the page. Though the monster is no longer available at FranticStamper, you can find lots of different chipboard embellishments that might suit your personality!

    What I love about current scrapbooking trends is that they include lots of clouds everywhere! I love clouds, so this October Afternoon paper is one of my favorites! As it is double-sided I used the reverse side of the cut clouds to add some matching colors to the page. I stuck them near to the cut clouds, with a little embellishment for each.


    I wrote "nice" with a pencil and then stitched over the pencil on the background paper, using my sewing machine and blue thread. I used the glittery chipboards for the 1st line title.


Thanks for stopping by and I hope you enjoyed my project! Have a lovely day,

Thursday, April 22, 2010

Roses are Red

by Erika Taylor

Victorian images and vintage creations are so amazing. They truly bring you to a place filled with wonder and beauty. When I first laid eyes on the Fancy Pants Vintage Valentines paper line, I immediate fell head over heels for it. The colors are soft yet striking, and the images and patterns can be used in so much more than a Valentines craft. Today I’m sharing with you a little piece of the past with a card using these wonderful papers.

Roses are Red

Supplies Needed

Instructions to Create Card

  • Cut kraft cardstock at 7” x7” score at 3 1/2”. Set aside.

  • Cut black cardstock 3 3/8” x 6 7/8”. Adhere 3 1/4” x 6 3/4” patterned paper to card front.

  • Cut out 1 5/8” x 3 3/8” black cardstock. Pierce edges with paper piercer. Adhere to card front.

  • Cut 40” of twine and wrap around card front 3 times. Adhere edges to back of card front.

  • Cut out 2 3/8” x 5 1/8” brown cardstock. Adhere 2 ¼” X 5” piece of patterned paper. Adhere to cardstock. Attach 5 1/8” trim to back of piece then adhere to card front.

  • Cut out heart shape from patterned paper. Distress edges, and then paint with Rock Candy Crackle Paint. Let dry. Ink edges using blending tool and Vintage Photo Distress Ink. Adhere to card front using pop dots.

  • Apply Cut out roses from patterned paper using precision scissors. Adhere to heart using pop dots.

  • Apply Liquid Pearls accents around image and along 2 corners of card front.

  • Paint hair, headband and lips with Shimmerz paints. Accent roses with Shimmerz paint as well.

  • Adhere entire card front to card base

  • Finish card by distressing edges and using Vintage Photo ink on edges.


Thanks so much for stopping by today and sharing a fabulous Frantic Stamper Vintage Valentines Moment

Toodles
Erika

Tuesday, April 20, 2010

Eiffel Tower

  by Debi Wind

"Eiffel Tower"

Supplies

How to:

  • Cut Anchorage cardstock to the size of 5 1/2"X8 1/2", score it and fold in half.

    Cut stripped Home pattern paper to the size of 4"X5 1/2" and using Aleene's Glue adhere stripped pattern paper to card.

    Cut dotted Home pattern paper to the size of 2"x3 1/2" and cut a piece of Espresso and Lagoon cardstock to layer under the dotted pattern paper.

    Using Aleene's Glue adhere Home dotted pattern paper to Lagoon and Espresso card stock and adhere to card.

    Allow to dry.

  • Using checkered background stamp image, ink image with Espresso ink, and stamp on ivory cardstock gently. The idea is to leave a bit of an impression of the image.

    Using Eiffel Tower stamp image, ink image with Butterscotch ink, and stamp over part of checkered background.

    Trim, and using the sponge distress the edges with Ranger Distress Ink Brushed Corduroy and Dried Marigold inks.


  • Using Aleene's Glue, adhere layered image to card.

    Allow to dry.

  • Using The Ultimate Glue adhere Fleur de Lis embellishment to card.

Sunday, April 18, 2010

Tinkerbell Card

by Sharon Jeffs

Tinkerbell Card

Materials

Instructions

  • Cut the Pink Core-Dination card to 5 1/2" by 11" and fold in half. Cut a square of the green card to 5" by 5" and emboss along the left half with the Cuttlebug Swiss Dots embossing folder.
  • Sand lightly over the raised dots and each of the edges until the white core beneath is beginning to show.
  • Cut a 4 3/4" by 4 3/4" square from the white card. Stamp all over using the flourish stamps and the Versamark ink. Emboss with Seafoam white embossing powder. To make it easier to see where I am going, I stamp and emboss each flourish as I go.
  • Shake each of the Radiant Rain Daubers until all the deposits on the bottom have been mixed together well. Spritz the white card gently with water to dampen it. Add dabs of each colour to the card, blending the colours together for a soft rainbow washed feel. Leave to dry.
  • Tear down one side of the embossed and coloured card, about 1" in from the side.
  • Apply gold leaf sizing to one of the flourish stamps and stamp down over some of the embossed flourishes. Leave until the sizing feels tacky and then apply small pieces of the gold leaf by patting it into the adhesive then rub into the glue gently with a soft paintbrush to remove any excess.
  • Adhere green square to the front of the card with the sanded embossing on the right side edge.
  • Attach last piece to the top of the green card with the torn edge running along the sanded dots so that it appears that the top piece was torn away to reveal the bottom section.

  • Finally, attach the Tinkerbell sticker to the front and the Star to the inside of the card.


Thanks for coming by today. I hope you've enjoyed my project. See you next time.

Friday, April 16, 2010

Bling Card

 by Lis Whiting

Bling Card

Materials:

Instructions:

  • Fold the black cardstock in half to make the base for your card. The final measurement should be 5 ½ x 4 ¼. Set it aside.

  • Color your Robins Nest Dew Drops

    • Dew Drops are small circles of acrylic. They come in many colors. For today we will be working mostly with the clear ones.


    • Get out your dew drops and several colors of alcohol inks. Use a craft mat.


    • Line up your clear dew drops. (I put them in two rows.)

    • Take the cap off one of your alcohol inks and place a single drop of the ink on top each of a few clear dew drops.


    • Continue coloring your dew drops until you have colored about 15 of them. (3 pool, 3 willow, 3 denim, 2 gold, 2 silver, 2 pearl)


    • You can use a heat gun GENTLY to dry them. The colored dew drops are dry when they aren’t sticky anymore. (It takes about a minute.)

    • To clean your craft mat, squeeze out a little Blending Solution and wipe your mat clean. (I’m amazed at how long this bottle has lasted me. Its been through at least 3 classes of 10 plus my own cardmaking. I still have half of a bottle left.)


    • Set aside the colored dew drops.

  • Using your distress inks, except for walnut stain, and a swirl rubber stamp, stamp in various colors on the front of your ivory cardstock (single sheet of 5 1/4 x 4).


  • Using the other piece of ivory cardstock, stamp a column (or other element of your choice.)


  • Using an ink blending tool, blend walnut stain on the edges of your stamped images. [pic 10]


  • Use Smooch Illuminate to trace all the stamped swirls on your card. Do not put smooch on the column. You can use a heat gun to gently dry the smooch after you have finished.


  • I wasn’t sure that I was going to like the Smooch Illuminate but I LOVE IT! It add a colorless sparkle – almost like a translucent pearl – to the card. I tried to get a good picture of it. The picture may look as though the smooch is ver the top but it really isn’t. Its just the lights shining on it. The total effect is more subtle.

  • Cut a piece of ivory ribbon and add this to the bottom of your stamped ivory cardstock. Attach on the back side.

  • Mount your stamped piece onto the front of your card base.

  • Stamp a sentiment on the column.


  • Place mounting tape on the back of the column and mount onto the card. (Sorry...the ribbon doesn’t show here because I had forgotten to put it on. I did put the ribbon on when I remembered but had to take off the column and re-glue everything. Yuck!)


  • The next step is to attach your dew drops to the column. The idea is to have a “spray” of “flowers” – only these will be dew drops.


  • I took all the dew drops that I was going to use and placed all of them on mini glue dots. I rolled out the mini glue dots and put them all down. This made it simpler for me to take the dew drops one by one and put them on.
  • Leave enough space between some of the dew drops so that you can place pearls between them.


  • Add some beautiful bling to the bottom of the card. I cut the pieces up and attached them where I wanted.