Pages

Friday, July 31, 2015

Two Design Team Announcements


We would like to thank Jeni Allen for her wonderful projects and camaraderie over the past few months, and for staying on to help us out when a guest we had lined up couldn't join us after all. We loved having her guest design for us, and will miss her a lot. We truly hope she will come back and join the team again sometime soon.


We also would like to welcome our newest guest, Marilyn Scheller.


Here is a little about Marilyn in her own words.

Hi there! My name is Marilyn and I live on a farm in Saskatchewan Canada. I have a full time job but in my spare time, I love to paper craft, especially creating cards.

I've been involved in this craft since 2011 and like most of us, it started out innocently and slow enough. A friend invited me to a home stamping party and the rest is history and now I am completely hooked.

Three of my favourite things which I cannot be without in this craft is my Copics, Big Shot and dies. I love using dies so when Frantic Stamper asked if I would do a guest design spot, I jumped at it and immediately said 'yes, yes, yes"!. I love the variety and selection of anything and everything the shop has to offer and the fab assortment of innovative dies.

One of the things I have gained through this craft and treasure the most is meeting some of the most creative and talented people from all over the world and am so lucky to be able to call them my friends.

Please join me in thanking Jeni and welcoming Marilyn by leaving a comment.


Tuesday, July 28, 2015

Tibute (Kathy Berger)


Tribute
by Kathy Berger


My dad was a World War II Spitfire pilot in the RCAF with 80 or more missions into enemy territory; as a squadron leader he was responsible for accompanying bombers on their missions and engaging in firefights to protect them.

Dad moved to the States shortly after the war, met mom, and settled down. I know we sometimes felt the lack of celebration of his accomplishments in the war when Veterans' Day came around. He was a vet, but his service was ignored because it wasn't as an American pilot. Despite flying for an ally, he was left out of our national celebrations. ( Dad was a US Citizen, having been born in Massachusetts, but chose to go to Canada to enter the war before the US did, fighting for the land of his parents' birth.)

We lost dad on Feb 12, 2011. It was on the 4th anniversary of his death that I sat down to draw our Transportation release of dies. Fran had asked for a fighter plane; but immediately I knew I had to make it a Spitfire.

I really struggled with drawing this plane...it might have been because I was drawing through a veil of tears. But I did finish...and with the final touch of drawing call letters, I had drawn Dad's plane.


From that moment on, I knew I had to use that die in a trbute to Dad, and this card is that tribute. The map on the front of the card is marked with a pin at the place in Canada where my father grew to be a man. The Canada patch on the front is an actual-sized copy of a patch off of Dad's wollen dress uniform.

Inside the card is dad's spitfire on a simple pop-up mechanism, along with two pictures of dad. The top left is dad in his flight suit. The lower right is of him in dress uniform posing with his severely damaged plane. Despite having lost tail rudder and flaps, he safely returned to base and landed his plane. His feat was the talk of the base for quite some time.


The inside of the card also holds tiny scans of his service book, showing his next of kin, his rank and his assignment. Here is a last look at the inside of the card.


*** Materials for this project available at www.franticstamper.com.
 
FRA-Die-09490
 
FRA-Die-09518


Saturday, July 25, 2015

Christmas Blessings (Lynn Mangan, Guest Designer)

Here is yet another card in our monthly holiday card series, posted on the 25th of each month...


Christmas Blessings
by Lynn Mangan


We mail out a lot of Christmas cards and whenever I can come up with a relatively flat card to mail out I am super pleased!  I made this card several weeks ago and decided it was time to make about ten of them to jump start my Christmas card stash.  To give the card a little extra finish, I matted a gray piece of card stock with a thin border of black card stock.  I love the way the square card base and gray/black mimicked the square outline on the fabulous intricate die cut.  To finish off the card I added a simple sentiment and one little gem to highlight the holly in the die cut.  So nice to finally be getting a dent in the Christmas cards...December is right around the corner!


*** Materials for this project available at www.franticstamper.com.
 
FRA-Die-02951

Friday, July 24, 2015

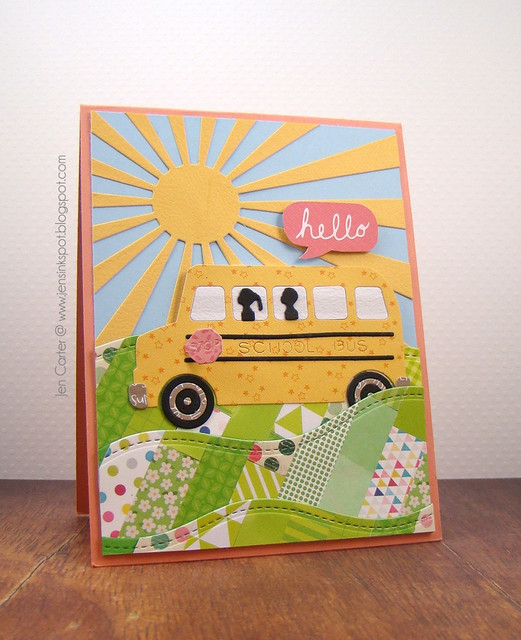
School Bus Hello (Jen Carter)


Jen Carter Quilted School Bus Hello 1.2


School Bus Hello
by Jen Carter


It's hard to believe that my summer is almost over and I have to go back to the school office in just a few short weeks.  WHERE did the summer go? With school on my mind, I wanted to create some school themed projects, so I started first with this card.

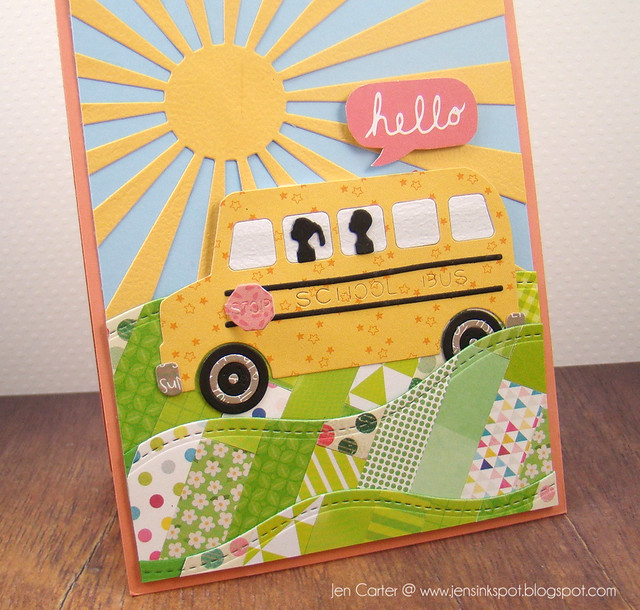
I love this new School Bus die by Frantic Stamper!  I wanted to do something fun with it so I decided to go with a quilted/pieced card.  I pulled out lots and lots of coordinating patterned papers and then put the dies to work.  I started by piecing that bus.  Oh my!  Isn't that just the cutest?  My kids don't even ride the bus to school but I still love it!  And the little boy & girl silhouettes that fit inside the window!  What a great addition to the die set!  The bus even has piece-able bumpers!

Jen Carter Quilted School Bus Hello Closeup

To create the background, I used the Sunburst Card Panel die to create the sun and just trimmed it where needed to fit on my card mat.

For the hills I took one piece of small cardstock, covered it with adhesive and then cut strips of patterned papers with various greens in it, adding in some white papers with different colors for contrast, and then cut them apart with the Stitched Scene Builder Edgers dies.  It looks like I used a large piece of paper for the hills but because the pieces are layered behind and on top of each other, I made those pieces go a really long way and I really like the look! 

Thank you SO MUCH for stopping by today!  I hope you enjoyed this card!


*** Materials for this project available at www.franticstamper.com.
 
FRA-Die-09590
 
FRA-Die-09141
 
FRA-Die-09403


Monday, July 20, 2015

Black And White And Red All Over (Kathy Berger)


Black and White and Red All Over
by Kathy Berger


This card is one I have been hoping to find time to do, mostly because I wanted to share a technique with you.

I started making the card by cutting 5 different papers using the Bubble Background die from Frantic Stamper. Four of the papers were various black and white or just black prints. The fifth was red. I reserved all the pieces from inside each of the cuts in separate small bowls. I set aside the inside pieces from the black dotted cut, and the outside pieces from the others.

I covered the entire front of the black dotted bubble background with Post-it tape,


and then I flipped it over.


This gave me a way to hold all of the pieces I was going to inlay in place while also allowing me to reposition them if I needed to.

I first placed a few red pieces in place where I wanted them. I tried to make them balanced in the piece, but I didn't lay them in any specific pattern.

After that I worked with the darkest of the inlay colors first, working from the top left to the bottom right, randomly placing the pieces. I repeated with the other colors. Laying them top left across to bottom right helped me to keep from putting too many pieces of the same paper next to each other.

When I was finished filling in the bubbles I took a piece of black cardstock that was quite a bit bigger than the background piece and applied a thin layer of liquid adhesive. I covered the Bubble Background piece with it and let the adhesive dry.

Once dry, I flipped it back over and removed the Post-It tape. I trimmed the black piece down so there was just a tiny border around the Bubble Background piece. I mounted them onto a white card blank.

I stamped my sentiment on a small strip of white paper which I then mounted onto a red strip and a black strip. I cut a flag on one end and mounted the sentiment to the card using foam tape.

Here are a couple more views of the card from different angles.


I hope you enjoyed the card and that you will give the technique a try!


*** Materials for this project available at www.franticstamper.com.
 
FRA-Die-09413

Saturday, July 18, 2015

Happy Birthday (Lynn Mangan, Guest Designer)


Happy Birthday
by Lynn Mangan, Guest Designer


It never seems that I have enough birthday cards in my card box so I am always looking for gender neutral cards. I thought it would be fun to make a tie die looking card using the Bubble Border die.  I took four different distress inks and inked up a piece of white card stock.  I then die cut the border die three different times.  To make it easier to have the die cut adhered to the card base I attached a double sided adhesive to the card stock before die cutting. This made adhering them super easy!

The card was finished off by a black strip of card stock and a stamped birthday sentiment.   Love that this could be used for a guy or girl!


*** Materials for this project available at www.franticstamper.com.
 
FRA-Die-09505


Friday, July 17, 2015

Love Just for You - with tutorial (Rachelle Green)


Love Just for You - with tutorial
by Rachelle Green


This card was fast and easy. I used a Copic colored image and embossing folder with white core paper that I sanded with sandpaper. Next I used the Frantic Stamper Precision Die set Love Filled Heart along with glitter and foil paper.

The next part forced me to find a way to align the Frantic Stamper Wavy Banners and Greetings stamp set with the Wavy Banners die set. It was actually very simple and now I have a sure fire way to get it right.


This is my first attempt. It's not bad but I'm a little OCD. I wanted the stamp and die to align better.


  • Die cut the wavy banner using a small piece of cardstock. This is now your template.


  • Stamp the wavy banner onto your chosen cardstock.


  • Using a piece a Painter's or other easily removable tape, align and tape the template on top of the stamped image.


  • Now position the die onto the template and secure it with a piece of tape.


  • Finally run this "sandwich" through your die cutting machine and voila!


Use this same technique for any die with matching stamp for perfect results. Be sure to keep the template in the same packaging as the die,


*** Materials for this project available at www.franticstamper.com.
 
FRA-Die-09116
 
FRA-Die-09475
 
FRA-CL-002


Thursday, July 16, 2015

Countryside Forsythia Bushes (Ann Greenspan)


Countryside Forsythia Bushes
by Ann Greenspan


I used this photo of my neighbor's yard as inspiration for my card:


Every year my neighbor's yard blooms with various colors as the season progresses.  First come the yellow daffodils and forsythia bushes, then the cherry blossoms, red buds and magnolias, and then it's time for the azaleas.  My card is a little late for the season but I wanted to wait for the Rail Fence ribbon die to make the card complete, and I didn't own that die until just recently.

I find it easier to make scene cards when adhering the scene dies to a card panel just slightly smaller than the actual card base.   This way the sky doesn't go right up to the top of the card; there is a little bit of white framing behind it.   I used a card base that was A2 sized or 4.25 x 11" folded in half giving it a folded size of 4.25 x 5.5".  The top white panel was cut to a size of 4 x 5.25".

Once the top white panel was ready, I die cut the hills using the Stitched Scene Builder Edgers.   I then cut one of the Medium Bare Elm and Medium Base Ash trees, manually cutting both down to a shorter height so they looked more like shrubs.

I used the tiniest of the Petite Layering Posies for the flowers on the bushes, cutting them out of yellow card stock and filling in the centers with a white gel pen.   Next I used the Rail Fence ribbon die and ran that through a wood embossing folder to give it just a little texture, but that is hard to see in the photo.  I added the tiniest of the birdhouses and the hummingbird from the Small Birds collection.  The final step was to cut out the Little Clouds and adhere them with foam tape to give a dimensional look.


*** Materials for this project available at www.franticstamper.com.

 
FRA-Die-09448

 
FRA-Die-09447
 
FRA-Die-09456
 
FRA-Die-09403
 
FRA-Die-09170
 
0FRA-Die-09193
 
FRA-Die-09084
 
FRA-Die-09415