Pages

Monday, September 28, 2015

SO much News!!


Hello!

Today we have three pieces of news to share with you. First, and probably the one many of you are here to get, we have a WINNER for our die giveaway!


Congratulations to TracyM #6773!


TracyM #6773 3:34 AM
FABULOUS die and pretty cards!!!
There is something SO CHEERY about sun ray designs => THANK YOU for the chance to win some CRAFTY AWESOMENESS :)
PS - I'm a fan on Facebook too, liked, commented and shared with my crafty friends.


We will be contacting you today to help you claim your prize!


BUT we aren't done!! We have more news! Starting today we have two new Guests joining our design team through the end of the year! We are THRILLED to have them, and we think you will be, too!

First, please welcome Kia Gibson-Clapper. Here is a little about Kia, in her own words.


Hi! I am Kia (Karen) Gibson-Clapper - legal name Karen, I am called Kia. I have always enjoyed having hobbies, and cannot imagine my life without a hobby. I sew for my home, (love interior design) I am a quilter, and I have sold my craft sewing at craft shows.

I started making cards 10 years ago and fell in love with it. I have tried many techniques over the years and have made cards from Clean and Simple to Shabby Chic, all of which I have enjoyed. I finally joined blogland this year, and am slowly making cards just for my blog. I love to do challenges when I have time, and I also sell my cards locally.

I am delighted to guest design with Frantic Stamper for the next few months.


And now, please welcome Tracey McNeeley.


Hello from Canada! I am so thrilled to be Guest Designing for the Frantic Stamper for the next thee months. I live in beautiful Muskoka, Ontario with my husband, two away at university children and a sweet Havanese named Sam. I have been creative all my life and have had an obsession with pretty papers since childhood. Now my obsession includes stamps and dies and different colouring mediums. You can find me on my blog In My Creative Opinion or up late at night creating in my craft room. I hope I inspire you to create something beautiful!

Tracey


Thanks for coming by. And thanks for being part of our creative sphere. We really do get our creative energy from our readers and followers.

Saturday, September 26, 2015

How I Do Inlay (Kathy Berger)


Ann and Jen have shared their way of doing inlay using two different dies in the Frantic Stamper line, Woven Ribbons Card Panel and Sun Rays Quilted Card Panel. I am going to share my method using a more intricate die, the Bubble Card Panel.

I hope you will enjoy this video that shows the steps I take when doing this kind of project. I find it to be especially helpful because I don't have to search for a particular piece to inlay; it is in the correct place on each color's cut sheet, and I don't have a lot of "confetti" particles running loose on my table.

Without further ado, here is my method of doing inlay...


And here are a couple of last looks at the card.


*** Materials for this project available at www.franticstamper.com.
 
FRA-Die-09413


Friday, September 25, 2015

JOY (Rachelle Green)


Once again we are at the 25th of the month and we are happy to share yet another holiday card. This time the card is from team member Rachelle Green. We hope you will en"JOY"!


JOY
by Rachelle Green


I'm almost ashamed to say that everything I used for this card was laying out on my desk (note to self: clean off your desk). The card base is part of a card/envelope set I bought on clearance at the end of the last Christmas season.

I started by using the Frantic Stamper Precision Die Holly Joy along with gold foil paper and green cardstock. I cut part of the gold foil holly swirls away and adhered it to the green cardstock. I used the Ranger Vintage Photo Distress Ink on the holly leaves. After adhering it to a die cut of the Frantic Stamper Precision Die Elementals #11 Bracket Coved Label Set along with Ranger Vintage Photo Distress Ink I added red round rhinestones as the holly berries. For some added dimension I added foam dots under the label and used the original foil cuts as accent pieces.


*** Materials for this project available at www.franticstamper.com.

 
FRA-Die-09621
 
FRA-Die-09468

Wednesday, September 23, 2015

Woven Card Panel Die Video (Jen Carter)


Woven Card Panel Die Video

by Jen Carter


Hello!  Today I have another video to share with you.  It has been requested by quite a few customers for a video on how to use the new Woven Card Panel die and I thought that that was a request I could help out with.


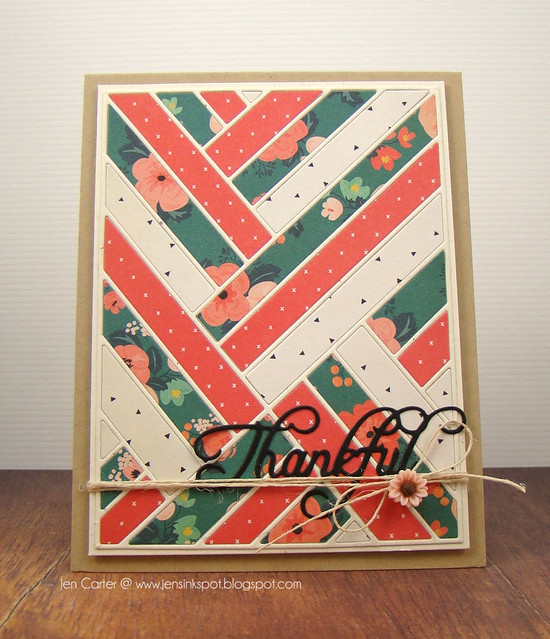
Below is the finished product of the card I made in the video.

Jen Carter Thankful Woven 1

As I said in the video, I chose three coordinating papers from my paper pad.  This is an easy way to choose coordinating papers, since the papers in the paper pads are made to coordinate with each other.  I chose the darker green as my dominate paper and used the longest strips from this paper on my card.  The other two papers were used as my accent colors.

To easily adhere the detailed grid outline (not the inside pieces) I recommend using Stick It! that you can also purchase from Frantic Stamper.  You won't be sorry!

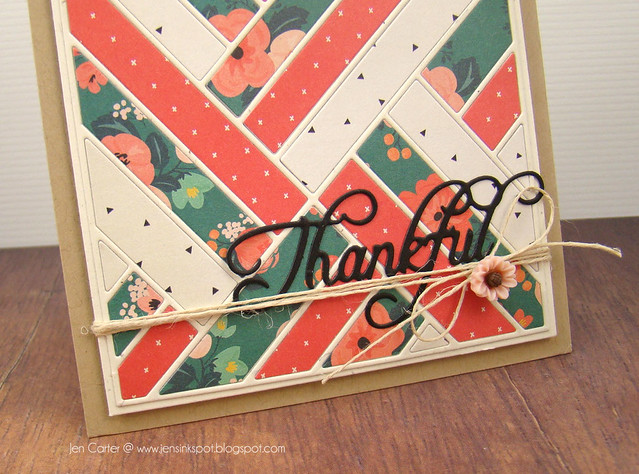
Jen Carter Thankful Woven Closeup 1

I didn't want to cover up the front of the card and distract from the pattern that the die creates, so I went very simple and added the Thankful word die as my sentiment.  I also used Stick It! to adhere this word also.  I added a little bit of hemp cord and a little resin flower as a small accent.

Thank you for stopping by today!  I hope you enjoyed the video!


*** Materials for this project available at www.franticstamper.com.
 
FRA-Die-09662
 
FRA-Die-09605

Tuesday, September 22, 2015

Sun Rays Quilted Card Panel Tutorial (Ann Greenspan)


Sun Rays Quilted Card Panel Tutorial
by Ann Greenspan


The Frantic Stamper Sun Rays Quilted Card Panel cuts out both the frame with spokes attached to it and the stitched rays which go back into the frame, all in one swipe through the cutting machine.

Before you start making your card, decide on what colors of cardstock you will be using.  I normally cut the frame using a solid color of cardstock and then cut the rays with either pattern paper or different colored cardstock from what I used for the frame.  For my first card, I chose to use a solid black frame and dotted orange and dotted black dsp for the rays.  I am using a white card base to mount the frame on.


The 3 tools I use to make this card are a pair of tweezers, a paper piercer, and a glue pen.

I cut my solid black cardstock with the die.  To remove the paper from the die, poke the holes in the four corners on the back of the die.  This will lift the corner of the frame that has the spokes attached to it.  Carefully remove the frame with spokes, trying not to stretch the paper as you are pulling it out of the die.  This is critical that you gently pull the frame and spokes, trying not to bend or stretch the paper.  After your first card, you will easily get the hang of it.


After the frame is removed from the die, then remove the stitched rays and put them aside to use on another card we will make later.  I want to have dotted orange and dotted black rays on my card so now I need to cut a piece of each of those papers with the die.  After the cutting is done, this is what you will have (I put the black stitched rays aside already; they are not shown in this photo):


I won't be using the dotted orange or dotted black frames right now, so put them aside for the cards we will make later.

Before adhering anything on the first card, I like to place the stitched rays back into the frame to see how it will look.  Do not glue anything yet.


Put the leftover rays to a side for now so you don't get them mixed up with the rays that you have in the frame temporarily.  Now we have just our frame, card base and 12 rays to work with.

To adhere the black frame to the card base, use a glue pen and only apply glue to the four outer sides of the frame as indicated with the red dotted lines in the photo below.  Center it as best as you can on the white card base.   I  do NOT glue down the spokes or center circle.


Begin adhering the stitched rays back into the frame, using tweezers and a glue pen.  When adhering the rays, adhere the outer edge first, lining it up perfectly with the black frame.

Also, when adhering the rays, gently lift the black spokes of the frame so the spokes don't get glued under the rays, if needed.  This normally isn't needed.


After all the rays are adhered back into the frame, if the black spokes between the rays are sticking up, simply run your glue pen under them and press them down.  I rarely ever have to do this though.  It depends on if the frame stretched at all when it was being taken out of the die.

Embellish the center circle area however you want and finish off the card.  I used the Frantic Stamper Stitched Coved Labels to cover the center circle, then cut out the EEEK from the Scary Words set.  I then adhered two spiders and a bat from the Cute Halloween Icons set.

So now that your first card is done, what do you do with the two extra frames you have and all those extra rays?  Make more cards.  I used the frame from the orange dotted paper along with all of the solid black stitched rays to make my second card:


Then I used the black dotted frame that was left over along with the orange and black dotted rays to make a third and final card:


So, with just one die, three different colored pieces of cardstock, and three swipes through the die cutting machine, I was able to make three different cards, then added the embellishments.  Imagine if you wanted to have more than just two different colors of rays on your card.  You could use three different colors which yields even more cards.   Be careful though; this gets very addicting once you make the first card and have pieces left over to make more, and more and more.


*** Materials for this project available at www.franticstamper.com.
 
FRA-Die-09
 
FRA-Die-09
 
FRA-Die-09
 
FRA-Die-09
 
FRA-Die-09
 
FRA-Die-09
 
FRA-Die-09


Monday, September 21, 2015

You Color My World (Rachelle Green)


You Color My World
by Rachelle Green


The elements of this card have been cut out for over a month. They've just been lying on my craft table awaiting the right sentiment. A few days ago, at about 4 a.m., the sentiment popped into my head and I immediately knew how to finish this masterpiece. I started by using the Frantic Stamper Precision Die Crayon Scribble and plain cardstock. Next I used Paint Splats along with foil paper. I absolutely have to use something shiny on all of my projects! Lastly I added the Paint Brush and Palette using very small amounts of scrap paper. I strategically layered all of the Frantic Stamper Precision Die cuts onto a background paper from my stash. For the sentiment I used an old Dymo label maker. I laid out the sentiment and accidently bumped the table. Each word was slightly askew and I liked it! I glued them in place and voila!


*** Materials for this project available at www.franticstamper.com.
 
FRA-Die-09594
 
FRA-Die-09
 
FRA-Die-09596

Sunday, September 20, 2015

LOVE Is All You Need (Karen Letchworth, Guest Designer)


LOVE Is All You Need

by Karen Letchworth


It's such an honor to be designing for Frantic Stamper using their amazing Precision Cutting Dies.  You will quickly fall in love with the high-quality and ease of using these wonderful die-cuts.  I used some older patterned papers from my "stash" to create this card.  Once I had layered my papers and added my hand-punched borders, I inked and machine stitched my card together.  

Next, I added some sweet little banners using the Stitched Fishtail Banners Die Set and added the sentiment (LOVE) using the sweet Big Handwritten Love Die.


The finishing touch was to add a length of vintage baker's twine around my card.  I really wanted to keep these sweet dies the focal point of my card, and by using Frantic Stamper's Precision Cutting Dies, making my card was so easy and fun.  I encourage you all to give them a try.  They really are awesome!


*** Materials for this project available at www.franticstamper.com.
 
FRA-Die-09636
 
FRA-Die-09398


Thursday, September 17, 2015

Winter Cottage in the Evergreen Forest (Kathy Berger)


Winter Cottage in the Evergreen Forest
by Kathy Berger


I promise this will be the last card from me for a while. I really want to let you see more stuff from other members of the design team, and I have a lot of drawing to do, but I did want to share one last card that I made and then I will go lock myself in my drawing room.

Most people who know me know that I absolutely hate snow. It is just cold and wet and gets dirty and melts and refreezes. It is just horrible stuff! And with my bum leg, there is just NO way I would want to experience it ever again! (I grew up in New England, so I had my share!)

But as much as I hate snow, I love snowy scenes and snowmen...and I especially love to create snowy Christmas cards! And this is definitely a snowy one!

I started by cutting and assembling my log cabin. I have to tell you this was REALLY fun! I had so many options, but I opted to go all out and use all the structure pieces and one window die and a door. Once I had it assembled I added my snow (a product made by Aleene's) to the roofs of each of the parts of the house. I then set the cabin aside while I prepared the background.


I cut the distant background out of white card-stock using the Evergreen Forest Edger die. I colored the trees with a blue-green Copic marker (things in the distance are bluer than things in the mid ground). I tapped my snow onto my trees using my favorite applicator.....my index finger!

Next I cut my trees for the mid-ground and foreground out of pine green card using the Small Oregon Fir tree and the Small Pine. I added some variation to the color of the card stock with some Copic markers, and then tapped on some snow.

Next I cut my Rail Fence Ribbon out of white card-stock, and colored the rails and posts with brown Copics. I added snow to it, too.

I then cut a snow drift for the foreground out of white card-stock using the Stitched Scene Builder Edgers. I covered that piece with snow.

I wanted a cardinal in the scene, but my cardinal die (part of the Small Birds die set) is too big, so I used a trick. I cut the bird out of red craft foam and used my heat tool to shrink it until it was just the right size.

Finally, it was time to assemble. I cut a card panel of white card-stock and sponged a cloudy sky on it. I then added the background evergreens. All the layers above that one were added with foam tape, from the background to the foreground.

Here is another view of the finished card. I hope you like it!


Now don't forget that Frantic Stamper has a Giveaway going. Be sure to visit this post for details!


*** Materials for this project available at www.franticstamper.com.
 
FRA-Die-09651
 
FRA-Die-09492
 
FRA-Die-09493
 
FRA-Die-09446
 
FRA-Die-09456
 
FRA-Die-09084
 
FRA-Die-09403