Wednesday, August 17, 2011

Warehouse Wednesday: Show Us Your Work

Show us your work

It's not your name in lights…. but it's the next best thing!  

We're looking for card samples made with the numerous stamp offerings on our site.  Most stamp companies provide us with quite a few samples, but not all. 


So we're asking for your help!   Send us cards made with stamps purchased on our site and we'll showcase them on our website (next to the corresponding product). As a reward, we will give you a $2 off coupon PER CARD we use (maximum of 10 cards) to use to buy MORE great stamps!!! 

We especially need cards made with stamps from the following companies:  Rubberstamp Avenue, Donna Salazar, Hampton Arts, Inkadinkado, LaBlanche, Hero Arts, Tim Holtz, House Mouse and Studio 490.  We could also use cards made from our own line of stamps…. but you're welcome to make cards using stamps from any of the companies we carry.   Please try to use only 1 or 2 stamps so that the image is really showcased nicely.   Please do not use stamps from Stampin'Up or other home-party based companies as we will not be able to use them due to copyrights.

All submissions should be made by EMAIL with a good clean scan or photo, to  franr@franticstamper.com.   Please make sure your scan or photo is well lit and in focus.  We reserve the right to accept or reject any submission based on quality, photo quality, and content.

We look forward to seeing your submissions!

Happy Creating,
-Fran
www.franticstamper.com
541-826-2500

Tuesday, August 16, 2011

Tip Tuesday: Storing Wood-mounted Stamps

Storing Wood-Mounted Stamps

Today we have a few ideas for storing your wood-mounted stamps. While a lot of folks are un-mounting their stamps and going to cling mount systems, some folks just prefer the wooden block. But those blocks can be hard to store. We hope these tips will help.

Tip #1
I bought a small bookshelf for all my wood-mounted stamps. I printed out all the names of my stamps on a piece of white paper then cut them out and attached these to the side of the stamp with a small strip of sticky tape. This means I can still find what I want without taking up the space with a bulky image showing.

Tip #2
I have some of my favorite wood-mounted stamps stored in a shadow box as a decorative accent on a wall in my hallway, amid photos and other memorabilia of my family.

Tip #3
I store my mounted stamps on some very special shelves my father made for me on a visit to my home (now that he has passed, these shelves have become even more special to me)


Tip #4
I store my wood mounted stamps in a cart. The cart I got at Home Depot I think. You can buy drawers for it of different depths. They slide in and out. I can get about 6 wire drawers in. Because of the wires I purchased some acrylic sheet and had it cut to the size of the bottom of each drawer. There is a worktable that fits on top so I can work on it as I use my stamps.

Tip #5
I have a lot of stamps! So, one thing I use for storing my wood is the box covers of copy paper boxes. Where I work we use a lot of paper and I can take the box tops home. They make good storage, I can actually cut the boxes down so if I want to I can stack them. I label the outside.

Tip #6
I store my stamps by category (birthday, Christmas, animals, floral, etc.) so I make sure that each stamp has ALL of the manufacturer information marked in permanent ink on its block before I put it away. I put the name of the manufacturer, the stamp name and item number (if available), and the date I purchased it. That way, if I use the stamp for a magazine submission I have all the information I need right at hand.

Tip #7
However you store your stamps, be sure to do so out of bright sunlight which can age and crack the rubber and have an effect on the adhesive used to mount the stamp.

Tip #8
I am fortunate enough to have wooden stamp storage cabinets that I bought a few years ago. It allows for single level storage of the stamps so that all block indexes are visible. I organize by subject matter.

Tip #9
If storing stamps vertical on a book shelf, buy inexpensive adjustable spice racks to store them on. They "step up" with each row so you can see stamps in the back.


Hope these tips give you some ideas for storing your own wood-mounted stamps.

Sunday, August 14, 2011

Sketch Sunday: ATC #6


Today's sketch is for an Artist Trading Card.


If you decide to use this week's sketch, the design team would love it if you would share! Upload a photo somewhere (Flickr, Picasa, Photobucket, etc.) and then share a link with us in the comments. To share all you need to do is add the following codes to your comment, and then replace the word "link" with the actual link to your photo:

      <a href="link">My ATC</a>

Your comment will then contain the words "My ATC" which will link to your photo. The design team really looks forward to seeing your work!

Smiles,
Kathy

Friday, August 12, 2011

Envelope Memory Box (Design Team Project)

by Kris Hankins

Ever need a special little gift to give someone for a bridal shower, birthday, or other memorable occasion? I came up with this nice little “envelope” memory box. It can hold special photos, notes, journaled tags, and other personal mementos from a special event. I have seen similar items made with chipboard as it’s base. Yes, that would make it quite sturdy, but also bulkier (I would definitely recommend the chipboard for a larger/deeper “box”). I wanted to try making a box that was only about an 1 ½” thick, and used only heavy cardstock as the base.

Well, the heavy cardstock worked perfectly! It gave this size of box enough strength and structure.

Envelope Memory Box

Here is how I made it…

I first cut my heavy cardstock in the following sized pieces –


I used coordinating papers from the Hot Off The Press “Roses In Harmony” paper pack. It includes some beautiful floral, music, text, dotted and striped papers. Just perfect for this type of project.

I cut a sheet of floral, green dotted, and music papers in half (two 6” wide pieces in each).

I layed out a piece of green dotted paper and a piece of floral print paper, end-to-end (print side down). I then layed out the sturdy cardstock pieces in the layout shown above (leaving about 1/8” between cardstock pieces).


The seam of the two papers was placed at 3.25” down from the top of “back” piece. There needs to be about 3/8” overhang of paper on all sides that is folded over the edge of the cardstock pieces.

Once all this was fitted, I adhered the cardstock pieces to the cut paper pieces. I used a good quality glue stick for this. I took time to make sure the edge were straight and lined up with each other.


Next, I folded the edges over and glued them down.


I lined the box with the music paper. I trimmed both of the 6” wide pieces down to approximately 5” wide. I glued these two strips in place making sure they covered the previously folded over edges. At this point, I scored between the cardstock pieces so the box would uniformily bend.


Next, I took (6) 4 ¾” x 6 ½” (A6 size) sealed linen envelopes, and I cut off ½” from the ends of each of the envelopes. This gave me (6) 4 3/4” x 5 ½” envelope “tubes”. I glued the first envelope tube to the back of the box, lining up the bottom edge of the envelope with the bottom/back edge of box. I made sure NOT to apply any glue to the outer 1” edge of each envelope. If I did, I would NOT get the according feature. (I ran three rows of adhesive tape down the centers of the envelopes.)


I did this with each envelope, stacking them as I went. I glued the final front envelope to the inside of the box front.

I punched some 1” circles from other coordinating/scrap papers and made “tabs” for each envelope pocket.

I embellished the front of the box with scalloped punched flowers (coordinating papers), a handmade ribbon flower, and a pearly hat pin.

I used May Arts Sheer Loop trim to make the ribbon flower. I covered a 1 ½” chipboard circle (Maya Road) with quality double sided tape. On the outside edge of the circle I adhered one end of the ribbon. I wound it in circles sticking the ribbon to the adhesive as yI went, working my way to the center of the circle. I made 3 or 4 cirles around the chipboard. I embellished the center of my flower with a small inked chipboard circle.

The box closure was made using two beautiful resin rose brads from American Crafts, and some thin twine. I just attached one brad to front lid and one to the front of box, then knotted the end of the thin twine around one of the brads.


As an “extra”, I took some manila tags and made them into journaling tags. This gives a place to jot down notes and memories of the event. I simply use coordinating papers and scraps to decorate the tags. I added stripes, circles, flower punches, etc. to the tags to add some interest. I didn’t want to cover them too much, as I wanted to make sure there would be plenty of room for journaling.

The end product was a very nice accordian envelope memory box. Truly a place to store cherished photos, notes and guests lists, memorabilia, etc. … from a memorable occasion.

Thursday, August 11, 2011

Technique Thursday: Hero Arts Videos


Today we would love to share a couple of videos from Hero Arts. Please note that the products shown in the videos are available at FranticStamper.com.

First up is a video sharing A subtly colorful background resist technique using distress inks and an acrylic block.


And next there is a fun card project using some stamps to create a scene, just perfect for a kid's birthday.


Hope that you have enjoyed today's videos. Be sure to check out the Hero Arts stamps and Ranger distress inks available at FranticStamper.

Wednesday, August 10, 2011

Warehouse Wednesday: Just in... new My Mind's Eye Collections!

Just in… new My Mind's Eye collections!!


We're so excited to finally have the new My Mind's Eye collections in store and ready to ship!

All their new collections are absolutely gorgeous, but of course I have my favorites. I'm really partial to the Lost & Found Christmas line featuring beautiful vintage burgundy and olive colors, adorned with glitter. One of the great things about this release is the improvement made on the glitter. If you recall, the original Lost & Found collection that came out last summer was beautiful, but the glitter went everywhere. They've listened to everyone's feedback and have improved the glitter resin. No more bits and pieces everywhere!!

Lost and Found 2 is next on my list of favorites (can you see a trend in my tastes?).

Here is a video from My Mind's Eye showing all the CHA Summer releases:


Note the new Six by Six collection featuring nothing but 6"x6" pads!! Our card makers will really love them!

For quick shopping, here is a link directly to the My Mind's Eye page on our website where you will find quick links to all the newest. http://www.franticstamper.com/mymindseye.htm

Hugs,
-Fran

Tuesday, August 09, 2011

Tips Tuesday: Paper Crafting Items from the Pharmacy


FranticStamper has a huge assortment of specialty paper crafting supplies and really should be your first stop for your serious crafting needs, but don't overlook your local pharmacy or department store for some of the basics that can fill in the gaps.

Today we would like to share some tips on items we found at our local pharmacy or department store and how we use them. We probably have mentioned some of the finds before, but thought that we would put them together here along with how we use them in hopes that this would be a handy resource.

Find #1
Fingernail polish: I buy the tiny bottles of polish that are less than a dollar each and get every color I can find. I use the polish to paint on acetate for a stained glass look. I float drops of polish on water to make marbleized glossy card stock. I use clear polish to protect the under-side of my mounted stamps' wooden blocks.

Find #2
Fingernail sanding blocks: I use a block to smooth fuzzy edges on card stock that has been cut with a slightly less than sharp blade; just rub the block gently along the edge. I also use one to distress card stock, sanding around the edges to rough up the surface. I use one to sand off the tips of my paper nibs when I use colored pencils with odorless mineral spirits. And I use one to sand off the top layer of Coordinations card stock that has been pressure embossed to show the inside color. At about a dollar, these are great tools to have at hand!

Find #3
Eyeshadow: These work just as well as stamping chalks for coloring card stock. They can also be floated on water for a faux-marbling effect on non-glossy card stock. I especially like to get packages that have closely related colors in the same case so I can get wonderful shading effects.

Find #4
Binder clips: These clips from the stationery aisle make great handles for small pieces of sponge (or makeup sponges). Simply clamp onto the piece of sponge and never have inky fingers again! And of course, they also make great clips to hold paper layers together (I use them to clamp things when gluing!)

Find #5
Pill cases: These little snap cases work great for storing little embellishments like small buttons, eyelets, and brads. The individual little bottles/jars are also great for holding custom colors of glitter or embossing powder. I found tiny plastic pill jars that I was able to put a round make-up sponge into. I poured in some of my odorless mineral spirits to saturate the sponge. Now when I do my colored pencil technique I can use the mineral spirits without worrying about spilling! I just touch the tip of my paper nib to the sponge and pick up just enough mineral spirits.

Find #6
Baby Wipes: These are great to have on hand to clean stamps, but also to have to clean your hands. There is nothing worse than ruining a nearly finished project with a stray inky fingerprint! Something fun to do with baby wipes is to take 3 or 4 wipes, stack them, fold them in half, and then roll them up tightly. Drop a few drops of water-based re-inker on them and swipe them across glossy card stock. Add more re-inker and swipe again in a different direction. Make your own plaids or other patterns!

Find #7
Dryer sheets: Use these to reduce static before using glitter or embossing powder. These are great for cleaning the last little bit of glitter off your work surface, too. Used dryer sheets can be stamped on and dyed; torn they can make as beautiful a layer as expensive mulberry paper!

Find #8
Goo Gone: This orange-oil based cleaner is great for removing adhesive...but it is also fabulous for dissolving wax-based media. That means it is great for blending crayon and colored pencils. Pair a small bottle of Goo Gone, some cotton swabs, and inexpensive colored pencils (all from this one store) and you have everything you need to do this wonderful coloring technique! Color your images in the areas where the color should be darkest, then blend out with a cotton swab that has been lightly dipped into the Goo Gone. You'll love the results!

Find #9
Simple Green: This eco-friendly cleaner is great for cleaning stamps. I water it down a lot, to about 1 part in 10, and put it into a small spray bottle (found in the travel size area of my pharmacy). I spritz it onto a terry dish cloth (also found in this store) and use it to give stubborn ink a good scrub.

Find #10
Tooth brush: This is a really necessary tool for getting into those crevices in stamps when giving them a thorough cleaning. But it is also perfect for spreading color in a fun spray. Dip the tip of the brush into watered-down reindeer, then rub your thumb across the bristles to let the ink fly. Be sure to have a protected work surface first, though!

Find #11
Painting Supplies: A flat paint pad makes a wonderful stamp scrub! Spritz with just water or your favorite stamp cleaner (like dilute Simple Green!) and scrub away! A small foam roller can be used to make cool water-color backgrounds. Dampen the roller with water, then drop several small drops of re-inker onto the roller. Roll back and forth over damp water color paper and make beautiful background paper! Smaller paint brushes are great for brushing off stray embossing powder and glitter from your projects.

Find #12
Stationery Supplies: The stationery aisle is an obvious stop when looking for supplies for your paper crafting. Paper cutters, scissors, paper, glues (especially rubber cement which can be used to remount rubber stamps, for a solid bond on paper, and as a great resist mask), paper fasteners and clips, markers, crayons and pencils are all obvious choices. But also look for things like double-sided tape, binder folders (they are decorative and a perfect weight for boxes and folios!) transparency sheets (great for clear cards or card windows), foam mounting tape, and labels (great for glitter techniques and faux-tile techniques).

Find #13
Automobile Sponge: Cut into wedges these sponges are great for sponging on ink. Use with clip binders to keep your fingers clean. Cutting up one sponge will give you enough pieces for just about every color family you have!

Find #14
Hand Sanitizer: This stuff is great when used with Copic markers! It performs very much like the colorless blending solution so is great for using to add texture to your colored image. Saturate a piece of corduroy fabric in the sanitizer and then place on your colored image carefully press down, and then lift. The color will spread where the santizer made contact and add subtle stripes to your image. Terry cloth is great for adding a furry texture to an image; add the sanitizer and press onto the image. Use the tip of a cotton swab to add dots. Your imagination is the limiting factor here!

Find #15
Alcohol: 91% rubbing alcohol is a great substitute for blending solution for many alcohol inks on smooth surfaces. Daubed on with cotton balls (purchased at your pharmacy or department store, of course!), it will move the alcohol ink for all sorts of great alcohol ink techniques. Pour a little alcohol into a bottle cap and add a drop or two of alcohol ink for a wonderful alcohol ink wash that can be brushed on with a foam brush (from the painting section, of course!).


We hope that you have been inspired by some of our finds and will use the ideas here to jump-start your exploration of your local pharmacy or Department Store.

If you have some great finds from your store, please drop us a comment and share!

Sunday, August 07, 2011

Sketch Sunday: Scrap #8


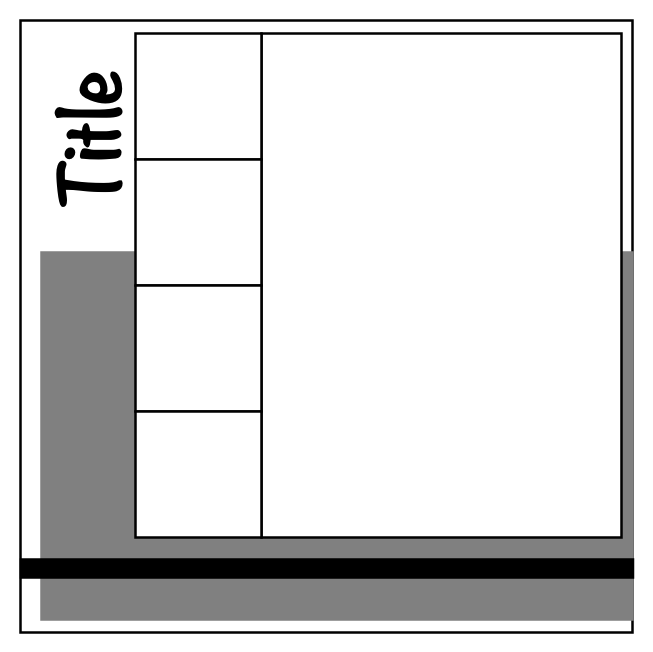
It is time to share another sketch... This one is a simple scrapbook page layout. Think of the small squares as a mix of photos, journalling blocks, or color blocks. Start with the very basic shapes of the layout but make them less simple by adding patterns or texture. Be creative and have fun!


And as always, if you decide to use this week's sketch, the design team would love it if you would share! Upload a photo somewhere (Flickr, Picasa, Photobucket, etc.) and then share a link with us in the comments. To share all you need to do is add the following codes to your comment, and then replace the word "link" with the actual link to your photo:

      <a href="link">My Page</a>

Your comment will then contain the words "My Page" which will link to your photo. The design team really looks forward to seeing your work!

Smiles,
Kathy

Saturday, August 06, 2011

Something Special Saturday: Meander Book


On Tuesday we published a template for a meander book and we got a request in the comments to see one of our books. We aim to please when we can, so this is a little meander birthday book we would like to share.


The book was made with a single sheet of 12"x12" card stock cut down to 11 1/4" x 11 1/4". That card stock was scored at 3 3/4" and 7 1/2" in both directions, and then cut in a spiral as shown in the template, and accordion folded on the score lines.

There were more pages available in the book than needed, so in two places two pages were glued together. (There are two places where the book would naturally open to what would seem like the back of the pages rather than the front; these two places were chosen for being glued closed.) Pages were then stamped and sponged and adorned with "Happy" and "b-i-r-t-h-d-a-y" and butterflies. The butterflies were cut from Elizabeth Park papers, the flowers are from Studio G, and the letters were die cut and decorated with Copic markers.

Finally, two covers were made from 4" square coasters covered with a piece of Elizabeth Park paper. That paper was sponged with the same colors as the inside of the book (the butterflies were perfect four the project, but we wanted more "autumn" colors.) The front was then simply decorated with piece of ribbon and a butterfly from a Martha Stewart stamp, colored with Copics. (This is going to be mailed across the country so mailability was a prime consideration in its embellishment.)

Friday, August 05, 2011

Just Fishing (Design Team Project)

 by Debi Wind

Just Fishing

It seems like birthdays creep up and I rush around trying to come up with an ideas. It is especially frantic when I am trying to make a card for a man. The card I made using the fishing theme is a perfect card for a man's birthday.

The products I used included a stamp by Northwoods, fishing papers from Paper House Productions, Versafine Smokey Gray ink, fishing twill from Creative Impressions, fish from Darcie's Natures Friends, and clear buttons by Buttons Galore. All are available at FranticStamper.com


First I made the base of the card out of white Core'dinations cardstock and added a layer of fishing pattern paper. I used a pale sage green and a light gold to make the layers. I stamped the image in Smoky Gray ink and sponged the edges with the same ink. I layered it onto the sage and gold cardstock. I added the pattern paper to the base card and used the will as a trim before layering the image onto the card. I finished the card off by adding more twill with a button and a fish.