Tuesday, October 04, 2011

Tip Tuesday: Die Storage


Die Storage


Tip #1
I have a collection of sizzix dies so I have the sizzix die towers. I like them because you can see the names of the dies and they spin so you can store on both sides. I like sizzix new spinning die storage. Its similar to the old tower but its horizontal instead of vertical storage. You can see what you have easily and it doesnt take up much room.

Tip #2
I have a lot of dies. In order to find what I want quickly, I have a list in my computer with the details of each die and what "bin" they are located in. Each bin is numbered. I always find what I need quickly and easily. The list also acts as a shopping guide so I dont buy the same die twice!

Tip #3
I store my Nestabilities and similar dies in CD cases. I cut pieces of magnetic sheet to size to fit in the plastic folders, and put the dies on the magnet, then into the folders. I have different cases for different categories of dies. It is a great solution for those Nestabilities, and very portable, too!


Tip #4
I store my nestabilities on a magnetic sheet. I buy the Xyron magnet/laminate. I run a 4x5 paper with the label name through my xyron and then use the magnet side for the storage. I put all of these in photo boxes which are then put in a storage bin. Neat and tidy!

Tip #5
I store my sizzix dies in modified copier paper boxes. I cut the box so that its about as high as a BIGZ die standing on end. I stack them all in side and then print out the list of dies on paper - add the paper to the lid and voila! instant storage.

Tip #6
I got rid of the plastic boxes that Tim Holtz's dies come in. I cut the product picture from the packaging and use clear packing tape to attach it to back of the die. I then store them in a decorative box.

Tip #7
You can see a fun storage idea in a PDF at this link.

Sunday, October 02, 2011

Sketch Sunday: Scrap #9


Scrapbook Layout #9

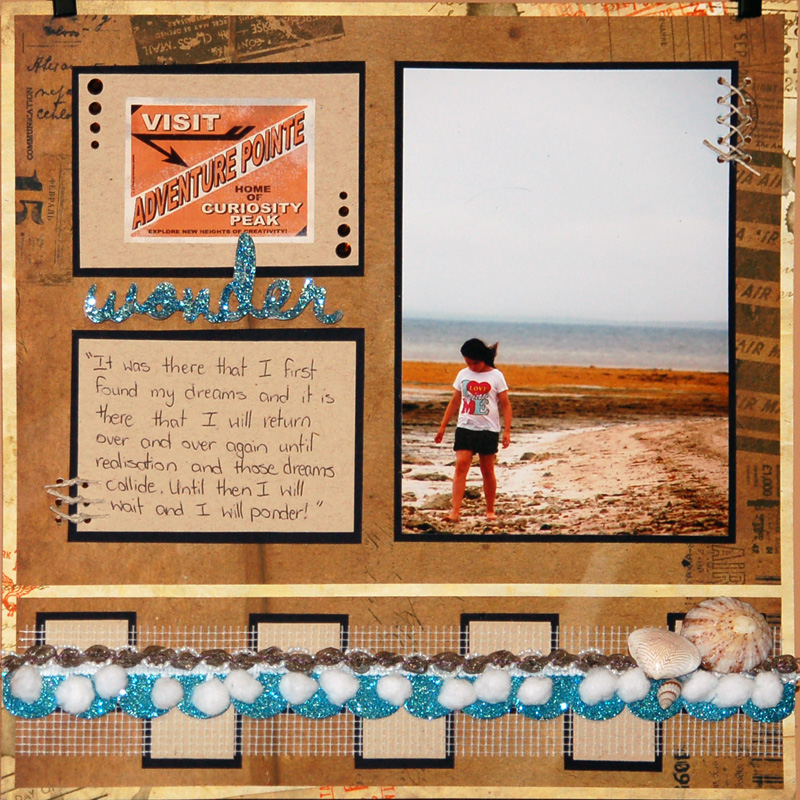
Today I have another scrapbook page layout to share with you.


I hope you will take a chance and give it a try. Design team member Sharon did, and came up with this really lovely page.


I am totally NOT a scrapbooker, but I took the challenge and made something with the sketch this week.

I had promised my daughter I would scrap the photos of her very first trip to Disneyland, but I have just not done it at all... because I am really not fond scrapping. BUT I am fond of my daughter, so I am challenged myself to use the sketch to make a page for her book. It has only been 13 years sonce that trip, so it is about time, don't you think? Here is the my first ever finished page for her book!


If you decide to use this week's sketch the design team would love it if you would share! Upload a photo somewhere (Flickr, Picasa, Photobucket, etc.) and then share a link with us in the comments by adding the following line to your comment, and then replace the word "link" with the actual link to your photo:

      <a href="link">My Page</a>

Your comment will then contain the words "My Page" which will link to your photo. The design team really looks forward to seeing your work!

Smiles,
Kathy

Saturday, October 01, 2011

Something Special Saturday: World Card Making Day

Happy World Card Making Day!


The design team has already gotten a start on some card making today, and has plans to make some scrapbook pages so we can share with you tomorrow when we present our next sketch. Some of us plan to shop for crafting supplies (at our favorite on-line paper crafting store, FranticStamper.com, of course), and to do some organizing in our craft areas. We are planning to make creative use of the day!

So what are YOU doing for World Card Making Day? We would love to see your creations. Simply leave us a note in the comments with a link to your photo. Don't know how? It is really quite simple. Just upload your photo somewhere (Flickr, Picasa, Photobucket, etc.) and then place a link to that photo in a comment by adding the following codes and replacing the word "link" with the actual link to your photo:

      <a href="link">My Creation</a>

Your comment will then contain the words "My Creation" which will link to your photo. The design team really looks forward to seeing your work!

We wish you the happiest of days filled with a lot of creativity!

Friday, September 30, 2011

Sweet Friends (Design Team Project)

by Kathy Berger

Sweet Friends


I just loved these papers from Bo Bunny! I loved the colors and patterns of these papers, and when I saw the cakes and cupcakes I just new I had to have the whole collection! I am planning to use most of them for a small recipe book for my daughter, loaded with all my mom's best cookie and cake recipes, but I just couldn't resist using some for a sweet little card for a friend.

As you know by now, for me a card really just has to "do" something for me to be truly happy, so I decided to make this one a little suspension card where I could showcase two of my favorite little images from the paper. Doesn't the suspended circle that spins just make the card more fun?


I hope you've enjoyed today's project! Until next time!

Thursday, September 29, 2011

Technique Thursday: Hauntings from Hero Arts


Only a month remains until Halloween, so it is about time to get started on those Halloween greetings. Hero Arts has a few videos to help inspire some spooky thoughts, so we thought we would share those with you today. We hope they will get you in the right spirits (bwaaahhaaahaaa! Pun intended!) Enjoy!

First up we have a little video for making a cute Halloween gift bag.


Next we have a vellum window card. We think you'll love the way the vellum creates a ghostly image of the spooky tree stamped inside the card.


By the way, FranticStamper DOES have vellum available, and we hope to get it onto the site soon. In the meantime, though, if you want some, just drop us a call or an email, and we'll get you set up!

And lastly, we have a spooky (well, maybe not) tri-fold window card, with TWO windows.


We hope you have enjoyed today's videos and that they will help get you creating for Halloween. FranticStamper has a wonderful assortment of card-stocks, papers, stamps, and embellishments to help you. You won't be tricked if you treat yourself to some new goodies from FranticStamper.com!

Wednesday, September 28, 2011

Warehouse Wednesday: We are swamped!


We are swamped!

The warehouse team has barely had time to breathe this week. We have tons of new product arriving that has to be sorted, added to the web page, and put onto the warehouse shelves. We have been getting a lot of orders that are keeping us busy (BUT filling your orders is our reason for being! We just love to provide the best service we can and love getting the best products into your hands!) Plus we have a bunch of exciting projects for FranticStamper on the burner.

We are so busy, though, that we really don't even have time to share anything special with you this week. We will aim for next week.

In the meantime, be sure to keep checking our New Products page to see some of the wonderful new stuff we can send your way!

Tuesday, September 27, 2011

Tip Tuesday: Decorating Chipboard Shapes

Decorating Chipboard Shapes


Tip #1
Ink the edges with ink pads.

Tip #2
Paint with light colour then dry brush edges with a darker colour or shade.

Tip #3
Cover with dimensional magic to creater a glazed look and feel.

Tip #4
Ink with embossing ink then coat with UTEE and heat. Repeat, then while last coat is still hot, stamp into the UTEE to emboss a pattern.

Tip #5
Cover with glitter then coat with Dimensional Magic to seal.

Tip #6
Add texture paste to the chipboard then swirl and/or stamp into surface to add pattern to the texture.

Tip #7
Apply a paint and crackle medium. Leave to dry thoroughly then rub a darker tone ink or paint into the cracks to highlight.

Tip #8
Add dimensional paints to the surface in a pattern.

Tip @9
Glue paper to the chipboard piece. When dry, trim as closely as you can with scissors, then use a sanding block to sand off the edges, sanding from the front of the piece to the back. The edges will get a little distressed, so add to that by sponging on a little ink around the edges.


We hope you'll enjoy trying these tips!

Sunday, September 25, 2011

Sketch Sunday: ATC #7

Today's sketch, scaled for an ATC (3.5" x 2.5"), is unusual for this size in that it contains a number of layers. Those layers, though, can be perfect for showcasing a tiny stamp or sticker.


This week a few members of the design team took up a challenge to use the sketch this week so we could share with you. Here are their designs.

Kathy chose to be pretty literal with the sketch and made a Halloween ATC to share with you. The little Jack O'Lantern is a sticker that has a little shaker built in!


Sharon, though, decided to be less literal and scale the sketch up to make a card. Here is her card, inside and out.


Lis also decided to go with a card translation of the sketch.


Next, though, Kathy decided that since she doesn't trade ATCs or save them she would use her ATC on a card. She used last week's basic layout to create a card that featured her ATC as the focal point of the card.


We would love to see what YOU do with this sketch. To share, all you have to do is upload your photo somewhere (Flickr, Picasa, Photobucket, etc.) and then place a link to that photo in a comment. Then add the following codes to your comment, and replace the word "link" with the actual link to your photo:

      <a href="link">My ATC</a>

Your comment will then contain the words "My ATC" which will link to your photo. The design team really looks forward to seeing your work!

Saturday, September 24, 2011

Something Special Saturday: My Copic Solution...


I finally got the complete collection of Copic Ciao markers.

I bought them as 5 different sets of 36 markers, and the sets each came in a crystal box. At first I thought those cases would be great store the markers, but I soon found that I really struggled to use them. I couldn't see any of the numbers on markers that weren't on the edges of the box, and when I was stuck in bed while recovering from the surgeries the boxes would tip over pretty easily and dump all the pens out. They just didn't meet my needs.

So I started looking for another solution. In my search I saw a lot of different shelf units with dividers But I didn't like having the fact that the markers wouldn't be a lot more visible since they wouldn't all be at eye level. And I was worried that the markers wouldn't be secure in the horizontal shelves (I have a very curious cat who just loves anything cylindrical and who loves to watch things drop to the floor; I was concerned that he would be able too easily to knock markers out of the horizontal cubbies and run off with them.)

Then I went to lunch at a cafeteria, and my solution popped out at me! I realized that what I needed was a cafeteria silverware server! I found a 6-cup one at a restaurant supply store, and I have to say it is PERFECT! Each cup snugly holds 30 Copic Ciao markers, meaning that the entire set of 180 markers fits just right! I sorted the markers by color family, then split them into groups of 30, and placed them into the cups (I cut a few circles from thin cork with a Nestabilities die and lined the bottom of the cups. With a few layers of cork I was able to raise the pens up so they fit less snugly, and was able to prevent the pen caps from getting stuck in a hole in the bottom of the cup.)


But then the trouble of finding just the marker I wanted recurred. It is impossible to see the numbers on the side of the marker, so it is hard to find the right pen.

I solved THAT problem by labeling my Ciao caps. I saw several different solutions for doing that on-line, and I combined my favorite ideas into my solution. I created a file with all the colors in numerical order by color family, complete with little circles around the numbers. I printed two copies of the file (I did both ends of my markers.) You can get the file here.

I then colored each of the circles with the matching color and then cut the paper into strips by color family.


I punched each circle with a 1/4" circle punch, and affixed it to the cap with a mini glue dot.


Though it was a tedious and time-consuming job, it was totally worth the effort since I can now find the right color with little effort. I just choose the color I need using my color chart and then go to the right cup and grab the right pen pretty quickly. I really love my new solution!


How do you store your Copic markers so they are easy to use? I'd love to hear your solution.

Til next time!

Smiles,
Kathy

Friday, September 23, 2011

Mini Desk Set (Design Team Project)

by Kathy Berger

My daughter recently moved into a furnished victorian house for her third year of college. In lieu of a desk in her room she has a trundle sewing machine cabinet she plans to use. She really does most of her studying in the library, so this will really be just a place to do some quick homework or jot a note to a friend.

She really doesn't want to write directly on the antique wooden surface of the desk, though, so she wanted to have a blotter to use; however, all the commercially available blotters were far too big for her space. So, I made her a blotter, and added a few other pieces for a little desk set.


I used a can from french-fried onion rings to make a pencil holder, made a box for a small pad of paper, created a few matching pens out of translucent barrel pens, and made the blotter from a pad of watercolor paper.

All of the items were decorated with papers from the Authentique Blissful Collection, available at FranticStamper.com. These papers were just perfect for this project. And my daughter loves it on her "desk"!