Thursday, June 18, 2015

Nautical - Take Two! (Michelle Leone, Guest Designer)


Nautical - Take Two!
by Michelle Leone, Guest Designer


Ok..... just a few more of the nautical themed cards!
I have some lovely new PPP Cornflower blue sequins (plus a few tiny silver stars) that were just begging to be used in a shaker card. So, here are two - both using the little sailboat from Frantic Stampers International Boating Icons die and the perfect frame (both positive and negative) from the Elementals #1 dies. Oh, how I love this blue/white color combination-so crisp and clean!


*** Materials for this project available at www.franticstamper.com.
 
FRA-Die-09535
 
FRA-Die-09306

Wednesday, June 17, 2015

Up, Up, and Away (Rozy Smith)


Up Up & Away
by Rozy Smith


Refer to coloring project for details on creating the Large Map for the front of card.

Use 7 Gypsies Global Paper Pack for card face front.

Stamp a Large Balloon using Frantic Stamper Stamp, color as desired.

Stamp a Small Balloon using Frantic Stamper Stamp, color as desired.

This project uses Glaze Pens by Sukura, but any style marker you like would work.

Attach your map to the card base, then apply the balloons, use mini black alpha letters for the Up Up & Away title.

Adhere ribbon and a bow and use metal embellishments to complete.


*** Materials for this project available at www.franticstamper.com.
 
FRA-CLG-116-02
 
FRA-CLG-108-06

Tuesday, June 16, 2015

Thank You (Jeni Allen)


Thank You
by Jeni Allen


Ok, do you love this card panel like I do!?? It was love at first sight for me when I saw this Saharan Screen card panel (as it is with most dies!!)! Isn't it just lovely!? I love it so!! I ran the card panel through my big shot with 4 different papers, and had several lovely piles of pretty pieces on my desk! I used an awesome double sided adhesive on a panel that was the same size as the Sarahan Screen, so putting all these lovelies in place was a super easy thing to do!! I tell you, double sided adhesive sheets are the bomb!! After I had all the beautiful papers in place, I attached the front panel to my card base and then added a die cut thank you! It really was a fun and not hard at all process!!


*** Materials for this project available at www.franticstamper.com.
 
FRA-Die-09498

Monday, June 15, 2015

It Takes a Village (Jen Carter)


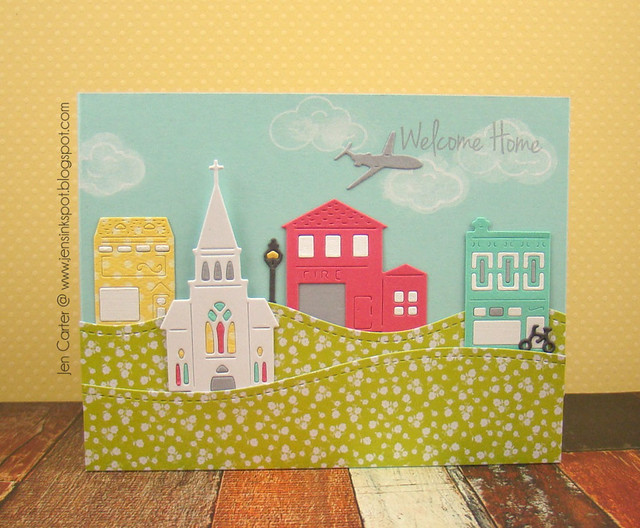
Jen Carter City Welcome Home


It Takes a Village
by Jen Carter


Hey everyone!  I have been excited to share this card with you.  I love house/building dies and stamps.  So you can imagine how excited I was when Frantic Stamper released a whole series of dies (and a stamp set to coordinate) that are houses, buildings, businesses, landscape items, dies for the sky, etc!  

This is the first card that I put together using these products.  One of the things that I really like about these dies is that you can go with just a silhouette type look where you choose not to add any details or you can paper piece to your heart's desire (like I did with the church and minimally with the other buildings).

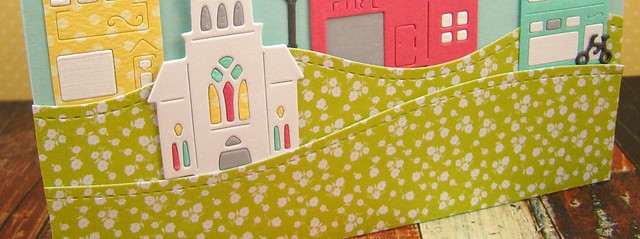
Jen Carter City Welcome Home Closeup hills

I wasn't sure when I started how many buildings I'd use in the scene, so I first cut my hills using the Stitched Scene Builder Edgers die set and placed it on my card front where I wanted them to be.

*Tip:  I only put adhesive on the bottom part of each hill so that I could tuck in the buildings where I wanted. This allowed me to move them around without "committing" myself to a placement until the very end.

The buildings I used for this card are the Village Candy Shoppe, Church, Firehouse, and Book Shoppe.

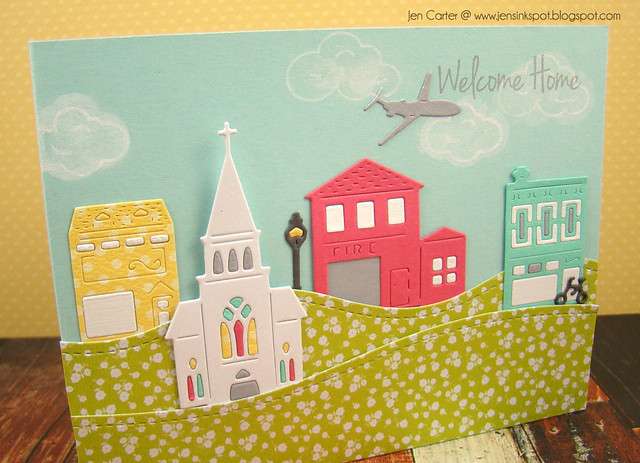
Jen Carter City Welcome Home Closeup

Here you can see how I have a little dimension on the buildings.  Don't you just love that teeny tiny bike (from the Village Wheels set), airplane (from the Village Sky set) and that little lamp post (from the Village Park & Traffic set)!?

To create the clouds, I inked up the back of the cloud stamp with white pigment ink from the coordinating On the Village Road stamp set,  stamped it on my card front, then used a white eraser to even out the ink and make it look more fluffy.  Then, I cleaned the stamp, turned the stamp over to the "intended" side, and stamped the details on top.  It really softened the clouds & added some dimension to them.

Another thing to notice is that on the yellow building, the Candy Shoppe, you can lift up that little rectangle piece at the top and make it 3D.  I chose not to do that on this card but I will use that fun detail on other cards and projects!

There are SO many fun dies in this set, many of which I was not able to fit on this card!  I hope you'll check out the Village dies andOn the Village Road clear stamp set from Frantic Stamper!

Thanks for stopping by today!


*** Materials for this project available at www.franticstamper.com.
 
FRA-Die-09543
 
FRA-Die-09541
 
FRA-Die-09540
 
FRA-Die-09545
 
FRA-Die-09539
 
FRA-Die-09538
 
FRA-Die-09549
 
FRA-Die-09403
 
FRA-CL-015


Sunday, June 14, 2015

Layered Posies Tutorial (Ann Greenspan)


Layered Posies Tutorial by Ann Greenspan


I have a brother and SIL who were married in a yellow barn in Pennsylvania so when I saw this yellow wood paper, I knew I had to use it on a birthday card for her.

I used the Stitched Scene Builder Edgers die to cut the top layer.  The nice thing about this die is that when you cut the paper with it, you actually have the stitching on both sides of the cut line, so you end up with two useful pieces of paper afterward.  I used both pieces on the second card in the photo above, just separated them a little to show the yellow paper behind them.

The Happy Birthday stamp works great with the Stitched Scene Builder Edgers in that it is curved almost perfectly with the curve on one of the dies in the set.  You can also manually change the curve to the stamp since it's a clear acrylic stamp and bendable.

To make the flowers on the cards, I cut various sizes of the Large, Medium and Small Layering Posies.  I inked around the edges first with a dark ink to give them some definition, then used a stylus and mat to shape them.  I started with the good side of the paper facing down and rolled a stylus around the very edges of the petals.


Then I flipped over the petals and rolled a large stylus right around the middle of the petals on the good side of the paper.


This is what the petals all look like afterward:


One way to give them even more dimension is to use small pieces of foam tape in between each layer when assembling the flower:


This is the final product:


Once your flowers are done, you are ready to cut the card stock to fit your card.  Position the Stitched Scene Builder Edger die of your choice (they come in a set of 4) on the paper where you want it.  Remember to leave room for your sentiment and flower.


When you are done you will have two pieces of paper that can be used together on one card or make two cards:


Here are photos of the individual cards that I made, changing each up a bit for a different look:


*** Materials for this project available at www.franticstamper.com.
 
FRA-Die-09555
 
FRA-Die-09556
 
FRA-Die-09557
 
FRA-Die-09403
 
FRA-CL-002


Saturday, June 13, 2015

Nautical-Number One! (Michelle Leone, Guest Designer)


Nautical-Number One!
by Michelle Leone


I may be just a bit obsessed with the Boating International Icons dies. This adorable little sailboat is perfect for masculine/unisex cards or projects.... Father's Day, Birthdays, Congrats, Thanks, etc.! I have also incorporated the oh-so-versatile Elementals #1 die, which provides the perfect frame within a frame.
I just may have gotten a bit carried away with this nautical theme and have lots more to share with you!


*** Materials for this project available at www.franticstamper.com.
 
FRA-Die-09535
 
FRA-Die-09306

Friday, June 12, 2015

Elegant Lady's Shoe (Rozy Smith)


"Elegant Lady's Shoe"
by Rozy Smith


Start with a 12x12 sheet of paper, cut into two equal pieces making a matching insert for the inside of the card. Adhere both sides together.

Die cut Fancy Frames #1 from coordinating papers.

Die cut Lady's Shoe from DCWV silver foil.

Die cut second Lady's Shoe from coordinating paper, inlay the center piece into the silver shoe, adhere.

Use the floral sprig from both die cuts, overlay paper sprig with silver sprig, offset for dimension.

Create small flowers using the Petite Layering Posies die.

Offset the frame, attach to card front. Attach the Lady's Shoe to the frame, decorate with the flowers.

Add flowers to the floral sprig and adhere to the bottom left of the frame.

Using fabric Washi Tape, layer two coordinating patterns on the left side of the card.

Apply bow to the upper left.


*** Materials for this project available at www.franticstamper.com.
 
FRA-Die-09561
 
FRA-Die-09193
 
FRA-Die-09471