Pages

Thursday, June 30, 2011

Technique Thursday: Tim Holtz Uses Distress Inks


Today we would love to share a couple of videos with Tim Holtz and Distress Inks . We hope you will enjoy them.

First up, Tim will share a few basic techniques for using distress inks.


Here is another fun technique... Color Blocking with Distress Inks.

Wednesday, June 29, 2011

Warehouse Wednesday: Meet the Team (Part 1)- Mattie: Our Mascot

Meet the Team (Part 1) - Mattie: Our Mascot

Meet Mattie, the Frantic Stamper mascot and spirit lifter.

Mattie is a yellow lab who is 3.5 years old. She comes to work every day with her owner, Sherie (you will get to meet her next week).

She's a pretty mellow girl who spends most of her day relaxing on her bed in the warehouse...until she hears the delivery trucks! She knows the UPS lady and the Fed Ex lady will both have a biscuit for her, and she greets them with enthusiasm.


Mattie always has a smile on her face. She's a good distraction for when we have a bad day.

She always starts the day greeting everyone with her "wiggle butt" and a kiss.

Hugs,
-Fran
www.franticstamper.com
541-826-2500

Tuesday, June 28, 2011

Tip Tuesday: Distress Inks


Today we would like to give you some tips for using Distress Inks. We hope you will find them useful.

Tip #1
These inks are a little different from other water-based inks in that they stay wet a little longer so they can be used well with embossing powder. Stamp your image with distress ink, add embossing powder, shake off the excess, and heat to melt the powder. Works as well as embossing ink, but comes in so many great colors! Use clear powder to have the color show through, or use opaque colored powders with different effects with different base colors.

Tip #2
Press a distress ink pad onto a clear acrylic stamp mount. The ink will puddle up and can then be used like water colors with a brush and water. But it can also be stamped from the block onto paper, leaving a block of color on the paper.

Tip #3
A Ranger craft sheet is a natural partner for distress inks. Swipe a distress pad across an area of the craft sheet. Spritz with water, heavily in some areas, lightly in others. Place cardstock on the inky area. Lift off carefully. Let dry. Repeat with other colors as desired. Makes a FABULOUS background!

Tip #4
You can paint directly from the distress ink pad. Simply place the tip of a damp brush against the pad to pick up color. Paint as you would with water colors.

Tip #5
A drop or two of distress reinker on a slick surface like the Ranger craft sheet or an acrylic block can be like watercolors, too, but will be brighter and more vibrant than ink taken from the pad.

Tip #6
Distress reinkers are PERFECT for use with Cut n' Dry to make custom, multicolor ink pads. Start by stamping the image you want the custom pad for in a permanent ink onto the Cut n' Dry. Then simply color in the areas of the image with the reinkers. The colors won't mix with each other, and your ink pad will be perfect for that image!

Tip #7
Because distress inks stay wet longer than regular inks, they blend better than regular inks. Use a blending tool to apply ink in a swirling motion, and blend into adjacent areas of color for beautiful effects.

Tip #8
Water has amazing effect on Distress ink. Once you have your background down, try dropping a few small droplets onto it. Or stamp an image on it using water as your ink. The ink will flow out away from the water for dramatic (though somewhat unpredictable) results.

Sunday, June 26, 2011

Sketch Sunday: Scrap #6


Today I would like to offer you a new sketch for a square scrapbook page layout.


The colors I picked for this sketch are bold primaries, and with that scheme, the photos should be bold and bright as well, with bright yellows, reds, blues, and perhaps some bright secondary colors, too, like green. Photos dominate the layout, so they need to show off the sketch as much as the sketch enhances them.

But perhaps this sketch would work as well with softer, lighter colors, as long as the photos are filled with them, too.

I hope you will give the sketch a try see what you think. What ever you come up with, the design team would love to see your creation! Upload a photo somewhere (Flickr, Picasa, Photobucket, etc.) and then share a link with us in the comments. To share all you need to do is add the following codes to your comment, and then replace the word "link" with the actual link to your photo:

      <a href="link">My Page</a>

Your comment will then contain the words "My Page" which will link to your photo. The design team really looks forward to seeing your work!

Until the next time,
Kathy
 

Saturday, June 25, 2011

Something Special Saturday: Feedback Results


A couple of weeks ago we asked you for some feedback on how we are doing with the blog, which features you like and which you don't. We thought we would take a moment to let you in on what we were told.

The biggest thing that we learned was that we can't possibly please everyone. We had some folks on opposite ends of the spectrum on every single question! The average score for each of the features was about 3.5, which tells us you like them a little more than you don't. But those of you who love certain features were countered almost 1-1 by someone who hated the same feature!

The tips were found to be really helpful by some of you, but others who are very experienced paper crafters felt they were far too elementary.

One person had no use for the Warehouse Wednesday feature and wanted us to eliminate it while another said it was her favorite thing and looked forward to it every week.

One person told us that she preferred the old style of design team projects with the step-by-step instructions and especially the product links. But another told us that she really preferred the new style because of its chattiness and because the links to products really annoyed her!

One person told us she didn't like the sketches because she never uses them, while another asked for MORE of them.

And that was the basic story of the feedback we got!

But we also got some suggestions to look to other companies for ideas and for comparison to see how we measure up. Those suggestions were a little disheartening for us, though, because the companies we were compared to are companies with pretty big corporations behind them, while we are a very small company that relies largely on the volunteer work of our Design Team Facilitator to publish our blog. There is just no way we can do the kinds of things that those companies do... we don't have the resources!

But with the resources we do have we will try to continue to provide you with as much information and variety as we can. If you have suggestions please feel free to pass them along to us. We really do care about what you have to say, and perhaps we will reach a consensus on something sometime!

In the meantime, though, Something Special Saturday will likely be on hiatus for the month of July. If something really unique pops up that plan might change, but otherwise, look for the feature to come back on its occasional basis sometime in August.

Friday, June 24, 2011

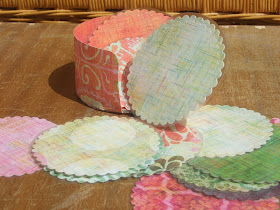
Basic Grey Coasters (Design Team Project)

by Joanne Wardle

Basic Grey Coasters

I received these gorgeous Basic Grey papers from the frantic stamper to play with, and I thought that they were just so beautiful I wanted to display them in my home. So I decided to make a coaster set and holder, so all my guests could admire them. They are so easy to make, I just cut them with a nestability die, covered them front and back with clear book covering film (sticky back plastic) and trimmed down, so they are waterproof and wipeable.


I used some more of the paper to make a holder, with some thick card as the base, all covered in the beautiful paper.

Thursday, June 23, 2011

Technique Thursday: Die Videos


Today we have a few videos on using dies in die cut machines. Be sure to check out all the embossing and die cutting tools, folders, and dies available at FranticStamper.

First up is Stacy from Spellbinders showing you how to use Spellbinders dies in a Cuttlebug machine.


Next we have a video on using Sizzix Movers and Shapers dies.


And lastly, we have a clip showing how to use the new Emboss Plus dies from Provocraft.


Wednesday, June 22, 2011

Warehouse Wednesday: Life Cycle of an Order

Life Cycle of an order

Today I thought it would be fun to take you through the steps we use each day in processing your orders.

First, we have to buy all the cool products and stock our shelves. Often, this involves traveling to CHA, or meeting with sales reps who show us all their wonders. Sometimes, we take our cues from you, our customers, as to what you wish we would carry.

We place our orders with the suppliers, trying as best we can to judge how much product we will need. That's a very tricky part…. order too much and you're stuck with inventory you can't sell… not enough and you risk a long wait to be restocked, thereby losing orders. It's always such a fine balance, but we do our best.

Then, when the product arrives, we need to check it in to make sure no mistakes were made by the vendors. Blaine is our man when it comes to this step. I load the items on the website and Charlene and Kathy update our inventory system to reflect the incoming inventory. We then catalog items and sort them on our shelves to they can easily be found when we pull an order.

Now we can start taking orders!! YAY!!!

Ashley and I take your phone calls, faxes and emails and give them to the warehouse. Sherie (our warehouse manager) pulls your order and places it in a "bin" along with your paperwork.


Your bin is then weighed and taken over to the "orders ready to ship" shelf, where it is taken by Ashley or me to invoice. At this point, we either contact you with a total for payment, or process the payment method you have provided. Your bin now heads off to our shipping area.

In shipping, Charlene, Kathy, or Ashley (sometimes Sherie or even myself) will package your product with care, add some little freebies if we have space and affix a label to the package.


Every afternoon, at 4 PM, one of us takes the van with all your packages to the post office where we entrust them to the US Postal Service for delivery.

Hugs,
-Fran
www.franticstamper.com
541-826-2500

Tuesday, June 21, 2011

Tip Tuesday: Storing Dies


Today the design team would like to share how we store our dies.

Tip #1
My Sizzix Originals and Sizzlet dies are stored in a dresser drawer (other drawers hold other crafting supplies.) I have plastic baskets that fit into the drawer, and stack 2-deep. The dies are organized into the baskets by category, and then I place baskets of similar items together, stacking, for example, floral dies on top of floral dies. That way if I am looking for a particular die I only need "disturb" a small portion of the drawer.

Tip #2
I have a collection of sizzix dies so I have the sizzix die towers. I like them because you can see the names of the dies and they spin so you can store on both sides.

Tip #3
I like sizzix new spinning die storage. Its similar to the old tower but its horizontal instead of vertical storage. You can see what you have easily and it doesnt take up much room.

Tip #4
I have a lot of dies. In order to find what I want quickly, I have a list in my computer (excel) with the details of each die and what "bin" they are located in. Each bin is numbered. I always find what I need quickly and easily. The list also acts as a shopping guide so I dont buy the same die twice.

Tip #5
I store my Spellbinder and similar dies in Vaultz brand locking CD travel cases.


I cut pieces of magnetic sheet to size to fit in the plastic folders, and put the dies on the magnet, then into the folders. I have different cases for different categories of dies. I have my Nestabilities in one, florals in another, and miscellaneous dies in a third. They dies fit just perfectly, are easy to access, and also travel well!


These CD cases even come in larger sizes.

Tip #6
I store my nestabilities on a magnetic sheet. I buy the Xyron magnet/laminate. I run a 4x5 paper with the label name through my xyron and then use the magnet side for the storage. I put all of these in photo boxes which are then put in a storage bin. Neat and tidy!

Tip #7
I store my sizzix dies in modified copier paper boxes. I cut the box so that its about as high as a BIGZ die standing on end. I stack them all in side and then print out the list of dies on paper - add the paper to the lid and voila! instant storage.

Tip #8
I made a binder to store my dies in. You can see it via a PDF on my (Sharon's)blog.

Until the next time...
The Design Team

Sunday, June 19, 2011

Sketch Sunday: Card #6


Today's I have a card sketch to share. I don't have a color scheme for you today, though... I thought I would leave that entirely up to you!

On a standard-sized card, the small squares at the bottom of the card would be sized for matted inchies...just perfect for those inchie stamps! This layout, though, could also be used for an 8 1/2" X 11" scrapbook page, in which case those squares could be mounted 2 1/4" photos.

I hope you decide to give the sketch a try!

And as always, if you decide to use this week's sketch, the design team would love it if you would share! Upload a photo somewhere (Flickr, Picasa, Photobucket, etc.) and then share a link with us in the comments. To share all you need to do is add the following codes to your comment, and then replace the word "link" with the actual link to your photo:

      <a href="link">My Card</a>

Your comment will then contain the words "My Card" which will link to your photo. The design team really looks forward to seeing your work!

Smiles,
Kathy

Saturday, June 18, 2011

Something Special Saturday: Petaloo Challenge

Petaloo Challenge

We would like to pass along some news from the folks at Petaloo International. They are having a Challenge, with some wonderful prizes.

Here are the rules:

Petaloo CMC Challenge June 15th - July 15th

  • all entries must be received by midnight PDT 7-15
  • Petaloo DT members may not enter...
  • Multiple entries are allowed...
  • Overseas entires are allowed...
  • Winners will be announced July 25-29 on the Petaloo Blog and Petaloo Facebook page
FranticStamper carries a large assortment of Petaloo products, and is thrilled to be able to pass along the news of this challenge! Just click on the banner below to enter.


Friday, June 17, 2011

Made in America (Design Team Project)

By Kathy Berger

Made in America


My daughter was a member of the Children of the American Revolution for a number of years. When I saw the wonderful American Made papers from My Mind's Eye I just knew I had to create a memory book for her. She has photos and membership cards, pins, and ribbons that are currently just sitting in a box, but I thought a CD folder album would be a great way to not only keep the items, but also to showcase them!

I started with 3 plain white CD folders. I cut a piece of the American Made papers to 10" x 5", scored it in the middle, and attached it to two of the folders so they formed a mini-book. I then cut another piece of the paper to 12" x 5". I scored that one at 5, 5 1/3", 5 2/3", 6", 6 1/3", 6 2/3", and 7". I accordion folded the paper on those scores, and then glued the accordions together to form 3 flaps in the center of what was then a 10" x 5" piece of paper. I then used this paper to glue the mini-book to the final CD folder, creating my full album.

I sealed 3 different envelopes (red, white and blue, of course!), then trimmed them down to form pockets, and glued them, staggered, to the ribs I had created.

I used various American Made papers to cover the insides of the CD folders and the front and back covers. Then I used the American Made Accessories and stickers from K&Company to decorate the pages. One fun discovery I made is that all of these papers have a tiny bit of pattern on the page label that is printed at the bottom of the page (to show the pattern on the reverse side)... I used these little strips of pattern to add great little bits of contrast to some of my pages. I hate to let any little freebie like that go to waste (see the strip of trim on the left hand page!)


I am going to let my daughter decide which photos she wants to include, and then I will mat and mount them, and finish embellishing the pages. I will also be putting photos on tags to put into the pockets of the CD folders.

So, this album is not really "finished", but this is the perfect way to give it to her, so we can complete it together!

I hope you will find some patriotic inspiration in these wonderful papers. They are just perfect for the upcoming Independence Day holiday, but they are just terrific as a base for an All-American girl's (or boy's) scrapbook!

Thursday, June 16, 2011

Technique Thursday: Tim Holtz Uses Alcohol Inks


Tim Holtz Uses Alcohol Inks


Today we have a couple of videos from Ranger Inks featuring Tim Holtz to share. We hope you'll enjoy them both, and also try out some of Tim's tips and techniques! Alcohol inks are so versatile. Be sure to check out all the great Alcohol Inks and supplies at FranticStamper.com!

First up are the basics on using the inks.


And now, here is an especially fun technique using these same inks and a can of compressed air.


Thanks for coming by today! Hope you have enjoyed the look at using alcohol inks.

Wednesday, June 15, 2011

Warehouse Wednesday: The Magic of Oz…


The Magic of Oz…

 
Graphic 45 has done it again!!!  Coming this week to Frantic Stamper is the new collection called "The Magic of Oz", featuring all your favorite characters from the legendary tale. This collection features something for everyone, from the gorgeous "poppy field" to the wonderful "journey to Oz" paper in ATC style.  As with the more recent collections, Graphic 45 also has 3 sets of Cling stamps made by Hampton Arts to coordinate with the theme.   

  Here is a small sampling of what is offered. Check them all out on the FranticStamper Graphic 45 page.  


  This collection is already a big hit!  We'd love to see your creations with these papers.  

  Hugs,
-Fran
www.franticstamper.com
541-826-2500  

Tuesday, June 14, 2011

Tip Tuesday: Alcohol Inks


Today we would like to offer you some tips on Using Alcohol inks. FranticStamper carries Ranger Adirondack and Jacquard Fiesta and PiƱata Alcohol Inks, as well as the complete line of Copic alcohol ink markers and refills. We hope you will give alcohol inks a try. They are a lot of fun and are a great way to add vibrant color to all sorts of surfaces!

Tip #1
You can use alcohol inks with great results on non-pourous surfaces such as glass, plastic, coated papers, and metal.

Tip #2
Different brands of alcohol inks work just fine together! Use them together to get just the color combination you want, but be careful with your Copic markers...other brands of ink may contaminate the tips of your markers, and those inks won't blend out.

Tip #3
Die cut pieces of aluminum cut from soft drink cans and decorate them with alcohol inks to make beautiful and unique embellishments.

Tip #4
You can use alcohol inks on foil as well as transparency and acetate. Foil includes foiled papers.

Tip #5
Flashing tape is another fabulous surface to try these inks on; can be even more fun if you emboss the tape first.

Tip #6
Apply ink with a special applicator tool that uses a piece of felt, or use a cotton ball. If you chose the cotton ball, a paper binder clip makes a great tool for holding the cotton ball and keeping ink off your fingers!

Tip #7
A little ink goes a LONG way. Add ink to your applicator sparingly… a drop or two at a time.

Tip #8
Put a little watered-down white glue into a plain glass ornament. Add a little ultra-fine glitter and swirl around to coat the inside of the ball. Turn upside down to let excess drain. On the outside of the ball, tap on alcohol ink with an applicator or cotton ball. Decorate the tops with ribbons and flowers; these make wonderful hostess gifts for holiday parties!

Tip #9
Ranger and Copic both make EMPTY alcohol ink markers. You can create custom colors to fill the Copic marker, and create markers with the Ranger pens and inks in your favorite Ranger colors or color blends.

Tip #10
96% rubbing alcohol (isopropyl) alcohol makes a fair and very inexpensive substitute for blending solution in a pinch. Add a single drop of alcohol ink to about a teaspoon of alcohol to create a terrific wash for backgrounds. Apply with a cotton swab or paint brush.

Tip #11
Use a plastic 6 well paint container like the kind you use for watercolors. Add drops of your alcohol inks to 5 of the wells. Add Ranger Blending Fluid to the sixth. Dip a paintbrush into the blending fluid and then the alcohol ink and paint away. Be sure to clean the brush in alcohol between colors. Don't worry about the ink in the wells drying out; it still can be used later. The blending fluid will pick up the pigment even after the alcohol has evaporated from the inks.


Sunday, June 12, 2011

Sketch Sunday: ATC #4


Today I have another ATC sketch for you. This one is a very simple sketch, with just a small square layer, but with a stamped image that extends just beyond its edges. Add a word image stamped at an angle, and your ATC is done!

Of course, no one is dictating the background onto which you would mount that simple square layer. I think this is where the real fun for this sketch could come in. Think of all the possibilities... you could use paint, a decorative paper, collage, distress inks, stamps, or even sew your background! Have fun, be creative, and make a wonderful little piece of art that expresses YOU!

I hope you will enjoy this sketch idea and give it a try!

If you do choose to try it the design team would love to see your creation! Upload a photo somewhere (Flickr, Picasa, Photobucket, etc.) and then share a link with us in the comments. To share all you need to do is add the following codes to your comment, and then replace the word "link" with the actual link to your photo:

      <a href="link">My ATC</a>

Your comment will then contain the words "My ATC" which will link to your photo. The design team really looks forward to seeing your work!

Until the next time,
Kathy

Saturday, June 11, 2011

Something Special Saturday: Feedback request


Today we would like to ask you to provide us some feedback on how we are doing with the Blog. As you probably know, we made some pretty big changes a the end of our first year with the design team, and we would love to hear what you think of the changes, and of the blog in general.

We have a few specific questions, and would love it if you would respond to those first, and then give us any additional feedback you would like. We have set up an email form with all the questions for you to use to send your feedback...we thought you might be more comfortable responding if you didn't have to worry about your feedback being public.

If you are having trouble with the email link, please just send an email with your feedback to franticstamperfeedback@gmail.com. Thank you.

1. Please rate each of the features of the Blog on a scale of 1-5 where 1 is HATE IT, get rid of it! and 5 is LOVE IT, don't change a thing!

Tip Tuesday
Template Tuesday (once a month)
Warehouse Wednesday
Technique Thursday
Design Team Friday
Something Special Saturday
Sketch Sunday

If you rated one or more of the features with a 1 or 2, could you please let us know why you don't like it, or how you would like to see the feature done instead? 2. We changed how we do our write-ups for our design team projects. Do you prefer the new, chattier style or our previous step-by-step instructions?

3. If we were to add a new feature to the blog what would you like it to be?

4. Do you read the Blog regularly? If not, is there something we could do to entice you to do so?

5. We seldom get comments from readers. Is there something we can do (within the limitations of Blogger's features) to encourage you to comment more often?

Thanks for providing this information and any other feedback you can offer! We really want to make this Blog work for YOU!
The Design Team.

Friday, June 10, 2011

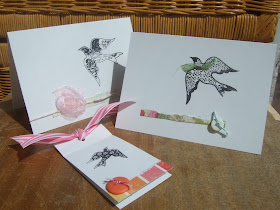
Cards and Tag (Design Team Project)

by Joanne Wardle

Cards and tag

I made a few cards with some bits and pieces from the frantic stamper. These are all really simple clean collage cards, using this beautiful set of bird stamps, scraps of gorgeous papers, buttons ,ribbons and twine.

The tag is made so that you can open it to read it. I like this style of tag as you can just attach it to the gift with adhesive, without the need for any ribbon. The ribbon is purely decorative

Thursday, June 09, 2011

Technique Thursday: Altering Die Cuts with Stamping


Altering Die Cuts with Stamping


Today we have a video from Hero Arts to share on altering die cuts with rubber stamps. We hope you'll enjoy it, and also try it out! Die cuts can make your projects really stand out, and this technique takes it up another notch. Be sure to check out all the great Hero Arts stamps at FranticStamper.com!


Wednesday, June 08, 2011

Warehouse Wednesday: Fundraiser for Japan's Animal Shelters


Fundraiser for Japan's Animal Shelters

The recent earthquake and resulting tsunami in Japan affected more than just people.  Hundreds of dogs and cats had to be rescued from the evacuated Fukushima nuclear plant as well.

In an effort to raise funds to help the animal shelters, Magenta has created 2 special edition rubber stamps (a cat and a dog). Magenta will send the proceeds from the sale of these 2 stamps to the Sora Peace Project in Japan to help fund the purchase of food and veterinary services.


We love animals too.  I have 5 cats, and we have a warehouse doggie (you'll meet her soon), so our hearts told us we need to participate in this.

We purchased 20 of each stamp and will be adding them to the website today.  If they go quickly, we will order more. Please check the website at:  http://www.franticstamper.com/magenta.htm to see and purchase the stamps.  

Hugs,
-Fran
www.franticstamper.com
541-826-2500
 

Tuesday, June 07, 2011

Tip Tuesday: Die Cuts Revisited


Today's tips offer more ideas for using your dies with your die cutting machine. We hope they will help you get more use of your dies!

Tip #1
Steel dies can cut through all sorts of materials. Try cutting aluminum from a soft drink can or chipboard, thin acrylic, felt, fabric, newsprint, mat board, vinyl, corkboard, magnet sheets, etc. Layer for different effects.

Tip #2
Add texture to dies by placing them into an embossing folder and running them through your die cut machine

Tip #3
I really love some of my die cut shapes. I cut extras and place them in a baggie so that I have them when I want them.

Tip #4
I cut the same shape from 3-4 materials. Then I use all of them on one card-layered. This is an awesome look for flowers or leaves on trees.

Tip #5
I really like acetate. I die cut acetate, stamp on it with StazOn and then layer it on top of a sheet of cardstock or patterned paper that has also been die cut to the same shape.

Tip #6
I die cut flowers out of watercolor paper. When I need an embellishment for a project, I add color with either markers or watercolors for a perfect match for my project.

Tip #7
I like to die cut and decorate thin cardboard, then die cut the same shape out of designer paper. After gluing them together, I cover with diamond glaze to make a beautiful embellishement

Tip #8
I die cut the same shape out of several different papers, then cut them into pieces and mix and match the pieces to recreate the shape. Add some faux stitches for a quilt effect. This is an especially fun thing to do with puzzle die cut pieces... makes a fun background!

Sunday, June 05, 2011

Sketch Sunday: Scrap #5 (Double Page Layout)


Scrapbook #5 (Double Page Layout)


Today I would like to offer you a new sketch for a double page layout.


The colors I picked for this sketch made me think of the woods and camping... the great outdoors. I love colors from nature; don't you? They also made me think of boy scouts, for some reason. Can't you just picture a photo spread of a boy scout camporee in this basic layout and color scheme?

Of course, this sketch doesn't require these colors; they are just the ones I picked to give you some ideas. You can chose colors to match your photos and still enjoy the cohesive nature of the two page layout... the shapes would give the pages a continuous feel even if the colors are different! So feel free to pick your own color scheme. And remember, this is just a sketch! Your finished product might barely resemble this starting point!

What ever you come up with the design team would love to see your creation! Upload a photo somewhere (Flickr, Picasa, Photobucket, etc.) and then share a link with us in the comments. To share all you need to do is add the following codes to your comment, and then replace the word "link" with the actual link to your photo:

      <a href="link">My Pages</a>

Your comment will then contain the words "My Pages" which will link to your photo. The design team really looks forward to seeing your work!

Until the next time,
Kathy
 

Saturday, June 04, 2011

Something Special Saturday: Seed Pocket


Seed Pocket

We haven't been doing step-by-step instructions for our projects this year, but today is something special! I would like to share a little seed pocket project I had posted on my personal blog a while ago. It is a very quick project to do and it can be used for all sorts of things! Put a small gift inside of it and it becomes a unique package, or make it with festive holiday papers and hang it in your tree as an ornament. Use it to save your heirloom seeds (which was the original use of the pocket), or put a lock of your baby's hair in it as a special way to save it. Whatever you decide to do with it, I think you will find the seed pocket a fun quick project to make.

To make this pocket you will need two pieces of double-sided patterned paper of your choice; one 8 1/2" x 5 1/2", and a 3" square. You will also need about 10" of ribbon, and a hole punch. You might also like to have a floss threader handy (these are normally used to thread dental floss through dental work or braces.)

  • With the rectangle of paper in landscape orientation, score at 4 1/4".
    It doesn't really matter which side is up.


  • Fold on the score line, strongly reinforcing the crease with a bone folder or scor-tool.


  • On the fold edge, fold the corners in to the center line, as shown.


    Reinforce the creases with a bone folder or scor-tool.

  • Open the paper.
    Decide which side of the paper you want on the outside.
    Re-crease the fold lines so that the diagonals are mountain folds and the horizontal fold is a valley fold, as shown in the photo.


    (NOTE: I changed my mind and decided to have the more bold paper be the outside AFTER I took this photo... I simply reversed the folds.
    This project is VERY forgiving.)

  • Fold on the creases, letting the center crease collapse inward.
    (Note: This is known in Origami as a balloon or waterbomb base fold.)


  • Fold the top layer of the sides of the base in to the center line, as shown in the photo.


  • Turn over and repeat.


  • Reverse the 4 folds you have just made so that the flaps fold toward the inside of the pocket.


    Set aside.

  • Score the 3" square at 1 1/2".


  • Fold on the score line, and place over the top of the seed pocket.
    Punch two holes through both the topper and the seed pocket as shown.


  • This step is not required, but it does make threading the ribbon much easier!
    Get a floss threader (meant for threading dental floss through braces and other dental work.)


    Thread the floss threader through the holes, and then thread the ribbon through the loop of the threader.


    Pull the end of the threader to get the ribbon to go through the holes.
    (NOTE: If you chose to skip the floss threader, thread the ribbon through the holes however you can.)

  • Tie a bow in the ribbon to seal the package closed.


I hope you have enjoyed the project and will give it a try!

Smiles,
Kathy