Friday, March 02, 2012

Gradient Card Set (Design Team Project)

Gradient Card Set

For today's project I used Adirondack Color Wash and Paint Daubers along with Core-dinations Vintage Collection Retro Mod Squad card-stock and Prima Clear Paintables Frame Mix to create a set of four vibrantly colorful cards.


To replicate what I have done, cut white bazzill card-stock into 4 pieces measuring 6 inch by 6 inch. Spritz the white card with water then apply the color washes as follows: For the first two pieces add Meadow, Denim and Sailboat blue. Then use red pepper, sunset orange and butterscotch on the remaining two pieces. Put aside to dry thoroughly.

Cut core-dinations card to create 4 pieces measuring 5 3/4 inch by 11 1/2 inch. Fold each piece in half to form the card bases for the four cards.

Trim the Prima transparency to create 4 squares, each measuring 5 3/4 inch by 5 3/4 inch.

Turn the first transparency over and use a paintbrush to apply small amounts of the Pearl paint to sections of the design. Repeat with the other 3 transparencies and put aside to dry.

Once you have decided which two transparencies will be used on top of the orange toned card, place the two transparencies face down on a protected work surface. Dab Sailboat blue paint around the transparency design then add in clover paint and blend together slightly.

For the remaining two transparencies, use the same technique with watermelon and butterscotch paint daubers.


Layer each of the transparencies over the top of their respective color washed card pieces; join the transparency and card piece together with brads.


Adhere one card front to each of the card bases, adding the yellow toned card to the blue base card, etc.

Stamp greeting onto glossy card stock (or print this digital stamp onto 4 inch by 6 inch card) then trim around. Attach each to a scrap of blue or orange card and trim around to form a mat. Repeat with a second mat if desired.

Adhere each greeting to the bottom right of the card.


Cut out sections of Prima felt vine and adhere around the greeting, allowing some to overlap it.


Using this technique I completed four cards in barely more time than it would have taken to create one, and yet each card is unique. I hope you will give it a try!


Thursday, March 01, 2012

Technique Thursday: Maya Road zipper-trim butterfly


You really will want to check out this amazing zipper-trim butterfly made by Maya Road DT member Ronda Palazzari. It is just gorgeous!


Friday, February 24, 2012

60th birthday (2011 Design Team Project)

by Polinka

60th Birthday

To make this page I used some We-R-Memory Keepers Precious Metals paper (Silver Lining Marquee) as a background. I added my photo and then finger-painted some acrylic paint on the photo's borders. I then added some October Afternoon Fly a Kite word stickers to opposite corners of the photo. Finally I added some machine stitching around the stickers using some red thread.

I love using paint and stitching when I scrap. They are inexpensive but really add a WOW factor and for me, make a project uniquely mine.

What do YOU like to add to your pages that give your unique style to your work? We'd love to hear from you. Please leave us some comments!

We would also love it if you would share some of YOUR layouts with us. Email them to FranticStamperSketchPhotos@yahoo.com.

We look forward to hearing from you!

:) 

Have a lovely day,

Thursday, February 23, 2012

Technique Thursday: Product Review: Go Kreate!

Go Kreate! Dies

Today we have reviews of Go Kreate! Dies from two of our Design Team members. First up we have Jane Larsson.


I was lucky enough to receive this die set in my first Frantic Stamper DT-package.


The die-set is made by the British supplier “Go Kreate” and it is frames shaped like windows - six different sizes.

Fran wanted me to try a die from this company; she was keen on making her first order with them but needed a review or two first.

The dies seem robust and high-quality, and cut through perfectly with the Big Shot. I really love them! I can hardly wait until Fran puts her first order with “Go Kreate” – I really need more shapes from their collection – NOW! ;)

When I laid my eyes on it, I instantly knew I had to use the die together with one of my favorite images right now: The Eiffel Tower!

I used the stamp Large Eiffel Tower from Fran´s own collection. It is sold cling-mounted, and you can find it here.

I heat embossed it with Tim Holtz Distress powder (Vintage Photo) which gave the tower that perfect look!


Patterned papers and deco’s are from K&Company (by Susan Winget) – gorgeous stuff that you can find here.

I hope to get more of these wonderful dies soon!

- Jane


Next up we have a review by Kathy Berger



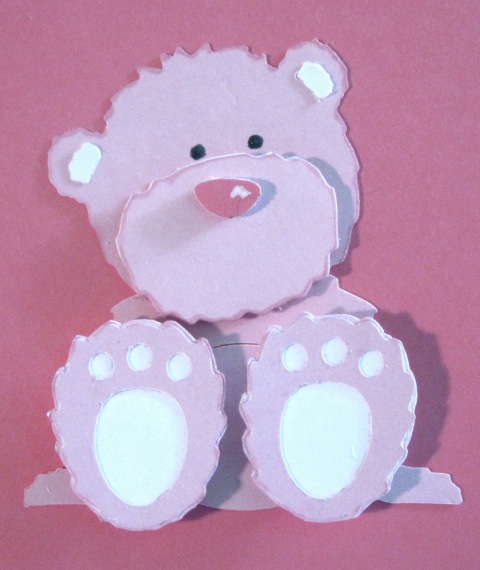
I, too, was lucky enough to receive some Go Kreate! Dies in my design team package from Fran. I got the new Boo on His Bum die and the nesting frame die Frilly Squares #10.


The Boo die is a thin die that comes with a sheet of self-adhesive release foam. Simply put the foam on the ridge side of the die and run through the die-cut machine and the die is ready to use.

This is a very detailed die... all of Boo's little toes are cut individually. Because of the detail, I ran into a bit of trouble getting Boo to cut with my older Cuttlebug which has gotten a little loose with age. I also have trouble cutting detailed dies from Memory Box or Some Assembly Required. In order to cut Boo I needed to add a shim, and never quite got the clean, crisp cut I wanted, though I was able to make do.

But I do have an older Spellbinders Wizard as well as my Cuttlebug, and I was able to cut Boo quite easily with that machine. I also borrowed a Big Shot from a friend for a few hours and had great results with it. I truly believe the problem was with my Cuttlebug and not with the dies.

UPDATE: I spoke with Fran about my Cuttlebug issue and she suggested I try the new metal adapter plate made by Memory Box as the perfect shim and cutting solution for a looser Cuttlebug. I got my shim recently and wanted to let you know how it worked.

Not only did the shim allow me to cut my little Boo Bear die perfectly on the first pass, but it also allowed me to cut a couple of really detailed Memory Box dies I had never been able to get to cut.With this shim plate they cut perfectly, in one pass, in my older, loose Cuttlebug. I HIGHLY recommend the metal adapter plate!


In any event, I cut a pink Boo for a baby card, and then cut some more Boos out of different shades of brown so I could play with mixing and matching his parts.

I wanted to make the pink Boo with foam dots between layers to give him dimension. To do that I assembled his feet on separate card-stock and then hand-cut around the feet. Otherwise, Boo was assembled just as he was cut with the die. Here is my pink Boo.


and here is one of his brown friends who was assembled without added dimension...


I also wanted to try the nesting frame dies I received. This package has four dies in it, ranging in size from about 2" square to about 3 1/2" square. They appear to be made of steel and are quite sturdy. These dies do not come with release foam, and don't need it. (This is the smallest set of dies in the same "Frilly Squares #10 shape... there are also a Half XXL and an XXL set available, for a total of 14 different dies.)

I had wonderful results with these dies even in my loose Cuttlebug. They cut perfectly every time I tried them.

For my baby card I wanted a little frame for my pink Boo so I used the second from the largest die and the smallest die. I cut with both dies in a single pass using a small piece of repositionable tape to keep them in place. Here is a close-up of a part of the frame on my finished baby card:


And here is the finished card. The background is a heat-embossed image from Frantic Stamper's own line of stamps, Lace background. (Isn't that stamp just beautiful?)


The bottom line for me is that I LOVE these dies. I think Boo is about the cutest thing ever and can't wait to get him standing, too, and to get all sorts of accessories for him! I will also be getting more of the frame dies; they are very versatile and cut wonderfully, and come in some really unusual shapes.

- Kathy

Wednesday, February 22, 2012

Warehouse Wednesday: We're swamped...


This morning we have already checked in 17 boxes of Bo Bunny product that arrived yesterday and made sure it is all available to order in our shopping cart. The rest of the day looks even busier!

Our little staff of five is absolutely swamped with handling arriving product from our CHA order (as well as from our usual stock orders), with adding items to the shopping cart, and with filling your orders.

We want you to know that our number one priority is YOU, our customer, and that we put you ahead of everything else. We try to bring you the latest and greatest in product, to help you with special needs, and to get your orders to you at the earliest time possible.

But in order to do that this week, there just isn't time to regale you with news from the warehouse. (Why did I flash to Garrison Keeler just then?) I hope that there will be more time for news next week...

In the meantime, just know that we are all busily filling orders, stocking shelves, and adding products to the website. Check us out at www.franticstamper.com.

Tuesday, February 21, 2012

Coloring Corner: Template for Mardi Gras


Happy Mardi Gras!

Today is the last day before the start of Lent in much of the Christian world. People all over the world celebrate with festivals, parades, and feasts. Two of the most famous celebrations are the Mardi Gras celebration in New Orleans and Carnival in Rio Di Janeiro.

Costumes are a major part of those celebrations, as are masks. Feathered, sequined, glamour, and glitz are all elements that make each mask unique to the wearer.

To help you with YOUR celebration, we would like to share a template so you can create your own special Mardi Gras mask. Use traditional colors of green, violet, and gold or some other color scheme. Just color it, or glue on sequins, beads, feathers or flocking. Use rub-ons or designer paper. Decoupage some photos or stamped images. Decorate the mask any way you want!


When you have finished your mask, please share what you have made with us. Email a photo to franticStamperSketchPhotos@yahoo.com and we will add it to this post.

We really would love to see your creation!

Sunday, February 19, 2012

Sketch Sunday: February 19, 2012


We hope you will enjoy the card sketch this week.


Some of our design team took the sketch challenge and want to share their cards with you.

First up we have a card from Jennifer Willis using the Frantic Stamper Cling-Mounted Rubber Stamp - Large Rose.


For her take on the sketch, Sharon Jeffs decided to create a rustic card with a country type feel. She used a soot stamping technique to stamp Frantic Stamper's Cling-Mounted Rubber Stamp - Pine #1, then also colored the patterned paper (Kaisercraft Vintage Timeless) using Distress inks and a soft dry brush technique.


Next we have a card from Kathy Berger. She used the Go Kreate! Sitting Boo die to create a bear and added a Go Kreate die cut frame to create the focal point of her card. (Kathy and Jane Larsson will have more to say about these dies in a product review this coming Thursday.) But what we think really made the card is the beautiful lace background, created by heat embossing detailed white embossing powder on an image stamped with the Frantic Stamper Cling-Mounted Rubber Stamp - Lace Background! It really looks like lace and gives a perfect soft touch to this baby card.


Next, Linda Phinney used the elements of the layout in a portrait orientation instead of a landscape to make her lovely stamp-free card. Using Hot Off the Press Floral Boutique 3-D paper tole foil die cuts and foam tape, she created a wonderful dimensional focal point for her card. With just the right touch of bling this card really stands out, don't you agree?


And lastly, we have a beautiful card from Jane Larsson. She used the gorgeous Frantic Stamper Cling-Mounted Rubber Stamp - Peacock Pair, colored with Copic Sketch markers for the focus of her card.


We hope you have enjoyed this sketch and our DT interpretations of it. We hope you will be inspired to create something of your own with our sketch. If you do, please share it with us! Just email your photo to FranticStamperSketchPhotos@yahoo.com and we'll add it to this blog entry.

Friday, February 17, 2012

Je t'aime card (DT member Sharon Jeffs)

by Sharon Jeffs


I have a special affinity to the Kaisercraft range of products.   After all its an Aussie just like like I am! Plus, they have some absolutely beautiful ranges to play with that suit all different preferences.  I chose to create my card using the ‘Sweet Nothings’ range.  I used their 6 by 6 paper pad so that I could add as much detail to my card as possible.

I began with a 6 inch square base is a kind of sage color green then added a trimmed piece from the ‘Sweet nothings’ range to it. The centre image is from the Frantic Stamper range of stamps and is called "Magnolia". (You can find it here.)I love this stamp a lot because it can be used in so many different ways like cutting out the centre section and using only that.  I also cut a scalloped circle to matt it from the same paper range.

To assemble my card, I first inked all the edges with a Brown Sepia color ink. I added a strip of hessian ribbon down the centre for a bit of a vintage feel and a few Prima rosettes to add that extra little bit.  Finally I stamped a word stamp (also from the Frantic Stamper range) and attached that to the bottom right of my card.

Thursday, February 16, 2012

Technique Thursday: Paper Topiary By Memory Box


Today we would like to share a beautiful paper rose topiary from Memory Box Dies. The artist used Pinwheel Posie die (MBC-DIE-98270), Scalloped Posie die (MBC-DIE-98269) and Small Pinwheel Posie die (MBC-DIE-98271).


Check out these great dies and many others at www.franticstamper.com

Wednesday, February 15, 2012

Warehouse Wednesday: And the madness continues...


And the madness continues...

CHA madness is upon us! The UPS lady commented today on how many packages we are receiving these days. You think? LOL!! It's a major challenge getting everything checked in, organized and uploaded onto the website, all the while filling pre-orders AND keeping up with orders. But you know what they say, "keeps us out of trouble", right?

What's in store? A WHOLE LOT!!!

  • We've just received 2 new collections from KaiserCraft: Tiny Woods (cute as a button woodsy theme) and These Days (a traditional victorian floral line).
  • October Afternoon has finally delivered the much awaited Sassparilla line, but they did not ship several items…. we hope to get this on the site by this weekend.
  • Cheery Lynn has just revealed their NEWEST dies!! Our shipment is due in next week. I'm adding the items to the site right now, and they should be ready to order by this afternoon.
  • The newest collection from We-R-Memory keepers is here too. It's called Baby Mine.
  • Also, we have a new collection from Webster's pages that needs to be uploaded.
  • We're also working on uploading the rest of the new Spellbinder dies expected to arrive mid-March.
  • We've just received 2 new collections from KaiserCraft: Tiny Woods (cute as a button woodsy theme) and These Days (a traditional victorian floral line).
  • October Afternoon has finally delivered the much awaited Sassparilla line, but they did not ship several items…. we hope to get this on the site by this weekend.
  • Cheery Lynn has just revealed their NEWEST dies!! Our shipment is due in next week. I'm adding the items to the site right now, and they should be ready to order by this afternoon.
  • The newest collection from We-R-Memory keepers is here too. It's called Baby Mine.
  • Also, we have a new collection from Webster's pages that needs to be uploaded.
  • We're also working on uploading the rest of the new Spellbinder dies expected to arrive mid-March.
There is so much more to be done….. but orders come first, and we have to concentrate our time there.

Please be sure to keep checking the new products area on our site:
http://www.franticstamper.com/newest-products.html and watch for new products being added daily.

Hugs,
-Fran
www.franticstamper.com