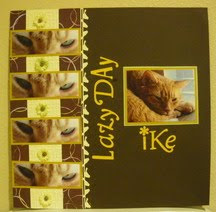
Saturday, July 31, 2010

Lady with Umbrella

by Debi Wind


Lady with Umbrella

Materials

Instructions

  • Cut Midge cardstock to the size of 5 1/2"X8 1/2", score it and fold in half. Cut Loves Labyrinth pattern paper to the size of 4 1/4"X5 1/4" and adhere to card.

  • Cut one piece of Midge cardstock to the size of 1 1/2"X4 1/4" and one piece of Cantaloupe cardstock the size of 2 1/4"X4 1/4". Adhere Midge cardstock to Cantaloupe cardstock and adhere to card.

  • Cut Loves Labyrinth pattern paper to the size of 2"X3 1/4". Cut Midge cardstock to the size of 2 1/8"X3 3/8". Adhere Loves Labyrinth flip side to cardstock and adhere to card.

  • Stamp Lady with Umbrella with Persimmon Ink onto Cream Puff cardstock. Trim, sponge edges with Persimmon ink, layer onto Peach, Cantaloupe, and Midge cardstock.

  • Adhere Fashion Walk to card and finish card with Sepia and Mint silk flower embellished with pearl brad.

Thursday, July 29, 2010

Flower Soft Card

by Sharon Jeffs


Flower Soft Card

I love everything textured which is why Flower Soft is such a wonderful medium to create with. It provides texture without all the bulk.

Materials

  • Paper and Cardstock
    • Basic Grey Patterned Paper – (Eva) Extravagance     ( BG-EVA-1350   $0.69)
    • CoreDinations Vintage Retro Mod Squad Collection Cardstock – Angel Orchid     ( COR-Pk-VRetro   $10.99/20 pack)
    • Bo Bunny Sophie Patterned Paper – Tickled Pink     ( BBP-P-02851   $0.89)
    • White Paper
  • Stamps
    • Flower Soft Moments in Time Rubber Stamp – Grows with Love     ( FS-RSL-GWL   $12.99)
  • Inks
    • Ranger Adirondack Stamp pad – Pitch black     ( RAN-ADP-Pitch   $4.99)
    • Brilliance Ink Pad – Coffee Bean     ( TSU-BD-Cof   $2.69)
  • Embellishments
  • Copic Markers
  • Tools
    • Tim Holtz Paper Distress Tool     ( TON-distress
    •   $5.95)
    • Nestabilities Scalloped Circle Dies – Large     ( Wiz-D-S4115
    •   $24.99)
    • Compass or Circle cutting system
  • Adhsives

Instructions

  • Begin by cutting the pink CoreDinations card into a rectangle that measures 5 ½ inches by 11 inches and fold it in half.
    From the Basic Grey patterned paper cut a square that measures 5 ¼ inches by 5 ¼ inches.
    Finally, cut a scalloped circle from the Bo Bunny patterned paper, using the largest nestability die and a circle that fits within the scallop using the white card.


  • Rough up the edges of the Basic Grey patterned paper square using a paper edge distressor.


  • Stamp the girl image onto the centre of the white card circle using the Pitch Black stamp pad and heat set to ensure it completely dries.


  • With the Copic Pea Green marker, colour in the grass and stems in addition to the leaves in her hair.
    When dry, re-ink over certain areas to add greater colour dimension.


  • Using the Copic Light Pink marker, colour in the flowers and lace trim on the dress.
    Add shadow effects to this pink trim using the Copic Rose Red marker.
    I’ve found the best way to do this is to pick up the darker colour by tapping the lighter tip to the darker and then colouring in a small circular motion.


  • Continue colouring in the little girls dress in the same manner using the Copic Pale Lilac and the Copic Lilac markers.


  • Next, colour the hair and skin with the Copic Skin White marker.
    Highlight the shadows on the skin areas using the Copic Milky White marker and the Copic Light Walnut marker for the hair.


  • Finally colour the watering can using the Copic Cool Grey No.3 marker and highlighting it with the Copic Cool Grey No.5 marker.
    Put aside for awhile to allow the inks to dry completely before continuing.
    Apply a thin layer of Flower soft adhesive randomly over the surface of the grass and stem areas of the image.
    I found it easier to add blobs and then drag the nib of the glue applicator through the blob. This gave me a kind of stem effect in itself.


  • While the glue is still wet, pour some of the Sage Flower Soft over the glue and gently pat into the glue.
    Tip circle onto its side and gently flick to remove any excess.


  • Repeat this process with the Sweet Pea Flower Soft, ensuring you apply some to the flowers in the little girl’s hair.


  • Ink the edges of the decorated circle and attach to the centre of the scalloped circle.


  • Adhere two of the Prima leaves to the bottom edge of this piece and the purple Prima bloom over the area where the two leaves meet.


  • Pin prick holes along the edges of the Basic Grey patterned paper and run a stitch through to create a sewn border.
    Finally, attach the scalloped circle section to the centre of the Basic Grey piece and this to the centre of the pink CoreDinations card.


Tuesday, July 27, 2010

Lazy Day Ike

by Lis Whiting


Lazy Day Ike

Materials

  • Paper and Cardstock
  • Stamps
  • Inks and Embossing Powders
  • Embellishments (I used different products which are not currently available, but these would work well.)
  • Tools
I really like scrapbooking. I like to look back on the memories of my life and photos and journaling help me to remember. Scrapbooking also allows others to know my life even after I’m gone.

I have pictures that my mom gave me of relatives that I don’t know. It’s such a shame. Other photos are almost white or stained because of the acid from paper that is destroying them over time. Scrapbooking addresses all of that by:
  • Using acid free or photo safe materials (Including papers, inks and glues) that safeguard photos so that they last a lifetime
  • Journaling or recording the who, what, when and where of a picture
  • Allows me to express myself through this art medium (yes, its an art form just like drawing or painting) and in the process, others will get to know me through my scrapbook art
Really, you only need a few things to start on your scrapbooking journey:
  • A 12 inch paper trimmer (this way you can work with any size paper)
  • A black felt pen (acid free) for journaling
  • Paper
  • Acid free glue or tape
  • Your photos
There are a few basics to getting started:
  • Probably the hardest thing is to get your photos out. Organization can be quite a big deal if you have a lot of photos. My solution is to start with the most recent event you took pictures of; a birthday, a trip, a holiday.
  • Once you have chosen some photos, spread them out (or look at them on your PC) and look for a color theme. Is there a lot of green grass? Colored flowers? What colors are the people wearing?
    The reason for this is simple. You are going to match some of the paper from your scrap page to a color in your photo. This will make that part of the photo “pop”. For example: I have a picture of my dad standing next to his favorite pink rose bush. He is wearing blue pants and a white shirt. If I back my photo with pink, the roses stand out. If I back the photo with blue, my dad’s pants stand out. If I back the photo with green, the grass around my dad stands out. Get the picture? (Sorry, I couldn’t resist the pun.)
  • The layout is how you organize your scrapbook page. Do you want you photos on the side? The top? Overlapping? You can take a piece of paper and draw out the layout before you start. In my project below you will see this.
  • The Title of the Page tells in a word or two what the page is about. These titles give you a strong idea of what a page might be like: SUMMER, GONE FISHING, CELEBRATE.
  • One last thing: You want to decide what size scrapbook pages you want to have. The most common size right now is 12 x 12. You can also find 8x8 and 4x4 easily.
Let’s get started! I took pictures of my kitty IKE. He is an orange kitty and I love him!

Instructions

  • I decided that since Ike is a brown/orange kitty with light greenish eyes and a little white on his face that I would go with a dark brown 12 x 12 cardstock as a background. This way anything I put on it will really show up and not blend into the background.
  • I chose several colors of cardstock and patterned paper and placed my photos in front of them to see which ones would bring out the features in the photos (his eyes) the best. I settled on dark brown for the back ground and light green & amber to mat Ike’s picture. I used only amber to mat the photos of Ike’s eyes because I wanted the focus to be on Ike’s picture.
  • To make the bird border and the patterned paper on the left side of the page:
    • I took a one inch strip of pale green cardstock and punched the bird border using Martha Stewart punch.

      Martha Stewart has done it once again. This punch is BEAUTIFUL!


    • I cut a 4 ¼ x 12 inch strip of pattered paper that was a slightly lighter shade of brown.

    • I glued the bird strip to the back of this patterned paper so that the bottom line of the punch just showed.

    • I glued the paper strip with birds down on the left hand side of my 12x12 page.
  • The embossed strip:
    • I cut THREE 2 x 6 inch strips of pale green cardstock.

    • I embossed each of them with one of the oriental designs that comes in the Oriental package of Cuttlebug Embossing Folders.

    • I cut away any flat or unembossed areas.

    • NOTE: I placed the unglued strips of embossed cardstock and my photos on the page to see where things would lie.

    • After I tested how it would look, I glued the first strip on the bottom of my page in the middle of the patterned paper.

    • I added the next strip and glued it down.

    • I finished by gluing down the third strip.

    • I trimmed any excess away.

  • The photos of Ike’s eyes:
    • I took one photo of Ike’s face and cropped it down to his eyes.

    • I printed this photo out four times.

    • I matted the amber cardstock on the back of these photos.

    • I placed the photos down on the left side of my page.

    • I added Prima flowers in pale green in between each photo.

  • To make the right side of the page:
    • I took the photo of Ike and attached it to my amber cardstock.

    • I cut a border of about 1/8 inch.

    • I took this and attached it to some light green cardstock and cut a border of about 1/16 inch.

    • I placed the photo on my page on the right BUT DID NOT GLUE IT DOWN YET.

    • I took a long package I happened to have (this is what you see in the pictures but you can use a ruler also). I placed the sticker letters on the edge of it LAZY DAY. I was then able to move the title around to see what I liked the best.


    • Once I had the title where I wanted it, I pressed down and stuck the letters down. I took the bottom edge of the letters carefully off the plastic I was using. Voila! A straight title!

    • I glued down Ike’s photo.

    • Since Ike’s name is so short, I hand placed the letters for his name under his picture.

I hope you’ve enjoyed this scrapbook page and the techniques I’ve shared. See you next time!

Sunday, July 25, 2010

3 baby layouts

by Polinka


3 baby layouts

Materials

  • Paper and Cardstock
    • Blue Paper from the Weathervane Collection Kit     ( OCT-Kit-weathervane35   $19.99)
    • Pink paper from the Daydream Collection     (Not currently available. Substitute Daydream Poppy Garden     OCT-P-PP010   $0.89)
  • Stamps
    • Basic Grey Mini Clear Stamp, Recycle     ( BG-CSM-31   $1.99)
  • Inks, Paints, and Embossing Powders
  • Embellishments
    • Ducks in a Row Label Stickers     ( OCT-S-228   $2.49)
    • Farm Fresh Label stickers     ( OCT-S-232   $2.49)
    • Making Memories Sticker, Tiny Alphabet, Brown Ledger 468 Stickers     ( MM-S-30284   $2.99)
  • Adhesives
    • Acid-Free Memory Glue Dots     ( GLUE-Memory   $4.99)
    • Staples

Instructions

  • Some more layouts for my album... this is a series about my nephews and niece, so I choose the same paper combination for all.
  • To keep the design simple and focus on the pictures, I simply decorated with stickers, all grouped at one or 2 places, with the titles: each baby's name and year of birth...
  • I loved this little tree stamp from Basic Grey, so I decided to use it once on each of the pages, with a light blue ink from ranger...
  • To finish embellishing, I put some staples and paint circles randomly everywhere... I also drew a white frame on the pictures' borders.
Have a lovely day,

Saturday, July 24, 2010

Grungy Twilight Moment

by Erika Taylor


Grungy Twilight Moment

When I first saw the Glitz Distressed Couture collection, I was whisked away to a place filled with Vampires and Werewolves. The line makes me instantly think of Twilight, and I wanted to share with you a 5 ½” x 5 ½” card I created with that in mind.

Materials

Instructions

  • Cut Black cardstock 5 ½” x 11”. Score at 5 1/2”. Set aside.

  • Cut Diablo cardstock at 5 3/8” x 5 3/8”. Cut Glitz Distressed Scroll patterned paper at 5 1/4” x 5 ¼”. Layer then adhere to card front.

  • Cut 4 1/8” x 4 1/8” black cardstock. Cut 3 ¾” x 4” Glitz Floral patterned paper. Layer.

  • Using Ruby Slippers Stickles, dot top and bottom edges of 4 1/8” x 4 1/8” cardstock. Let dry.

  • Adhere Maya Road Sheer ribbon to center of 4 1/8” x 4 1/8” piece. Adhere entire piece to card front.

  • Using Big Shot and Nestabilities, cut out 2 classic circles from Diablo cardstock, 1 scallop circle from black cardstock and 1 scallop circle from Glitz Scrolls patterned paper. Adhere largest circles together. Adhere smallest circles together. Layer with pop dots.

  • Spray Maya Road wings with Scarlet Glimmer Mist. Let Dry. Lightly dab with white painter dauber. Once completely dry, highlight wings with glaze pens in black and white.

  • Paint wings with Distress Crackle Paint. Let Dry.

  • Apply alcohol ink directly onto brad buddy medallion. Sand raised portions. Adhere wings to circles, then layer medallion.

  • Apply rub-on to card front.

  • Adhere entire circle piece to card front.

  • Finish card with Prima Say it in rhinestone swirl, Kaiser Craft black rhinestones and Stickles.


    Here is a close up of the Medallion and wings.
Thanks so much for stopping by today and sharing a Grungy Twilight Moment with Glitz Designs.

Toodles
Erika