Saturday, April 30, 2011

Something Special Saturday: Guest Blogger


WOW! Four Special Saturday posts in a row!! We never planned to have this feature be this regular, and in the future it is unlikely to continue at this pace, but we do have another special treat for you today! We have a guest blogger who has prepared some wonderful art for you using a Bo Bunny collection. Please welcome Cheryl Johnson.


K: Hi Cheryl. Please tell our readers a little bit about yourself.

C: I was born an Army Brat just before the end of WWII and we settled in Milwaukee, WI after Dad was discharged in 1946. By that time, there were 3 of us kids, and 3 more after that. When we were kids, we used to play at a community playground in the summer that was supervised, and it was close to our house. There was a terrible red headed kid my age on a bike that used to ride around the playground, trying to pull pigtails and ponytails as he rode by. I ran all the way home to get away from him. It wasn't until I dated a particular young man I met through a friend, that we discovered he was the terrible redhead and I was the pigtailed girl. I married that wonderful Submarine Sailor in 1965...that's 28 years of Navy life, moving from coast to coast and back, plus a stint in Hawaii where I took up counted cross stitch. We ended his career in Bremerton, WA where we stayed 24 years and decided to join our only daughter and her husband in San Antonio, TX. We've been here 3 years, but sadly, our Grandson moved back to Washington shortly before we got here. By the way, the photo is my most recent picture...taken in April with my Hubby, Larry at my Mom's place in Wisconsin. You'd never know he was that "terrible redhead", would you? He's taking good care of me so I can continue my hobby. Thank goodness!

I worked in many of the places we lived, and had to retire on disability in 1994 after a long illness that has progressed. It was then that I was introduced to stamping by attending a home party and got the fever...I can never get enough paper, stamps, or embellishments, but I force myself to stay on a budget. That's hard to do, and I rarely even go to craft stores...I shop on line because I can no longer drive, and the online items are endless. I love those sales! My husband finally had a studio built onto the house that I could work in without climbing stairs, but I had to leave it behind when we moved to Texas. My daughter and son-in-law graciously gave up their finished garage for my studio in Texas. I am a rather messy but organized "creator"...I like to have everything around me that I could even hope would work for the project I'm doing. Putting it all away is another story. I love having a friend in for a day of stamping and scrapping, and fortunately my best friend is very accommodating to make sure it's a good day for me, too.


K: What inspires you?

C: Just about everything I see, an old photo, a vintage pin, feathers, dried ferns, tags from product lines...(I have one that is lime green that says, "Blah Blah, Blah!" that I'm dying to work into something fun.) I've been known to decorate bottles, boxes, bags, clothing, picture frames, furniture, and was even tempted to decorate the Welsh Pembroke Corgi that belongs to my daughter. Instead, I made him about a dozen neckerchiefs that he loves to wear--he gets to pick which ones he likes. I am doing a scrapbook for him, since my daughter got him when he was about 2 years old and we love him to pieces. I was amazed at how many pet things there are to use for ideas.

K: Why did you chose Bo Bunny for these projects?

C: Bo Bunny is one of my favorite lines of papers and embellishments...I have nine of their lines...complete with everything! However, when I saw the Gabrielle line by Bo Bunny being pre-ordered at Frantic Stamper, I fell in love with it and had some ideas for that subtly beautiful paper...one was the two-page 12x12 layout of my father's family tree, using everything I could of the product line. I had some leaves of different textures that I'd kept in a glass jar for ages, knowing someday I'd use them, and they came in handy for the family trees. I also used a mask for the tree and the Tattered Angels Spanish Moss mist because it blended so well with the paper I chose. I was going for a fun, eclectic look with some vintage pictures and flowers. The anniversary card was a no-brainer...I needed to make my daughter and son-in-law a card to celebrate their April 9th anniversary and of course, the paper was perfect for the card. They loved it and it is sitting on their desk. Their entire china cabinet is full of birthday, wedding, anniversary, valentine and St. Paddy's day cards that I've made for them over the years. No room for china.

Every project I start is a product of love...for the person it is meant for, for the reason it is sent, and for the love of creating something that people actually keep. All I have to do is look at the paper and it "speaks" to me. When one of my best friends passed away two years ago, her brother sent me the entire box of cards I made for her over the years...we had been friends since Kindergarten and our birthdays were in the same month. Her nickname was Mouse, so a good many of her cards had mouse motifs. I keep them in a special box because I can't bear to look at them just yet. My Mother has kept all the cards I've made for her and said she is running out of room to keep them. My friends and family all say the same thing...my cards are the ones they keep. Now I am busy sending paper and embellishments to my sisters and nieces for their scrapbooking and stamping...getting them hooked, too! They're so far away, but this makes the distance shorter when I see what they've made. My mother even got into the scrapbooking and stamping fever, but decided she had so many pictures she'd rather scrapbook with my sisters and nieces these days. I'm glad I could start a family tradition, being the oldest of six. When I leave this earth, there will probably be a lot of paper, ink, stamps, embellishments, etc. enough to start a store, but I will have made my mark...and made a lot of stamp and paper companies happy, too! Not to mention those who inherit this mess of perfectly wonderful stuff! I plan to live to 100, despite all, so they'll just have to wait while I stamp my "art" out!

K: Thanks for being a part of our team today, and thank you for being willing fun to share with our readers! Without further ado, let's show them some of your lovely work.

C: First I have a 2-page 12x12 spread for our Family History Wall.

K: I love the idea of a history wall...I think I will have to see about adding one to our home!


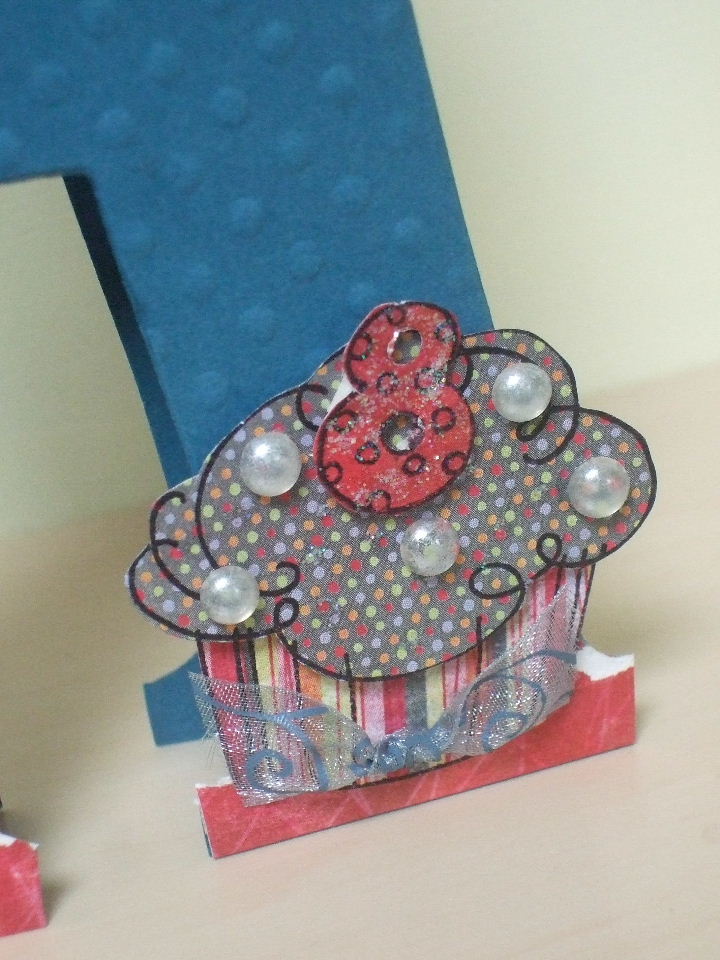
C: And next are photos of an anniversary card made for my daughter and son-in-law, front and inside.


K: Thanks again for coming by! Hope you enjoyed our little visit with our special guest!

Friday, April 29, 2011

3-D Letter Card (Design Team Project)

by Joanne Wardle

3D Letter card

I made this card for my son Alex. Young kids just love cards with their initials. I also find that boys are quite interested in the construction of cards such as this. The careful placement of the struts in this card allowed it to fold flat to go in an envelope.


I hand drew my letter, but you could use word art to make a template. Obviously this would not work with all letters. To make my card I used card from a Basic Grey Sugar Rush 6"x6" pad, a cupcake stamp by Stampendous, some stickles and assorted bling and ribbons. I also used a Fiskars "Energy" texture plate to add interest and texture to my card.

To make this card I folded an A5 card in half, drew the letter "A" onto the card, and then cut out both pieces. I embossed one of the letters with the dots on the fiskars plate and then ran an embossing tool around all of the cut edges to create a more finished effect

I made the struts by folding a strip of card with two mountain folds, then cutting it into pieces. I attached the pieces to the front and back of the card. The important thing here was to make sure that all the struts were perfectly vertical, else the card would not fold flat. Otherwise, it didn't matter where they were placed, but I needed to use enough to ensure the structure was stable.


I decorated the letter with papers, my saying, and a cupcake, and finished it off with glitter and glitz.

Thursday, April 28, 2011

Technique Thursday: Zipper Trim Flowers


Do you want to know how to make these beautiful zippper flowers using Maya Road Zipper Trim?

Check out the video tutorial Maya Road has put together and make some for yourself!


The supply lists (and this video) are posted on the Zipper Trim Flower Tutorial. Have fun creating some of these Zipper Trim Flowers soon!

Maya Road Zipper Trim is available at this link on www.FranticStamper.com.

Hugs,
-Fran
www.franticstamper.com
541-826-2500

Wednesday, April 27, 2011

Warehouse Wednesday: Technique Tuesday Stamps


Technique Tuesday stamps

It seems strange talking about "Technique Tuesday" on Warehouse Wednesday…. and no, this is not a technique day… but a stamp company that we are just starting to carry! Technique Tuesday features dozens of great clear stamps including designs by Ali Edwards. Today, we received our first shipment from them!


The cute images and wonderful sayings are great for cardmakers and scrapbookers alike, with everything from phrases to backgrounds, boy and girl themed designs, holiday and everyday too! We'll be adding them to the website starting Friday (maybe sooner if I can).

We hope you like this new addition to our inventory! Remember, we always welcome your feedback! If you have a suggestion of a line you want us to carry, drop us a note and we'll add it to our wish list.

Hugs,
-Fran
www.franticstamper.com
541-826-2500

Tuesday, April 26, 2011

Tip Tuesday: Frugal Papercrafting


Today the team would like to present some money-saving tips for your paper crafting. We hope you will enjoy them!

Tip #1
Shop thrift stores, dollar stores, garage sales, yard sales, estate sales, etc. for items to use for your projects. Check with print shops they will sometimes give you scraps.

Tip #2
Bargain bins at fabric stores are full of pieces of fabric, trims, ribbon, and buttons that can be used as backgrounds, embellishments, etc.

Tip #3
Check out bargain MORE bins. Check them out not only in the craft and fabric stores but, also, stores such as Target. You would be amazed at the items one can find to use for stamping projects. Items like erasers can be carved and stamped, pencil erasers stamp wonderful little dots and or rubber sink stoppers stamp perfect rings. Inexpensive stationary can be stamped on and embellished to become special. Coasters can be painted and stamped. Garden kneeling mats make a wonderful work surface for shaping paper flowers. Plastic place mats are terrific for protecting your stamping table from stray ink. Think outside the box!

Tip #4
Recycle cartons and packaging. Stamp on the unprinted side for a project; use to make templates from, use in a collage, etc. Not only will you be getting free materials to work with, but you'll be helping the environment, too!

Tip #5
Go through junk mail. It can be full of colorful paper, dark paper, backgrounds, etc. that can be incorporated into stamping projects. I especially love the bits of vellum or foils that occasionally appear in my mailbox.

Tip #6
Inquire at your local card shop after a major holiday if they have any leftover envelopes. Most shops will throw out the cards and envelopes after the holidays, and will be willing to share.

Tip #7
Use clean old rags in your stamping area. Cut up old sweatshirts for cleaning stamps. They can be thrown into the washer and used over and over again.

Tip #8
Buy white cardstock by the ream. Heavier weight cardstock can be found at office supply stores.

Tip #9
Check out the sale page at FranticStamper.com! There are always terrific sale prices on quality crafting items!

Sunday, April 24, 2011

Sketch Sunday: Scrap #3


Happy Easter! Today's sketch is done in colors that make me think of Easter, Spring, and Mother's Day. In the large photo block I can see a photo of a little girl in her lavender Easter dress, standing in a field and holding a basket filled with her collected eggs, with her name spelled out in the squares at the bottom. Or perhaps a photo of my beloved grandmother in her favorite chair with a bouquet of lilacs from her garden on the side table; I envision photos of her garden filled with lilacs, irises, and violets in the smaller squares. I can almost smell the blooms... what a vivid memory they form in my mind.

I hope this sketch will evoke some memories for you and will help your creative juices to flow. If you do use this layout the design team would love to see what you make. Upload a photo somewhere (Flickr, Picasa, Photobucket, etc.) and then share a link with us in the comments. To share all you need to do is add the following codes to your comment, and then replace the word "link" with the actual link to your photo:

      <a href="link">My Page</a>

Your comment will then contain the words "My Page" which will link to your photo. The design team really looks forward to seeing your work!

Until the next time,
Kathy

Saturday, April 23, 2011

Something Special Saturday: Contest Winner!


The design team congratulates the winner of our egg contest, Isabelle D. Vachon from Saint-Georges, Canada. We loved her winning entry!


Isabelle will be getting a prize package from FranticStamper.com.

Our thanks to our the readers who sent in entries. We hope that our next contest will have even greater participation.

Friday, April 22, 2011

Spring Basket (Design Team Project)

by Kris Hankins

Spring Basket


Thank goodness spring is upon us. It has been a long, cold winter for most of us. But, the snow has now melted, the plants are blooming, and the birds are chirping. It is time to enjoy spring. This little gift basket is perfect for giving a small gift to someone, or even using for Easter treats. For mine I used paper and card-stock from the "Hello Luscious" collection from Basic Gray, May Arts polka-dotted ribbon, Prima watercolor roses, and Tim Holtz's Caged Bird Die. Basic Grey collections are the perfect papers for this type of project (and many others). Since the papers are all double sided it gives you great variety and versatility; you can mix and match so easily! Plus, you don’t have to worry when the backside of the cardstock is visible, like the scalloped edges of this basket.

Cut a 10 ¼” x 4” strip from Blissful paper. Cut two scalloped rectangles from the Raspberry Syrup cardstock using the largest Nestabilities classic scalloped rectangle die. Cut a 2 3/4” x 3 5/8” piece of Inviting paper. Lastly, cut the bird from the Succulent cardstock using the Caged Bird Die.

Score the strip of Raspberry Syrup cardstock 3/4” in from each side (lengthwise). Score across 3 3/4” in from each end. Snip the 3/4” folds as shown in the sample below. 


To finish making the basket, add an adhesive to the outside of folded-in flaps. Attach the scalloped rectangles to the front and back of your basket (the scalloped edges should extend over edge of basket). On the front, attach the cut piece of Inviting and embellish. Be sure to give the bird a personality with a crystal eye. Attach the wing with a 3D foam square to add some dimension to the bird. 


For the handle, knot a piece of the sheer polka dotted ribbon in the center. Attach the ends to the inner sides of the basket using a strip of adhesive and a pink flocked brad.

You are now done with your colorful Spring Basket. Fill it full of cheerful goodies!

Thursday, April 21, 2011

Technique Thursday: Glitter


by Lis Whiting

Hi everyone! I hope that you are having a fabulous week! How would you like to add some fabulous bling to your next project? Well, I have just the thing… GLITTER! Glitter is a wonderful addition to any crafter’s toolbox. Today I would like to share three techniques for getting more out of my favorite glitters, all available at FranticStamper.com.

I was attending the Carson show for scrapbooking and card making and came across a booth that was teaching a wonderful technique with glitter and lace (alas I didn’t think of it!).

This technique requires shipping labels available at office supply stores like Staples. You can use any size, but I used pieces cut to 4 1/4" x 5 1/2". To keep my workspace organized and glitter-free I used Martha Stewart Glitter trays; a package comes with a few trays and a brush. Each tray is made of a thick cardboard-like material and has a funnel at one end. The glitter doesn’t seem to cling from static when using this tray. If you choose not to use the trays, be sure to have plenty of space to work and cover your work surface with paper. It is also probably a good idea to wipe your surface with an anti-static bag or dryer sheet before you start.

Peel the backing off of a label and place the label into the tray so that the sticky side is facing up. Choose a piece of pretty lace large enough to cover the label. The lace that will work best will have a larger design and some areas with large spaces (see photo.)

Put the lace onto the label side and press it down to adhere. Now – sprinkle your first color of glitter all over the lace. Remove the excess glitter and return it to the bottle using the built-in funnel. Take a damp paper towel and wipe the inside of the tray to remove any stray glitter.

Turn the glittered lace/labe upside down and rub the backside to press the glitter into the adhesive. Remove the lace. Now sprinkle on a second, darker glitter color. Repeat the step of pressing the glitter into the adhesive by rubbing the back of the label, and then remove excess glitter. Once the extra glitter is off, you can see the lace pattern in glitter!


For my second glitter example, I glittered some little die cut houses and added them to my card as an embellishment. Simple, you say? You bet!

I started by die cutting the houses from the Heritage cartridge by Cricut. For those of you who like vintage and who have a Cricut, I recommend this cartridge. It not only has the little houses and a great font but it also has some beautiful cameos. After cutting the houses, I brushed on a thin but even coat of tacky glue over the die cuts and then dipped them into glitter to coat them.

I am IN LOVE! I didn’t think that glitters could get much better than the ultra fine but I was wrong. WOW! You should see these glitters. They are called Glitter Ritz and are MICRO FINE. The sparkle that this glitter lets off is incredible. The pictures don’t do it justice. The micro fine glitter has a velvety feel to it. It is incredibly fine and adds no bulk to whatever you are glittering. This glitter comes in a fabulous selection of colors. (My favorite today is coppery rose.)


I love glitter! It’s so fun and beautiful to send and receive glittered cards. I sometimes don’t like to use it, though, because glitter can find its way onto most anything! So, for my third project I wanted to share with you a painting technique with glitter that practically eliminates stray glitter.

For this technique I used the Glitter Ritz micro fine glitter, Diamond Glaze and a small paint brush. The micro fine glitter is so tiny that when I mix it with Diamond Glaze I get a glittery paint. I then simply used my brush and painted each glitter “color” onto my card. I even mixed a couple of colors together to get a brown-green to create a “shadow” on the pumpkins.


Note: I didn’t have any micro fine orange glitter so I used ultra fine glitter that I have from Martha Stewart. When you look at the card, look at the pumpkins, which were colored with that ultra-fine glitter, you can see through the glitter to the stamped image. With the micro fine glitter you cannot. The difference is really significant.

I hope that you enjoyed my glitter techniques and try some of them for yourself!

Wednesday, April 20, 2011

Warehouse Wednesday: Shipping and Handling


Shipping & Handling

Today I'd like to talk to you about the ever changing, ever complicated "shipping and handling".

This is probably one of the most difficult aspects of managing a mail order company. The rates and rules are so diverse, and so complicated, that you have to consider many factors when deciding how best to ship a package.

The commercials on TV make it look so easy. "If it fits, it ships" says the friendly mail carrier. "Logistics" says the man in the brown truck. But when you get down to reality, it's not that simple.

Every order we ship is looked at on a case by case basis to offer you the best shipping option. Since we ship all over the world, we have to keep track of rates for dozens of countries.

US-bound small light weigh orders can ship USPS First Class mail. When orders start getting a little bigger (12 ounces or over), we need to ship by "Priority Mail" or "Parcel Post". Often, Priority Mail is actually less expensive than Parcel Post. Go figure!! Logic would tell you otherwise, but not so. Then we have several sizes of "Flat Rate" options. The friendly TV mailman tells you there are 4 sizes (flat rate envelope and small, medium or large flat rate box). Did you know that is not entirely true? As a commercial USPS account, we also have access to 2 other sizes of boxes. We have the Regional A box and the Regional B box. The A box is the same rate as a 2 pound package… and the B is the rate of a 4 pound package. BUT (and here is the confusing part), these 2 boxes are "region based". In other words, if you live close to us, using the "B" box is a better buy than the normal "medium flat rate box"…. but if you live across the country, the "B" box is quite a bit more expensive. (for the record, Regional A & B boxes are not available at your local post office. They are only available for commercial account holders who purchase postage online)


So for each order, we have to determine what is the BEST size box for your order. We take into account which box your merchandise fits in and where it is going. We price each option to find the best deal.

UPS is another matter all together. Their rates are not the best when it comes to the standard crafting supply order. Most of the time, the rates are higher than the post office. The main reason is because they add a $2 to $4 surcharge for home delivery (depending on how far you are from a major sorting center), then on top of that, there is the surprise of the "fuel surcharge" which is added to our bill at the end of the week…. but does not show on the screen when we check rates. So we might "think" the UPS rate is 30 cents less, when in reality we will be billed a 5% fuel surcharge later on. Then, there is also the $20 fee they charge us each week for having the UPS guy drive by to see if we have any packages. $20 a week!!!! Yikes!!! I think it's time to cancel that service.

International orders face a different sort of challenge. The first rule of international shipping is "under 4 pounds = First Class (which used to be called airmail)" and "over 4 pounds = Priority Mail". A few years ago, the USPS did away with the "surface mail" option which took 2-3 months from point to point, but was a fantastic bargain for heavy orders. We still get request from time to time for a "surface mail" shipping quote…. sorry, not possible.

I won't bore you with all the details of international shipping. Suffice it to say there are 18 "zones" depending on the country we ship to. Each "zone" has different rates as well as size and weight restrictions.

So where does the "handling" part of S&H come into effect? Well, that's where we have to account for use of packing materials (bubble wrap, bubble envelopes, packing peanuts, tape, labels, etc.) as well as gas for the trips to the post office. We try to keep this to a minimum by re-using boxes as much as possible. The USPS does a fine job of telling consumers in their TV ads that they offer a pick up service and will pick up all your packages for you. Another half-truth. They will pick up the packages the NEXT day (adding 1 more day to the delivery time), and our route driver's truck is "too small" for all our daily packages…. so they won't pick up for us. Nice!

Lastly, there are the ever changing (increasing) rates. Just yesterday, another USPS rate increase went into effect. The sneaky devils did not raise the cost of a postage stamp…. so the news media didn't even bother to announce the rate changes. Most people aren't aware that Priority Mail rates went up in January and Parcel (first class) rates went up yesterday…. oh and international rates went up as well. We here at Frantic Stamper have decided NOT to adjust our shipping rates to account for these increases this year. Our shipping/handling rates for 2011 will remain unchanged and we will absorb all rate increases. (Next year, we will most likely have to raise them if the increase happen again)

Hugs,
-Fran
www.franticstamper.com
541-826-2500

Tuesday, April 19, 2011

Tuesday Tips: Glitter


Today the team would like to present some tips about using glitter, a fun and inexpensive way to add a lot of shimmer and shine to your project.

Tip #1
There are a number of "grades" of glitter including coarse, fine, ultra fine and micro fine. In addition there are opaque, transluscent and even glow in the dark. Choose the right glitter for your project.

Tip #2
When using glitter it is best to work on something that does not produce or keep static. Examples are plastic. Martha Stewart has a great glitter tray that is made of cardboard. It doesnt get static-y when glittering and its easy to wipe out and use again.

Tip #3
The right glue helps with making sure your project comes out wonderfully. Choose a glue that thicker (not a paste) and has a little water in it for spreadability. Tacky Glue, Best Glue Ever and Martha Stewart glitter glue are good choices. They all dry clear.

Tip #4
Think about your background when glittering. This can change the look of your project: black vs white or colored cardstock can make the glitter brighter or darker looking (the cardstock shows through)

Tip #5
You can use a damp paper towel to easily wipe up stray glitter particles. The glitter will get caught in the weave of the towel.

Tip #6
Consider using transluscent or transparent glitter. Uses the same color as the cardstock for a unique and monochromatic look. Also, if using patterned paper, the pattern will show through.

Tip #7
An alternative to messy glitter is glitter glue (such as Stickles by Ranger). They work great for adding small highlights without fussing with glitter.

Tip #8
Use transparent glitters on acetate to make stained glass cards.

Tip #9
Before adding glitter to your project wipe over your paper with a dryer sheet or an anti-static bag like the Puff Static Away bag by Suze Wienberg. This will help you to shake off excess glitter without it sticking.


And speaking of glitter.... using glitter would be a GREAT way to decorate those Easter Eggs for our Easter Egg contest. The contest closes tomorrow night, so get those entries in!! Remember, all you need to do is send us a photograph of your egg to franticStamperContest@gmail.com. A prize package awaits the lucky winner!

See you tomorrow with news from the Warehouse!

Sunday, April 17, 2011

Sketch Sunday: Card #3


Today's sketch is for a square card, but could probably also be used for a scrapbook page, or perhaps as a square element ON a scrapbook page! Sketches aren't cast in concrete; they are intended to be used as a starting point. For me, they are a way to simplify the task of finding balance and harmony in a creation. Sometimes when I am creating a card from scratch, I get to what I think will be the end and I find it is just "missing something." That never seems to happen when I start from a sketch. The balance is always right, the layout always works... as long as I have images or papers that enable me to get the relative sizes of the elements right.

How about you? Do you find using a sketch helps you to get to a finished product more easily? How do you use sketches (Do you use sketches??)? Please leave a comment and let us know your thoughts on this or any other sketch.

And as always, if you decide to use this week's sketch, the design team would love it if you would share! Upload a photo somewhere (Flickr, Picasa, Photobucket, etc.) and then share a link with us in the comments. To share all you need to do is add the following codes to your comment, and then replace the word "link" with the actual link to your photo:

      <a href="link">My Card</a>

Your comment will then contain the words "My Card" which will link to your photo. The design team really looks forward to seeing your work!

Smiles,
Kathy

Saturday, April 16, 2011

Something Special Saturday: Contest Reminder


I wanted to remind you that we are having an Easter Egg decorating contest.

Decorate a paper, plastic, wooden, or real egg of your choice, take a photo of it, and send the photo to the design team for us to vote on. All entries must be photographed in a high quality photograph, one egg per photo, and emailed to franticStamperContest@gmail.com NO LATER than midnight PDT, April 20, 2011. Please try to keep the size of the photo file under a megabyte. Enter as many times as you wish, but each egg entered must be your own creation, must use products available at FranticStamper.com, and must NOT use any product available only through home party companies (for example, Stampin' Up.) The design team will chose a winner from the eligible entries, and the winner will be announced on Saturday April 23, 2011. The decision of the design team is final.

The winner will be sent a prize package by FranticStamper, so get your creativity going and start decorating your eggs!

For inspiration, I would like to share one of my egg creations. This egg started off as a pale yellow plastic egg, about 2 1/2" tall, and 1 3/4" in diameter at its widest point, and was inspired by some Fabergé eggs...


I colored the outside of the egg with lapis blue alcohol ink, then used a Martha Stewart edger punch to punch the metal lattice out of aluminum flashing tape. I added little strips (1/8" in width) of that tape as well, and then added rhinestones. I colored the inside of the egg with a gray alcohol ink pen.

I made the platform using a 1 3/4" circle punch, first with a circle of card-stock held in place by a strip of flashing tape around its edge, then with a circle of flashing tape on top. Lastly, I made the metal rose out of a ribbon of flashing tape, using a quilling tool and punched out some flashing tape leaves and embossed them.

The silver holder was a plastic soda bottle cap, a medicine bottle cap, and a piece of wood, all covered with the flashing tape. I added a small ornament hook on the front, and some bling.

I sure had fun making this!! I hope you will join me in the fun and enter the contest. I'd love to see what you have made!

And lastly, I have another bit of inspiration for you. Here is a video from Hot Off The Press, on using Dazzles™ to decorate Easter eggs. Make Dazzling Easter eggs! Use the Dazzles™ right on your eggs or use them as a mask for dying. Watch the video to see how Paulette decorated her Easter eggs and even made an Easter basket!


Kathy Berger
FranticStamper Design Team Facilitator

Friday, April 15, 2011

Tenerifa album (Design Team Project)

by Polinka


Tenerifa album

Last summer, we went to Teneriffa for a week, and loved it so much, that I just had to make a whole album with my bunch of pictures... Here are a few of the inner pages of this album.


I used the Stella Rose collection from My Mind's Eye with simple cardstocks, to give the whole album an unity... I really like this kind of binder albums from Bo Bunny, because they're practical and easy to use, you can add as many pages as you want, and decorate it your own way... 


Have a lovely day,