Wednesday, February 25, 2015

A Merry Poinsettia Christmas (Ann Greenspan)


Once again it is the 25th of the month. In the spirit of trying to get our holiday cards made ahead of the season, we are making and posting cards every month on the 25th. We hope you will join us in making a card today. Here are a couple of cards from team-member Ann Greenspan.


A Merry Poinsettia Christmas
by Ann Greenspan


I think poinsettias are so beautiful, especially in a church all lined up on the altar.  I had this poinsettia paper for a long time and never knew what to do with it until I saw the Mix 'N Match Merry Christmas die (FRA-DIE-09068) from Frantic Stamper.  When I cut out the die in red shimmer paper and held it up to the poinsettia paper, it blended in with the background paper, so I cut a tag out of a more solid colored paper and put the words partially on the tag.

When the first card was done, I sat back and looked at it for a minute.  I wanted the words Merry Christmas to stand out even more so I made another card using the same background paper but this time using a lighter colored tag behind the words.  I think the words stand out a lot more on the second card.


The poinsettia is a pre-made embellishment but Frantic Stamper makes a lovely poinsettia die (FRA-DIE-09283) that I could have used, but I just wanted to use up my embellishments this year.


*** Materials for this project available at www.franticstamper.com.
 
FRA-Die-09068

Saturday, February 21, 2015

With Sympathy (Jen Carter)


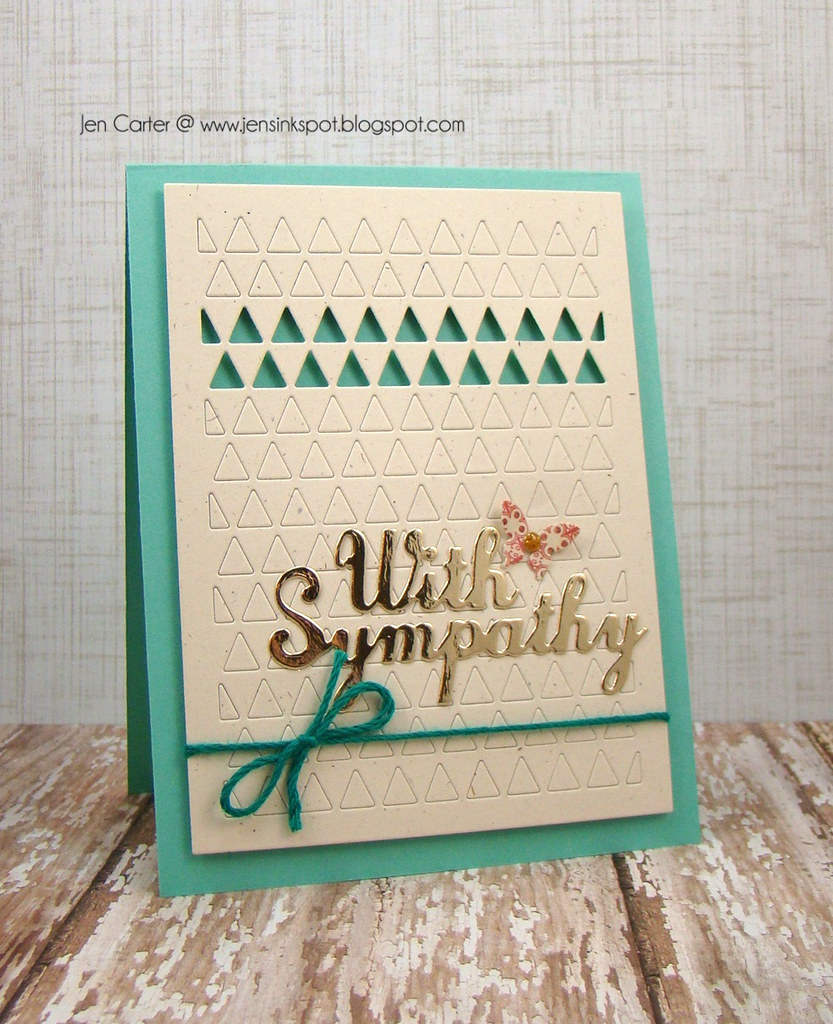
Jen Carter With Sympathy Triangles Frantic Stamper Blue

With Sympathy
by Jen Carter


Sympathy cards are never fun to make.  Finding something appropriate can be very difficult. And because they aren't fun to make, I don't usually have any on hand when I need them.  With that in mind, I made two different versions of the same card using the Frantic Stamper Small With Sympathy word die.

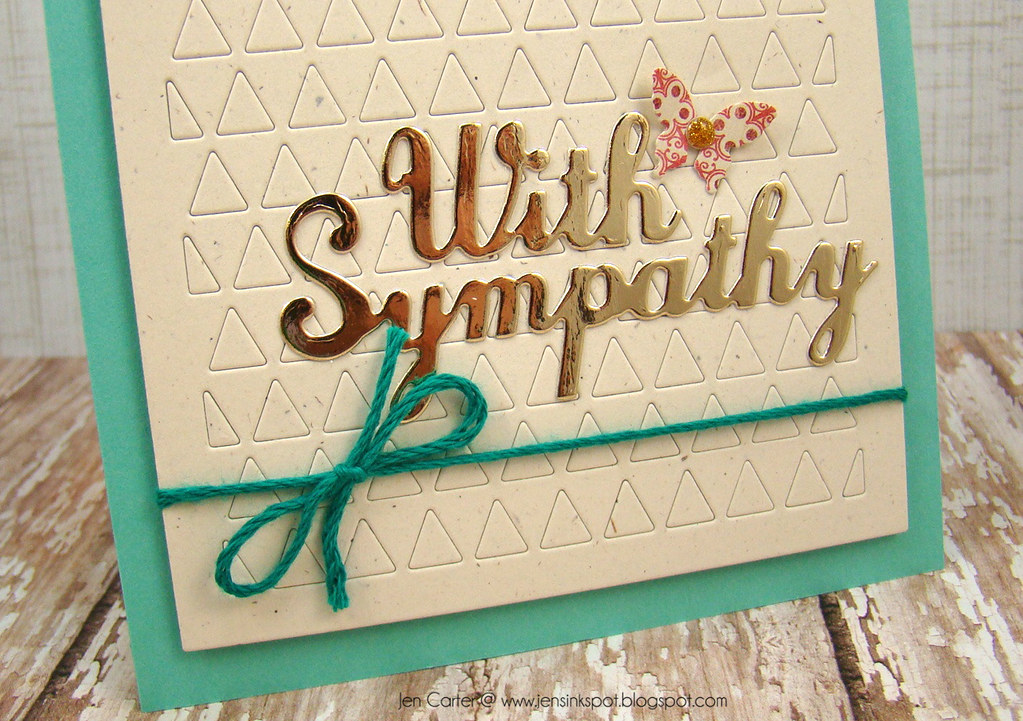
Jen Carter With Sympathy Triangles Frantic Stamper Blue Closeup Top

I created the background with theTriangle Card Panel die. I really like how versatile this die is! I chose to leave most of the triangles in place (I taped them on the back side of the cardstock so that they would all stay in), and only popped out two rows.   You can see here that when I was finished with the card front, I popped the triangle panel up with dimensionals.

Jen Carter With Sympathy Triangles Frantic Stamper Blue Closeup Bottom

I die cut the small With Sympathy with gold cardstock. Then, I added a small butterfly from the Petite Butterflies die set and added a gold glittered enamel dot to the center.  I tied a piece of twine around the bottom of the card front to finish it off.

Jen Carter With Sympathy Triangles Frantic Stamper Pink

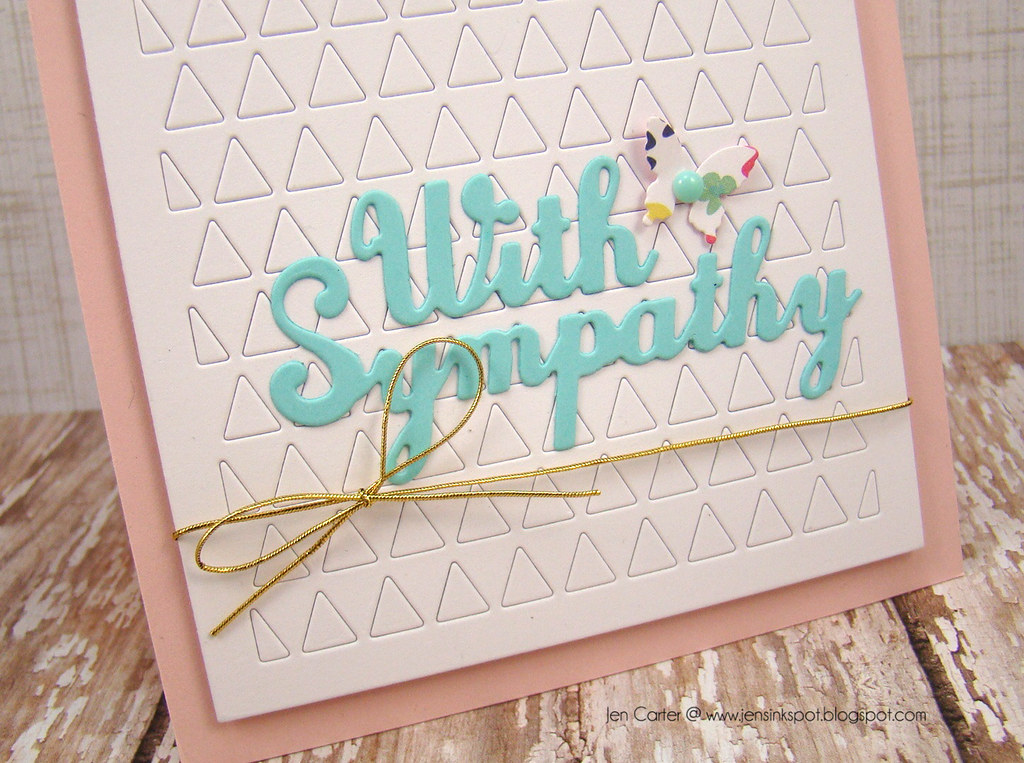
This card is almost identical to the first, I just changed up the colors for a more feminine look.

Jen Carter With Sympathy Triangles Frantic Stamper Pink Closeup Bottom

I still incorporated the trendy gold into my card, but this time as an accent bow.

I hope that this gave you some ideas on how to work with those very difficult Sympathy cards!

Thanks for stopping by today!


*** Materials for this project available at www.franticstamper.com.
 
FRA-Die-09358
 
FRA-Die-09267

And, if you would like a more elegant "With Sympathy" die, this is also available:
 
FRA-Die-09359

Thursday, February 19, 2015

Wavy Beach (Kathy Berger)


Wavy Beach
by Kathy Berger


When I designed the Stars and Stripes Photo Card I saw many things in its curved lines. I saw a flag waving in the breeze, snow-covered hills, sand dunes in the desert, and ocean waves. I decided to create some waves for you today, in a tropical setting. Get your piƱa coladas ready and join me by some blue tropical waters.

To make this card I cut a base for the wave piece from a scrap of paper from my recycle bin using the Dotted Journal Card. This journal card is the exact same shape as all of the photo cards so it works perfectly as a base to build upon (I could also have used the Stitched Photo Cards, FRA-Die-09149, which is also the same size and shape).

I cut the Stars and Stripes card from white card-stock three times, and from several coordinating shades of blue (I used paint chips from the same color family for the waves, but the sky was colored with Copics), reserving the cutouts. I layered two of the white cards to the base, and then filled in the cutout sections with a single layer of the saved pieces, gluing them into place.

I cut the Memory Box exclusive for Frantic Stamper sailboats out of white card-stock and adhered them to the piece, and then I glued the final Stars and Stripes card on top.


I added the panel to a plain white card with its corners rounded, and then added the Mix 'n Match Palm Tree on top, supported by foam tape on the edges.

I hope you have enjoyed my little escape to the ocean, my favorite place to be!


Wednesday, February 18, 2015

"Wonderful You" (Rozy Smith)


"Wonderful You"
by Rozy


Hello everyone! Today's card was constructed using Tattered Lace Panoramic Dies. There are several layers involved and was quite the challenge. This is my first attempt at a project.

The die set comes with specific instructions for cutting and joining together. There are several steps that involve the use of embossing folders and cutting frames with the die set but the results are well worth the effort.

For embellishments I useD skeleton leaves, mulberry flowers, Vintage Bling & cutouts, ribbon, Chalk markers, and the Frantic Stamper Word Dies, Wonderful & You.

I also used the Rain Forest Birds Card Panel using pink vellum and then cutting out the birds for a very soft floral frame.

Hope you all enjoy the end result!


*** Materials for this project available at www.franticstamper.com.

Tuesday, February 17, 2015

Jukebox Birthday (Rachelle Green)


Jukebox Birthday
by Rachelle Green


Is it just me or does the front of this card remind you of the front of an old style jukebox? It happened purely by accident. I started with a 4 1/4 x 5 1/2 base. After choosing background papers from my stash, I colored the image with Copic markers. I used the new Elementals #8 Arched Labels die to cut the image. I also used the die as a stencil to ink around the die with Tim Holtz distress ink. The corner dies from the same set added more dimension. After I added the bling and sentiment, the entire thing reminded me of the a jukebox. I can see all kinds of possibilities with this set. Stay tuned for more!


*** Materials for this project available at www.franticstamper.com.
 
FRA-Die-09374


Monday, February 16, 2015

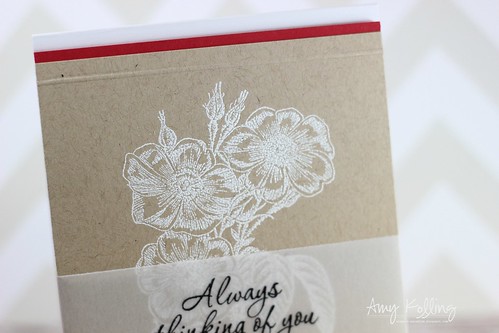
Thinking of you (Amy Kolling--Guest Designer)


Thinking of You

Thinking of you
by Amy Kolling--Guest Designer


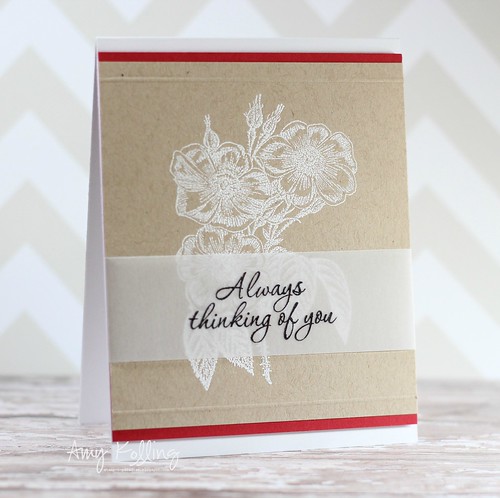
I don't know about you but "condolences" or "thinking of you" cards are ALWAYS hard for me to create. My solution? Insert floral stamps as a backdrop with the sentiment in the forefront!

Here I've stamped the Redoute Rose #3 in Versamark ink and white heat embossed it onto kraft cardstock.  Just look at all the detail that really stands out!  A sentiment from Good Friends by Hero Arts was stamped onto a wide strip of vellum.  For just a bit of color, I' added in a panel of red that peeks out both above and below the floral panel.

Thinking of You2


*** Materials for this project available at www.franticstamper.com.
 
FRA-Die-09?


Monday, February 09, 2015

Southwest Note Card (Anne Harada, Guest Designer)


Southwest Note Card
by Anne Harada, Guest Designer


Hi Everyone!

I was over the moon when I heard Kathy was designing Southwest themed dies to add to the FS Precision Dies line!  The card I have for you today uses both the Kokopelli character and Zia symbol from the FRA-DIE-09409 "Kokopelli and Zia (set of two)" set.

I have always loved this little Kokopelli guy, and I am thrilled to now have the image available as a die!


I started my card by creating a background with Distress Inks.  I randomly tapped several colors of the minis onto an acrylic block, then generously misted it with water so the colors starting blending together.


Next, I turned the block onto my white card panel.


I let it sit on there for just a few seconds so the colors would soak a bit into the cardstock.  After removing the block, I heat set the ink (mostly because I was too impatient to wait for it to dry naturally LOL!).


When the ink dries, it tends to soften the colors some which is typically a good thing when you're going for that watercolor look!

Next, I added texture with a Cuttlebug Embossing Folder, then stamped my sentiment in Versafine Onyx Black ink onto the lower left corner.


I mounted the background panel onto a black cardstock layer and then die cut the Kokopelli and Zia and adhered them to the panel.  Done!

DO try out some of these new and unique dies from the Southwest series!  I love playing with them and will have more samples to share soon!  TFL!!


*** Materials for this project available at www.franticstamper.com.
 
FRA-Die-09409


Sunday, February 08, 2015

I got this die. Now what? (Kathy Berger)


I got this die. Now what?
by Kathy Berger


Frantic Stamper recently released this very unusual looking die set meant for making pop-up cards. Since this die is pretty unusual, I thought I would try to explain a bit about each of the components of the die. Before I do, though, I want to apologize in advance for the quality of the photos. It is a pretty gray day here, with more gray days forecast, so it is just a lot tougher to get a good shot.

Today I will only be showing you how to use the main pop-up mechanism die, which is the largest one in the set, shown on the left of the above photo. I will try to get to the rest of them in soon, but my schedule is pretty tight, with all the die design work. I will tell you a bit about the other pieces, though.

First, though, let's deal with that main mechanism die. The thin pieces that extend out from the sides of this die have two purposes. Firstly, they will help you to place the die on you card-stock or paper, and secondly, they will score a fold line where they are placed. To make the most basic kind of pop-up card, you would position these extensions along the line where the card would be folded. I find it easiest to make small score marks at the edges of my card at the center line using my score board, draw a line between the score lines, and line up my extensions on that line.


Run the positioned die through the die-cutting machine and you will have a two little slits in your paper, and a few score lines. I chose to run mine through the die cut machine three times in total, two in one direction, one in the other. This works perfectly fine as long as those extensions on the die are on that same center line.


Reinforce the scores with a ruler and a stylus or on a score board, and extend them to the edge of the card if necessary. Valley fold the main score line and the folds at the top and bottom of the two slits. Mountain fold the remaining score. You will have made a narrow stair pop-up.

What can you do with those stairs? That is up to your imagination!

Glue something to the front of each one, individually, or do like I did with my two lower stairs and glue something between two of them.


I think you get the idea. Here are a couple of other views to show the mechanisms a little better.


But what about all these other pieces? What are they for? Let's get the simpler ones to explain out of the way first.

The half-circle dies can be used in a few different ways. They can be used to cut a nice semi-circular slit for closing a fold-over flap, or to cut out a nice finger gap for a pocket. And they can be used to support or reinforce a popped-up piece of card-stock. Cut so that the diameter of the semi-circle is at the same level as the popped-up piece, the half-circle can be folded back and glued to the piece, just adding stability for a bigger pop-up.

The long rounded rectangle can be used to stamp a tiny phrase onto. It can also be used as a reinforcement for a pull-tab for all sorts of mechanical card mechanisms. And it can be used to create a slot in a card for some mechanical card mechanisms (like a push-me-pull-you card).

That leaves us with the other three rectangular mechanisms. These are intended to work with the main pop-up mechanism, as supports for taller pieces. If, for example, you want to have a tall vase filled with flowers pop up, if you simply attach the vase to the main pop-up, the flowers might flop a lot when the card is opened since they would only be attached to the vase, and not to the card.

The longer of the three rectangles is meant to be the support at the top of that vase of flowers. It will cut a support mechanism that is the same depth as the main die. Cut it, valley fold the score on the part still attached, mountain fold the other, and you have a perfect support for those flowers.

Let us suppose that you want to create a pop-up jar of flowers. You would first cut the main pop-up, attach the jar to that, then glue some flowers to the inside of the top of the jar. You would reinforce the flowers with the longer rectangular die. And you would have a lovely jar of flowers.

But even though it pops off the page, it still somehow lacks dimension. What if you used some pop-dots to attach some more flowers BEHIND ones you already have. You could use the other dies to reinforce those! These dies cut supports that don't pop-out as far as the longer one, so they can be used to help hold those flowers that are to the rear of the main.

Think about the depth you could achieve in that vase... I think when I have time, that is exactly what I will do! And when I do, I will be sure to share exactly how I used them.

But for now, I hope that I have answered some of your questions!

There are so many ways to use these dies, so many possibilities. Go ahead and give this set a try. I think you will really love all it can do for you, from the simplest pop-ups to something much more involved.

Smiles,
Kathy


*** Materials for this project available at www.franticstamper.com.
 
FRA-Die-09414
 
FRA-Die-09371
 
FRA-Die-09384
 
FRA-Die-09383