Wednesday, September 29, 2010

Mini Pocket Tag Card Set

by Anne Harada


Mini Pocket Tag Card Set

Materials

Instructions

  • For this project, I’ve made little tags with the wonderful Inkadinkadoo set called “Boxed Wishes”.
    I used the tags to make a set of mini pocket cards.


  • I chose three of the six images from the "Boxed Wishes" set and colored them with Copic markers.


  • 
 I cut them out and added a circular clip and some hemp twine to each one to make the tags.


  • 
 Next I created the card bases by folding a 4-1/4" x 5-1/4" Kraft piece of cardstock. 
    I trimmed a Bahamas panel to 2-1/4" x 4" for each card and adhered one to each of the card bases. 
    Using a gold Sharpie pen, I added dotting around the border.


  • 
 To make the outside-pockets of the card, I punched a Martha Stewart's Trellis Border out of Pineapple CS. 
    I trimmed them to 2-1/4” wide, than applied glue only to the bottom and very edges of the sides to create the pocket so the tags could be slipped inside. 
    I wrapped each panel with a light blue satin ribbon and tied a knot around each ribbon to make a “bow”.
    I punched three Strawberry Splash CS flowers with a Martha Stewart Cosmos flower punch.
    I used my button as a template to pierce my holes into the center of the flowers.


  • I threaded hemp twine through the top of the trellis and then added on the flower and then the button, then tied the knot on top.


  • Finally, I inserted my tags into my cards!


Monday, September 27, 2010

Haunted House!

by Lis Whiting


Haunted House!

I couldn’t resist making this Halloween Card with the Martha Stewart Punches! I really love the detail that has been put into these quality punches. This is a really fun card to try. I hope that this design gives you ideas to try other designs for Halloween cards!

Materials

  • Paper and Cardstock
    • Bazzill Basics Monochromatic 5-color packs
    • Bazzil Bling
      • String of Pearls Bling, 2 pieces, each 2"x2"     ( BAZ-BL-801   $0.69)
      • Blank Check Bling, 8 1/2"x11"     ( BAZ-BL-802   $0.69)
      • Handsome Bling, 5 1/2" x 8 1/2"     ( BAZ-BL-708   $0.69)
    • American Craft Cardstock
  • Inks and Embossing Powders
  • Embellishments
    • Ranger Stickles Distress Glitter Glue, Tim Holtz Distress, Fired Brick     ( Ran-STTH-fired   $2.59)
  • Tools

Instructions

  • Fold your Bazzill Bling Handsome (dark blue) in half to form your base card.
    The card will open from the bottom.

  • Take your green cardstock and tear it so that it forms a hill to the right.(refer to card photo)
    Edge the green with Black Soot ink (I used direct to paper technique.)
    Glue it down on the card, making sure that the green goes to the bottom edge of the card base.

  • Take your brown Bazzill and tear a smaller hill, hill is on the left this time.
    Edge this with the Black Soot also but lightly.
    Don’t glue this yet.

  • Using the Graveyard border, punch out your border with Blank Check Bling (don’t you just love these names?)
    Cut the border so that you have about 1/4” solid cardstock under the border.
    Cut the border up into smaller pieces (see photo).

  • Put double stick tape on the FRONT of the pieces.

  • Take your brown torn Bazzill and place one of the gravestone pieces on it to position it.
    Make a small mark with a craft blade to the left and to the right of the piece directly onto the brown cardstock.
    Make a cut in the brown cardstock from one mark to the other.
    Now, slip the bottom of the gravestone piece through the cut so that only the gravestones are showing.
    Press firmly to attach on the back side using the double stick tape you put on.


  • Do this for the other gravestone border pieces.
    NOTE: I didn’t use the entire border; I only used a few pieces.

  • I saved the crow from the border for the house.
    I cut it off the border and added it to the roof.

  • Glue your brown cardstock with the headstones in place to your card.

  • Punch out the RIP headstone. Since this is Bling cardstock there is a coating, so we need to use StazOn Black ink.
    Use direct to paper technique to highlight the embossed RIP letters and the edges of the tombstone.
    Let dry.

  • Cut a piece of green cardstock a little longer than the RIP headstone and about one inch high.
    Fringe the long edge of the green.
    This will become overgrown grass.

  • Hold the completed green fringe up to your headstone and trim the middle a bit so that you can see the RIP letters.

  • Mash and mangle the fringe.

  • Use mounting tape to adhere your headstone to your card (lower left).

  • Use glue dots or double stick tape to adhere the fringe over the RIP headstone.

  • Punch out an 11” length of Iron fence using black cardstock.
    Put the punched border up to your card (its going on the bottom), measure from edge to edge of the card, and cut off the excess.
    Add glue dots to the back of the fence and adhere to your card.

  • Take a toothpick or tweezers and get the grass to stick through the fence.
    Design Ideas:
    • You can bend the tops of the fence to make it look older.
    • You can emboss with black distress embossing powder to give it a rough surface.

  • Take the leftover fence and cut the bats out (3 of them).
    You want to leave a small tab at the bottom and top of the wings.
    This will be the head and tail of the bat.

  • Glue the bats to the card over the graveyard.

  • Punch out your haunted house.
    Place the punched out house against a yellow square of cardstock.
    Cut the yellow so that it is the backing behind the house.
    This will be the color of the windows.
    Glue the yellow to the back of the house.

  • Add mounting tape to the house and adhere to card.

  • Attach your moon with double stick tape behind the right of the house.

  • Add the raven (crow) to the top right spire of the house with glue.


  • Take a paper towel and dab it into black soot ink.

  • Wipe gently onto the green cardstock from the door of the house toward the graveyard.
    This will be the “path”.

  • Add some stickles fired brick glitter glue to the open door of the house.
    Let dry.
Have a Happy Halloween!

Sunday, September 26, 2010

Life Unscripted

by Lis Whiting


Life Unscripted Card

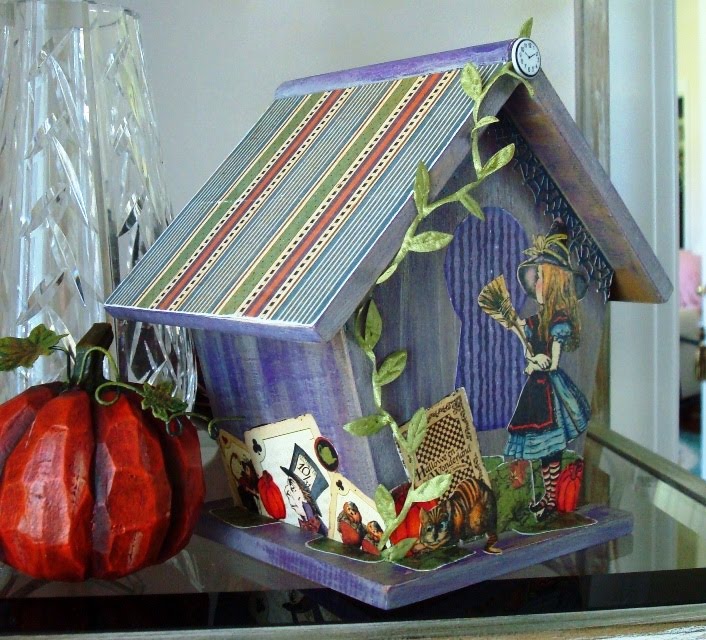
This is a fun card that I made. I do love the Alice in Wonderland papers from Graphic 45. I love the old drawings and the colors really add that feeling of Halloween. But I wanted to do a card that wasn’t quite so Halloweeny (is that a word?). So, here is my card. I think Alice is a great addition to a card with a title of Life unscripted!

Materials

  • Paper and Cardstock
    • Fancy Pants Papers, My Family Line
      • Sister, 4 1/4” x 10”     ( FP-P-141   $0.89)
      • Father, 4 1/4” x 10”     ( FP-P-142   $0.89)
      • Cards, choose one from page for tag     ( FP-P-133   $0.89)
    • Graphic 45, Hallowe'en In WL, Jabberwocky     ( G45-P-0245   $0.99)
    • Manila Cardstock, 8 1/2” x 10”
  • Distress Inks
  • Embellishments
  • Tools

Instructions

  • Fold your manila cardstock in half lengthwise to create your card base.
    Set aside.

  • Both pieces of patterned card will be glued on top of the card base.
    The left side will be folder over to the back and glued there.
    In order to do this easily, you will need to emboss a fold line.
    • Take both pieces of patterned cardstock, an embossing tool and your fiskars craft mat.

    • Emboss on the reverse side so that any markings you make won’t show.
      Mark 1/2 “on what will be the left side of your paper.

    • Using your embossing tool emboss a line from top to bottom on both sheets.
      This will be your fold line.

    • Crease and fold the paper.
      (That’s it for now. Don’t worry if the fold opens up. We will be gluing later on.)
  • Take your darker paper and punch a border on the right side.


  • Attach to your base card with glue.


  • Take the lighter colored paper and using either an xacto blade or cutting wheel, cut a wavy line vertically through this one paper.
    (Do not cut the darker colored paper.)


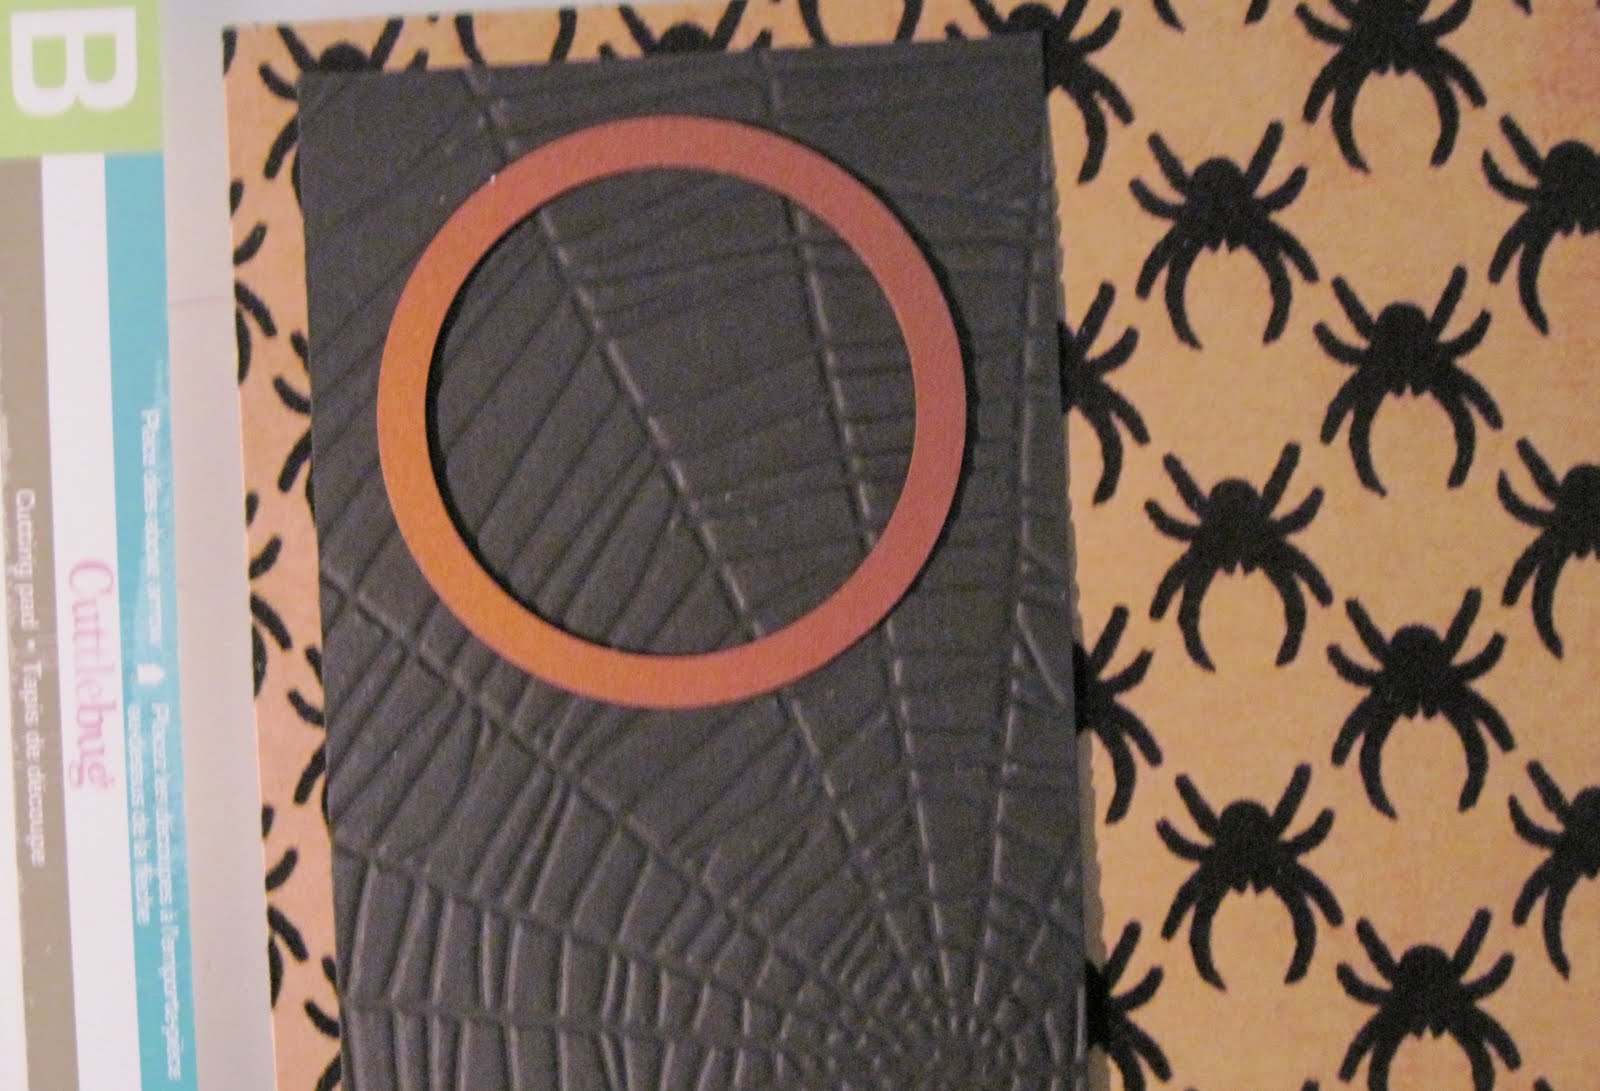
  • Take your circle punch and punch 4 holes (1 1.4”) in the paper. Remember to leave space at the bottom for your tag.

  • Take a gold pen and edge each circle in gold.

  • Take each Alice image and place behind the circle.


  • Trim away any excess that shows.

  • Glue image on the back of the paper so that the image shows through in the punched out circle.


  • Using your Suze craft mat and an ink blending tool, color the edges of the card and the paper with the punched holes.


  • Attach the paper with punched holes to your card with glue.

  • Take your Cards paper and cut out one of the sayings.

  • Bend the upper right corner over.

  • Punch a small hole and add a red glitter brad.


  • Blend weathered wood around all edges of the tag.

  • Blend faded jeans on the corners.

  • Add mounting tape to the back of your tag saying and mount on the bottom of your card.

  • Take some black ribbon, make a bow and attach with double stick tape to the lower part of your card – on top of the tag.


  • Only adhere the left side to the card.

  • Trim any excess on the LEFT ONLY.

  • Take a thin piece of double stick tape (or glue dots) and place on the right side where you want to make your ribbon folds.

  • After you lay down your tape (or glue dots), begin to fold the ribbon. Each fold ends touching the tape which will keep it from unraveling.


  • Trim the end of your ribbon.
This is a good pattern to use for Thanksgiving and Christmas. Just imagine all the different pictures you can put behind those circles! You can even make a scrapbook card with your kids faces to send to grandmother!

Saturday, September 25, 2010

Time for Tea

by Erika Taylor


Time for Tea

A Cup of Tea Hallowe’en style

I absolutely love the Haunted collection from My Minds Eye. The flocking just added that perfect touch , when making a Halloween card.

Materials

Instructions

  • Cut black cardstock 5 ½” x 8 ½”. Score with Scor-Pal at 4 ¼”.
    Set aside

  • Cut 4 1/8” x 5 3/8” striped patterned paper.
    Distress edges.

  • Cut 3 ½” x 4 ¾” purple cardstock and 3 3/8” x 4 5/8” patterned paper.
    Layer using double sided tape.
    Adhere to striped patterned paper.

  • Cut 6” piece of ribbon.
    Adhere to back side of paper using double sided tape.

  • Cut out 2 ¼” x 3” green cardstock and layer with 2 1/8” x 3 7/8” patterned paper.
    Adhere to card front.

  • Cut out Alice and tea set image from patterned paper.
    Adhere Alice image with double sided tape, to card front.
    Adhere tea set with foam dots to card front.

  • Cut out Beware sentiment from patterned paper.
    Adhere to card front.

  • Finish card with alpha sticker sentiment and rhinestones.


Adding different layers of dimension on a project can really have impact. Thanks so much for stopping by today and sharing a little bit of the My Minds Eye Haunted Collection.

Toodles
Erika

Thursday, September 23, 2010

October 31st

by Erika Taylor


October 31st

Oh Alice, Do you have the time?

One of my favorite childhood stories was Alice in Wonderland. Down the rabbit hole I’d go as my mom read the story to me. So when Graphic 45 came out with the beautiful Hallowe’en in Wonderland collection, I just knew that I’d travel down that rabbit hole again.

Materials

Instructions

  • Cut black cardstock 5 ½” x 8 ½”. Score with Scor-Pal at 4 ¼”.
    Set aside

  • Cut 4 1/8” x 5 3/8” orange cardstock, 4” x 5 ¼” patterned paper.
    Layer using double sided tape.

  • Cut 3 ½” x 3 ¾” black cardstock and 3 3/8” x 3 5/8” patterned paper.
    Layer using double sided tape.
    Cut 3 ¾” x 1 ½” purple cardstock. Punch one edge using border punch.
    Adhere to backside of layered piece.
    Adhere entire piece to card front.

  • Cut 6” piece of ribbon and finish bottom edge using scissors.
    Adhere to backside of card front then wrap around top of card front, adhering along the way.

  • Cut out 2 ¼” x 3 5/8” green cardstock and layer with 2 1/8” x 3 ½” patterned paper.
    Adhere to card front using foam dots.

  • Cut out flourishes from green cardstock using Slice and Think Pink design card.
    Adhere to card front.
    Add rhinestones to flourish.

  • Cut out Alice image and clock image from patterned paper.
    Paint accents onto patterned paper using Smooch paints.
    Once dry, adhere to card front using foam dots.

  • Paint grungeboard numbers using Smooch paint.
    Before dry, sprinkle with glitter.
    Adhere to card front once dry.

  • Adhere entire card front to black card base that you put aside.

  • Finish card with die cut element sentiment.
Thanks so much for stopping by today and sharing some magical Hallowe’en In Wonderland by Graphic 45

Toodles
Erika

Tuesday, September 21, 2010

Eat, Drink, and Be Scary

by Kathy Berger


Eat, Drink, and Be Scary

Materials

Instructions

  • Make The Frankenstein's Monster:

    • Cut a rectangle of green card stock about 1 1/4" x 1 1/2".
      Holding the rectangle in portait orientation, use the Angle corner chompers to trim the bottom corners, forming a tag.
      Sponge black ink around all of the edges.

      Cut a rectangle of black card stock about 1 1/4" x 1/2".
      Cut one edge to form hair for the monster.
      Glue to the base of the monster face.

      Cut a small rectangle of green card stock to serve as a neck.

      Punch the hydrangea out of green card stock.
      Punch three 1/4" circles out of green.
      Punch two 1/4" circles out of white.
      Punch two 1/8" circles out of black.

      Cut one of the petals off the large hydranea for a nose. Cut one of the green 1/4" circles in half to form eyelids.

      Sponge black ink around the edges of each of the pieces.

      Glue a black circle to each of the white circles to make eyes.
      Add a small mark with a white gel pen to each of the black circles.
      Glue a green half-circle to the top of each of the eyes to form eyelids.

      Glue the head onto the neck of the monster.
      Glue each of the small hydrangeas into place on the underside of the neck, forming the neck bolts.
      Glue the nose into place.
      Glue the eyes into place.
      Glue the remaining two green circles to the underside of the head to make ears.

      Draw a crooked smile and a couple of little scar lines, using a black gel pen.

  • Make the vampire:

    • Cut a rectangle of blue cardstock, about 1 1/4" x 1 1/2".
      Cut a rectangle of black paper about 1/2" x 1 1/4".
      Use the heart punch to punch the hairline in the black rectangle.
      Glue the hair to the blue rectangle.
      Corner round all of the corners of the rectangle using the 1/4" side of the rounder chomper.

      Punch two 5/16" red circles.
      Punch two 1/4" white circles.
      Punch two 1/8" black circles.
      Punch four 5/16" blue circles.
      Cut one of the blue circles in half.

      Sponge black ink around the edges of all of the pieces.

      Glue the white circles to the red circles.
      Glue the black circles to the white circles.
      Add a little dot of white gel pen to the black circles.
      Glue the half circles to the eyes to form eyelids.
      Glue the eyes in place.
      Glue a blue circle below the eyes to form a nose.
      Glue the other two blue circles to the underside of the face to form ears.

      Draw a smile using the black gel pen.
      Draw white fangs with the white gel pen.

      Cut a rectangle of black cardstock about 1/2" x 1 1/2".
      Wrap it around the bottom of the face to form a cape.
      Glue it into place.

  • Make the Mommy Mummy:

    • Cut a rectangle of white cardstock, about 1 7/8" x 2 3/4".

      Tear 9 strips of white cardstock about 1/4" wide and about 2 1/4" long.
      Sponge the edges of the strips with black card stock.

      Adhere 8 of the strips to the white cardstock, going off the edges, horizontally crisscrossing the rectangle.

      Trim the strips so they are even with the edges of the rectangle.
      Corner round all 4 corners using the 1/4" side of the rounder corner chompers.

      Sponge black ink lightly all over the mummy's body.

      Punch two 1/2" circles out of green cardstock.
      Punch two 5/16" circles out of black.
      Punch one 5/16" circle out of white.
      Sponge black ink around each of the pieces.

      Adhere the black circles to the green.
      Add white dots to the black circles.
      Adhere the eyes to the mummy.

      Adhere the white circle to the mummy, just below the eyes.

      Tie a knot in the remaining strip, and glue into place.

  • Make the Baby Mummy:

    • Cut a rectangle of white cardstock about 1" x 1 1/2".

      Tear 5 strips of white cardstock, about 1/8" wide, and about 1 1/4" long.
      Sponge black ink along the edges of each strip.

      Adhere all of the strips to the white cardstock, going off the edges, horizontally crisscrossing the rectangle.

      Trim the strips so they are even with the edges of the rectangle.
      Corner round all 4 corners using the 1/4" side of the rounder corner chompers.

      Sponge black ink lightly all over the baby mummy's body.

      Punch two 5/16" circles out of green.
      Punch two 1/4" circles out of white.
      Punch two 1/8" circles out of black.
      Punch one 1/8 circle out of white.

      Ahdere the 1/4" white circles to the green circles.
      Adhere the black circles to the white circles.
      Glue the eyes into place.
      Glue the 1/8" white circle below the eyes to form the nose.

      Glue the baby mummy onto the mommy mummy.

  • Make the grave stone:

    • Cut a piece of craft cardstock to 3"x 2 1/4".
      With the piece in landscape orientation, corner round the top two corners using the 1/2" side of the corner chompers.
      Stamp the spider and web in the top right corner.
      Stamp the saying centered.
      Sponge black ink all over the grave stone.

  • Make the grass and pumpkins:

    • Cut a rectangle of green cardstock 5 1/2" x 1 3/4".
      Cut grass blades as desired.
      Draw lines in in the grass with the fine point side of the green marker.

      Stamp the pumpkins onto orange cardstock.
      Cut them out carefully.
      Adhere to the grass, just above the bottom edge.

  • Make the card:

    • Cut a piece of black cardstock to 5 1/2" x 11".
      Fold in half to form a square card.


  • Assemble the card:

    • Glue the monster and vampire in place first.
      Adhere the gravestone in place, covering the very bottom edges of the monster and vampire.
      Glue the mummies in place.
      Glue the grass in place.

Sunday, September 19, 2010

Halloween in Wonderland

by Kris Hankins


Halloween in Wonderland

Graphic 45 makes some of my absolute favorite paper collections, with the latest one being Hallowe’en In Wonderland. I knew I wanted to use this paper to make something that I could sit on my coffee table along with my mini pumpkin collection this Halloween. I came up with this Hallowe’en In Wonderland birdhouse.

Materials

  • Unfinished Wooden Birdhouse (from local craft store)
  • Paper and Cardstock
  • Stamps
    • Small Pumpkin Stamp of Choice
  • Inks, Paints, and Embossing Powders
  • Embellishments
    • Leaf Trim, Olive     ( MA-BY-16   $0.99/yard)
    • Clock Button or Watch Face (or decorative button of choice)
  • Tools
    • Martha Stewart Spider Web Border/Corner Punch     ( MSC-PU-42-60021   $24.99)
    • Colored Pencils

Instructions

  • Start off by painting your unfinished wooden birdhouse with a base coat of purple paint.
    After that dries paint back over it with a 50/50 wash of brown paint and glaze medium.
    After that dries paint with a 50/50 wash of light gray paint and glaze.
    Make each "wash" layer light, random, and streaky.
    Wipe any excess glaze/paint off.
    Some of the purple base paint should show through, but be muted by the washes.

  • Cut to size and glue Uncommon Nonsense paper to each side of the roof.
    When dry, sand the edges lightly for an aged appearance.

  • Using the back side of the remaining Uncommon Nonsense paper (spider webs), punch border pieces using Martha Stewart’s Spider Web border punch.
    Glue all the way around the birdhouse under its eaves.

  • Cut out the cat and Alice from the Wonderland Classified paper.
    Using color pencils give each of the characters some color and personality.

  • Cut several playing card images from the Jabberwocky paper (both 12x12 and 8x8 sheets).

  • Cut pieces of the green You’re Late paper in size/shape of the small playing cards.

  • Stamp your favorite small pumpkin image several times on orange paper.
    Color/shade the pumpkin images using colored pencils.
    Cut pumpkin images out.

  • Cut a keyhole shape from a sheet of the Mad Hatter paper.
    Make the top of the key hole large enough to cover hole in birdhouse.
    Glue the keyhole on the front of the birdhouse.

Saturday, September 18, 2010

Happy Halloween Card

by Lis Whiting


Happy Halloween Card

Did I mention how much I love the Graphic 45 Halloween papers? Well, I DO! The Alice theme is so much fun and the colors are really vibrant with purples, blues and oranges.

Materials

Instructions

  • Fold your gold pearl card base in half. The card will open from the bottom.

  • Punch out the graveyard border in gold.
    Cut off all but one raven. Save these for later.

  • Punch a round hole in the upper left of the black cardstock piece (see the completed card for positioning).

  • Adhere your black cardstock to your card base.

  • Attach your graveyard strip to you card. Be sure not to have any black cardstock showing at the bottom.


    Isn’t this cool? The gold bling makes the circle shine like the moon.
    You could stop right here and give this scary graveyard to someone. (I wonder what it would look like with a couple of punched out bats?? Hmmm…)

  • To make your tags:
    • Punch out 14 tags from Uncommon Nonsense (blue with spiderweb side) using the tag punch.
      TIP: To make it simpler to handle these divine tiny tags (I love tiny tags), I used some repositionable tacky tape.
              I laid it down on some scrap paper and then put the tags on the tape (half on and half off).


    • Using an ink blender and forest moss distress ink, color the edges of the tags.

    • Dry with heat gun.

    • Add one letter to each tag to spell out Happy Halloween. (I used all lowercase letters and I used black for “happy” and red for “Halloween”.)

    • Using your finger, place a small drop of stickles glitter glue on it and then rub it around each letter on each tag.
      The glitter will want to get stuck in the edges and creases which is just what we want!

    • Dry with heat gun.

    • Remember those ravens? Use a pair of tweezers (because these little guys are small!) and glue one the “h” in Halloween and one each on the two p’s in “happy”.
      Add red gems to the tops of your tags.


  • Glue the last raven on the gravestone facing the other raven.

  • Add mounting tape to the backs of the tags and adhere them to your card. Be sure to leave room for the hand and the cat.


  • To make your cat:

    • Cut out the Cheshire cat from Curiouser (found in lower left of the collage side)

    • Using your ink blender tool, edge the cat in walnut stain.

    • Use the Vintage Collage die to cut out a crown and small pointing hand (set the hand aside for the next step) using the kraft or yellow ochre colored cardstock.

    • Edge the crown in walnut stain.

    • Attach the crown to the head of the cat.


    • Add green gems to the top of the crown.

  • Adhere the cat/crown to your card to the left of the word “happy”.

  • Add a small line of glitter glue to the bottom of the crown. [pic 7]

  • To make your pointing hand:

    • Place your die cut hand on your craft mat.

    • Add a thick layer of weathered wood crackle paint.

    • Let it dry.

    • You can use a heat gun AFTER it starts cracking in order to speed up the process a little.

    • Add walnut stain all over the hand, rub in gently to get the ink into the cracks.

    • Take a damp paper towel and dab off some of the ink to show the colored cracks.


  • Add mounting tape to the back of the hand and mount onto your card.
    The hand should be pointing toward the greeting.

    Note: If any of the cardstock is showing around the edges when you are done, don’t worry, just trim it off.
This is one scary card! Hope that you enjoyed this. See you next time!

Friday, September 17, 2010

Trick or Treat

by Debi Wind


Trick or Treat

Materials

  • Paper and Cardstock
    • Bazzil Singles Cardstock
    • My Mind's Eye, The Spider Web Collection (Substitute your favorite spooky paper)
      • Toil and Trouble
      • Spider's Silk
  • Stamps
  • Inks and Embossing Powders
  • Embellishments
    • Creative Charms Pearl Stickers, Black/White/Pink     ( CC-PRL-asst   $2.59)
  • Tools
  • Adhesives

Instructions

  • Cut Black cardstock to the size of 5 1/2"X8 1/2", score it and fold in half.
    Cut Toil and Trouble pattern paper to the size of 4"X5 1/4" and adhere to card.

  • Cut one pieces of black cardstock to the size of 2 1/4"X5 1/4".
    Cut Lima Sensation to the size of 2 1/8"X5 1/8".
    Cut Spider's Silk pattern paper to the size of 2"X5" .
    Adhere to Spider's Silk paper to Black and Lima Sensation cardstock and adhere to card.

  • Stamp Birds and Trick and Treat with Black ink onto Vanilla cardstock.
    Trim, using the sponge distress the edges with brush corduroy and spice marigold ink, and layer onto Lima Sensation and Black cardstock.

  • Adhere image and quote to card and finish card embellishing with Black Pearls.

Wednesday, September 15, 2010

Suspended Spider

by Kathy Berger


Suspended Spider Card

Materials

  • Paper and Cardstock
  • Stamps
  • Inks and Embossing Powders
  • Embellishments
  • Tools
    • Martha Stewart Crafts Punch, Large Spider     ( MSC-PU-232113   $14.99)
    • Nestabilities, Circles Small     ( Wiz-D-S4116   $24.99)
    • EK Success Punch, 1 1/2" circle     ( EK-PSPNP-09   $13.99)
    • EK Success Punch, 1 3/8" circle     ( EK-PSPNP-10   $13.99)
    • Cuttlebug Embossing Folder, Spider Web     (not currently available)
    • Cuttlebug Die Cutting Machine and plates     ( Pro-cuttlebug   $89.00)
    • ATG-714 Double Sided Adhesive Tape Gun     ( ATG-714   $59.99)
    • Craft knife     ( MM-Knife
  • Adhesives
  • A piece of white dental floss, about 8" long

Instructions

  • Cut the white cardstock to 11" x 5 1/2".
    Score, in landscape orientation, at 5 1/2".
    Fold on score line to form 5 1/2" x 5 1/2" square card.

  • Cut the flocked spiders paper to 5 1/2" x 5 1/2".
    Using the ATG and tape, adhere the flocked paper the card front.
    Set aside.

  • Punch two spiders out of black cardstock.


    Cover each of them with a thin layer of the tacky glue.
    Sprinkle both liberally with black glitter.
    Shake off excess.
    Set aside to dry.

  • Place a 3" x 4 1/4" piece of black cardstock into the spider web embossing folder.
    Run through a die cutting machine per manufacturer's instructions (A plate, 2 B plates).

  • Use a punched out spider to determine the size of the circle die you will use to punch the hole in the front of the card.
    The spider should fit completely inside the die.


  • Open the card.
    Align the embossed black card stock over the front of the card, about a quarter inch from the lower and right edges.
    Place the die, cutting side down, onto the black card stock where the hole is desired.
    Use very low-tack tape to hold the die and cardstock in place, if desired.


    Run through the die cutting machine per manufacturer's instructions (A plate, B plate, C plate).
    The die will not cut through all of the layers of cardstock, but should cut through the black cardstock and leave a partially cut impression in the remaining layers.
    Remove the black card stock layer.
    Re-align the die on the card using the cut impression as a guide.
    Run through the die cutting machine to cut the front of the card.


  • Turn one of the spiders so that the glitter side is down.
    Apply a thin layer of glue to the legs.
    Place a piece of red-liner tape onto the abdomen of the spider.


    Peel back the red liner.
    Affix the piece of dental floss to the red liner tape.


    Place the unglittered side of the second spider on top of the first, carefully aligning the legs.


  • Place small pieces of red-liner tape at the top and bottom of the cut out hole on the front of the card base.
    Affix the dental floss on the red-liner tape so that the spider is centered in the hole.


  • Turn the open card over.
    Place the circular piece cut out of the front back into the hole, taking care to have the spiders in the same orientation as the ones on the front of the card.


    Put adhesive on the circle.
    Close the card.
    This will cause the circle to adhere to the back of the card in the correct position to align with the hole when the card is closed.

  • Adhere the black embossed panel in place on the front of the card, being careful to align the holes.

  • Open the card.
    Cut a 3/4" long slit along the center fold, starting about 1" from the top of the card.
    Pass both of the ribbons through the slit.


    Put the web ribbon on top of the dot ribbon.
    Tie a knot in the both ribbons at the same time.

  • Cut the brad ends off the brad.
    Use a large glue dot to attach the brad over the knot in the ribbon.
    Loop a 5" piece of the web ribbon over the knot and tie, keeping the ends even.

  • Stamp the SPOOKY saying on the kraft paper.
    Punch a 1 3/8" circle out of the kraft paper, centering the saying in the circle.
    Punch a 1 1/2" circle out of black paper.
    Mount the kraft circle onto the black circle, sandwiching the ends of the web ribbon between them to form a hang-tag.