Saturday, November 29, 2014

Gift Decorations with Dies (Jen Carter)


Gift Decorations with Dies
by Jen Carter


I recently had the pleasure to spend a weekend with a bunch of terrific crafty girls.   We were each suppose to bring a gift and to wrap it in cute packaging.  I didn't have the right size of box so I decided to make my own!

I used my Scor-Pal to create the size of box I needed following this basic template and adjusting it to the size I needed to fit the items I placed inside.  I wrapped a colorful patterned paper band around the lid.

Stamping Away Box closeup 1.7

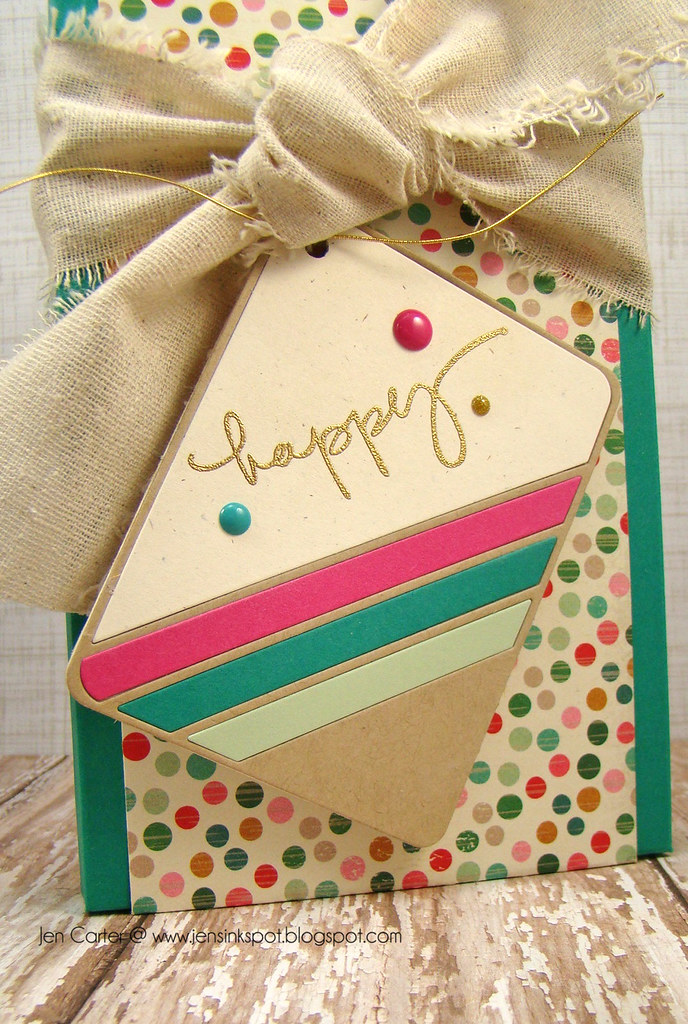
To make the tag I used one of my favorite dies from Frantic Stamper called Diagonal Stripe 3x4 Photo Card die.  To make this tag a little thicker and to more easily attach the various pieces, I first cut the tag with chipboard with a sandwich that didn't allow the die to cut completely through.  I then trimmed around the outside edge with a craft knife.  I picked coordinating cardstock for my frame and stripes and attached them to the base.  The "happy" was heat embossed with gold embossing powder. I added a few enamel dots to finish off the tag.  I punched a hole in the top of the die piece to make it a tag and tied it on with a little bit of gold wire wrapped around the canvas bow.

Stamping Away Inside 1.2

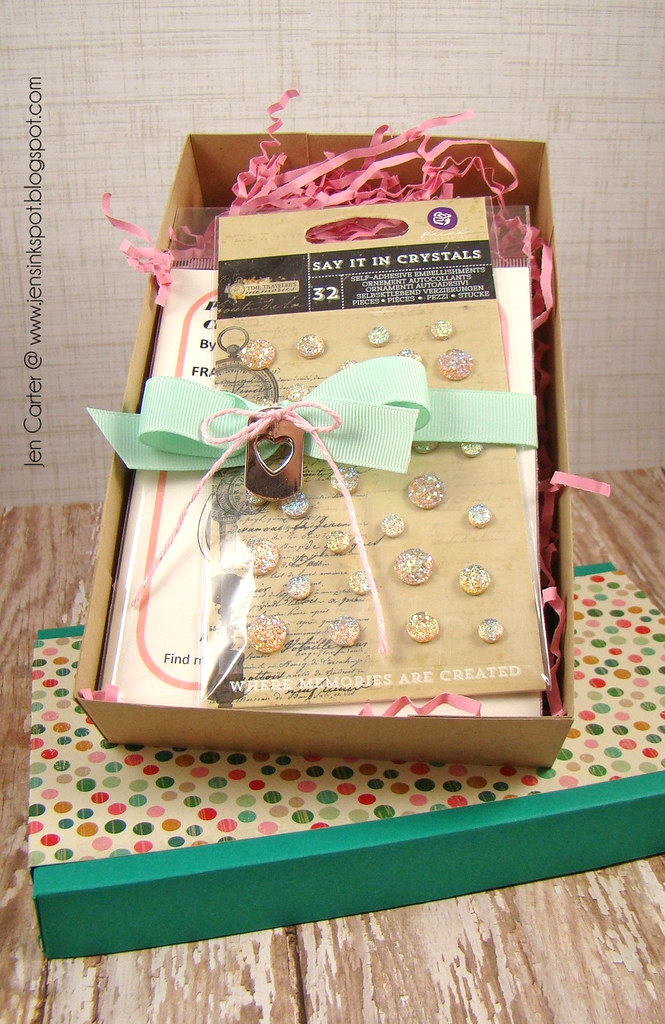
When the box was opened this is what was inside.

Stamping Away Inside 1.1

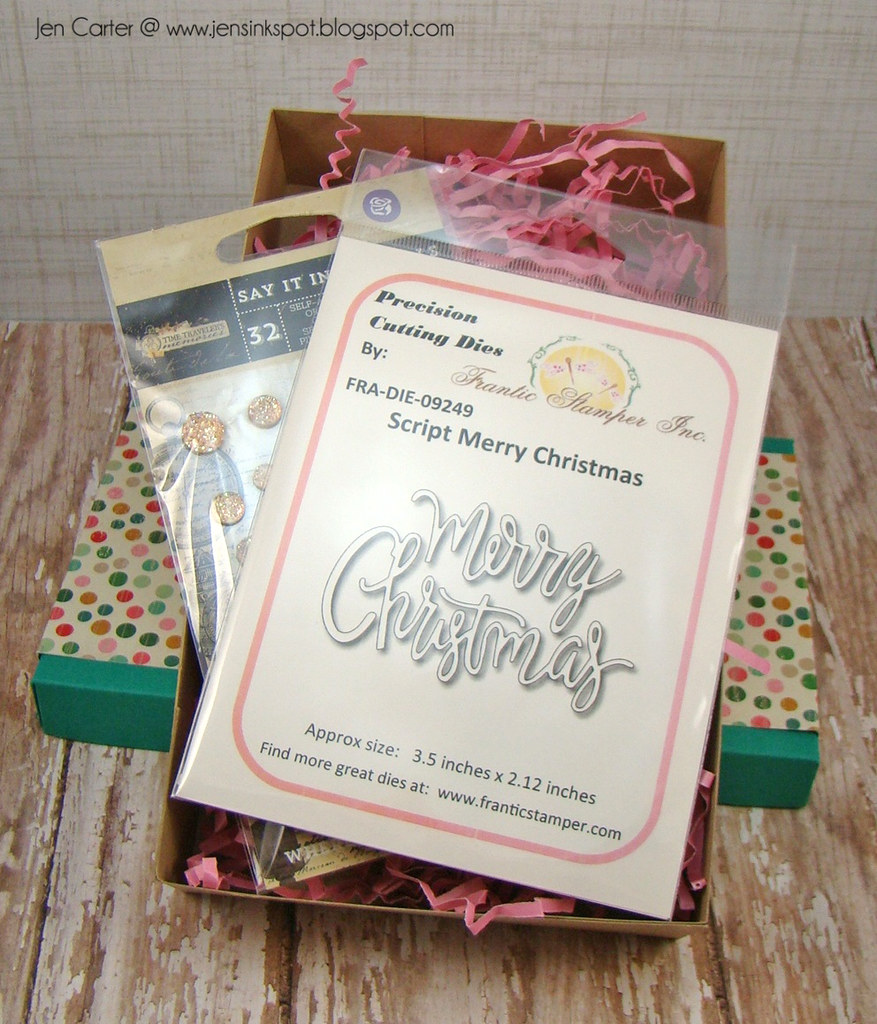
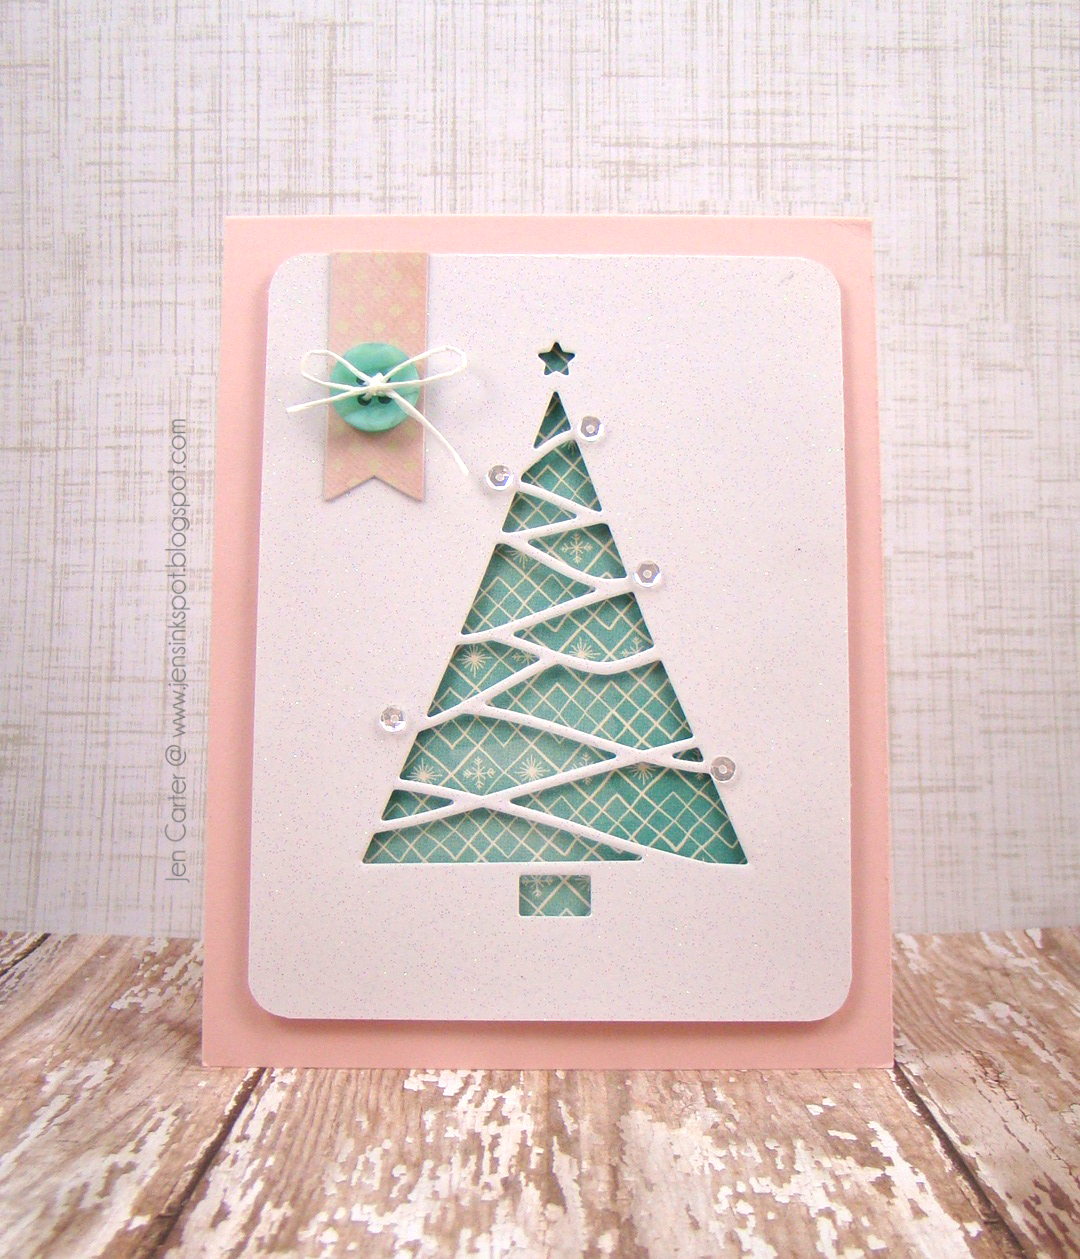
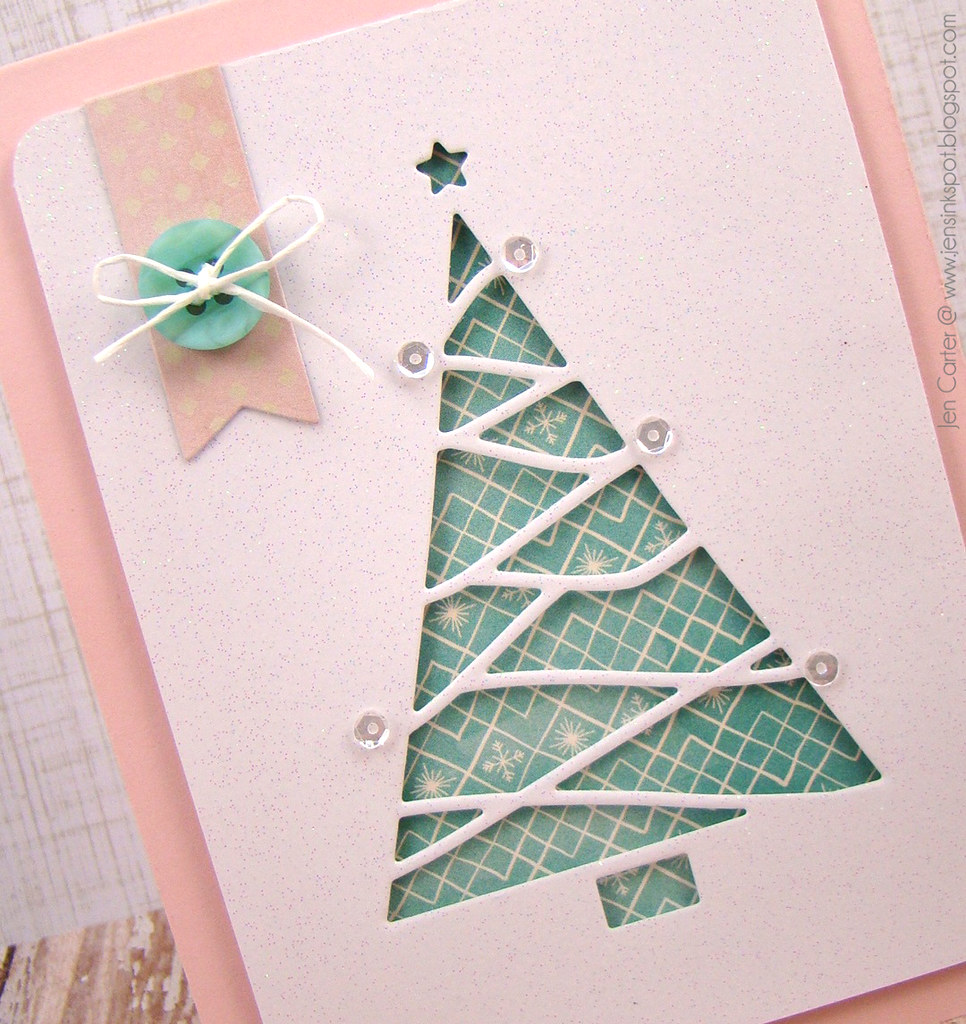
This die from Frantic Stamper is another one of my favorites!! It is called Script Merry Christmas and it is gorgeous!  My make and take for the weekend used this die too!

Stamping Away Box Side 1.6

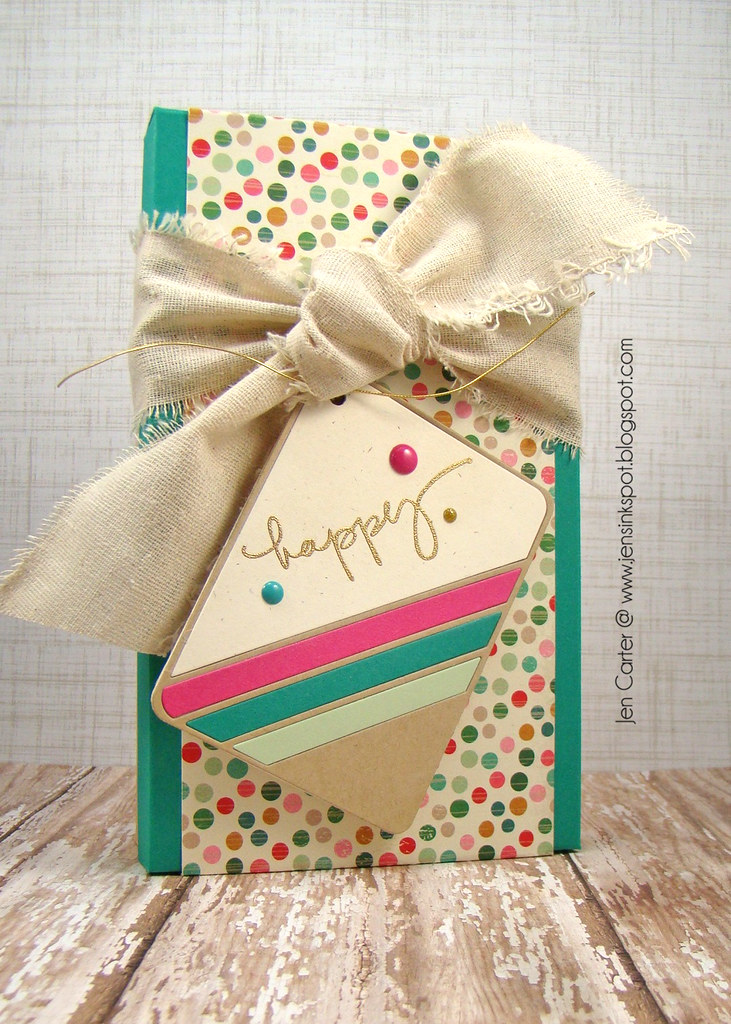
Here's one more view of the complete box.  I LOVE finding ways to use my dies in out of the box ways!  Can you imagine how cute these would be on Christmas presents?

Thank you for stopping by today!  I hope you have a wonderful day!


*** Materials for this project are available at www.franticstamper.com.

Frantic Stamper Products Used:

Wednesday, November 26, 2014

Peaceful Dove (Kathy Berger)


Peaceful Dove
by Kathy Berger


I saw a card on Pinterest that featured a white-spattered light blue background with a lovely embossed dove and a simple sentiment of peace. I loved the card and wanted to create my own version of that card, with a simple but peaceful feel.

I created a backdrop for my Frantic Stamper Large Large Peace Dove (FRA-Die-09252) by cutting a piece of powder blue cardstock and splattering and spraying it with Hero Arts unicorn ink spray. I then cut the Frantic Stamper Peace (FRA-Die-09247) from a strip of white card stock, and layered the negative over the blue background, filling in the holes with the small cutout pieces to ensure that the word Peace was perfectly readable. I saved the positive for a different project.

Next I tied a silver ribbon around the piece, and attached it to a white layer, just a little bigger than my blue piece. I then attached my dove to the blue piece, making sure it overlapped a little onto the white piece.

Using foam tape I layered my focal piece onto another piece of white cardstock, and then glued that onto a light blue layer, and finally to my white card.

This one is going to be one of my cards I send this year so I will be making about 25 copies of it. I just love its quiet, peaceful feel and I hope the people I send it to like it as much as I do! I hope you have enjoyed it, too.


*** Materials for this project available at www.franticstamper.com.

Frantic Stamper Products Used:


Thursday, November 20, 2014

Butterflies in Flight (Lis Whiting)


Butterflies in Flight
by Lis Whiting


Today's card is inspired by the many butterfly paintings, cards and art projects that I'm seeing on the web.  I love all the butterfly cluster projects. Butterflies are so feminine and delicate.

I started by using Frantic Stamper's Petite Butterflies. I love this die for two reasons: 1-everything is on a single flat die which means I can't lose little pieces, and 2-there are three sizes of butterflies!   I die cut my butterflies using blue sticker foil. I prepared the sticker foil by adding it to plain card stock and then embossing it.  I cu two sets of butterflies. I didn't use the butterfly bodies that are also on the die (how nice!).


To prepare my card, all I did was to choose a pretty blue pattern paper (DCWV) and cut another card panel (Daisy Circles) out of white shimmer paper.  I layered this onto a white card stock base.

I arranged the butterflies, largest at the bottom and smallest at the top, few at the bottom and more at the top.  I also had them flying slightly to the left.  I attached my butterflies with a drop of liquid glue in the center so that the wings could be folded up.


I hope you enjoyed my butterfly card.


*** Materials for this project are available at www.franticstamper.com.

Frantic Stamper precision Dies Used:

Tuesday, November 18, 2014

Smile (Rachelle Green)


Smile
by Rachelle Green


The entire time I was coloring this image, I was thinking of what dies to match it with. I started with a Kraft cardstock base and a red mat. Next I embossed a piece of Bo Bunny "Lemonade Stand" double sided paper. I choose the Frantic Stamper "Instant Camera Photo Card" and pierced around the perimeter to add some dimension. Next I used the DieNamics "Reel Life" die along with elements from the Diagonal Stripe Photo Card. Finally I added Tim Holtz "Filmstrip Ribbon" in keeping with the picture taking theme.


*** Materials for this project are available at www.franticstamper.com.

Frantic Stamper Products Used:

Monday, November 17, 2014

PEACE Triangle Christmas Tree (Ann Greenspan)


PEACE Triangle Christmas Tree
by Ann Greenspan


If you are you looking for a quick Christmas card that you can reproduce by the dozen in no time at all, do I have a card for you.

Simply cut out the letters P, C and (2) E's out of any alpha die you have as long as they will fit on a 5x7 card or bigger.  Next die cut the Triangle Christmas Tree die by Frantic Stamper (FRA-Die-09254);  I used glitter paper for mine.  Adhere with a glue pen and the card is done.  Of course you can glam it up by adding Stickles or gems to the tree.


For the blue card below, I traced the outer edge of the Triangle Christmas Tree die onto blue paper, manually cut it out and adhered the silver diecut to the blue base.


*** Materials for this project are available at www.franticstamper.com.

Frantic Stamper Products Used:

Sunday, November 16, 2014

Good Luck (Rozy Smith)


"Good Luck"
by Rozy


The Frantic Stamper Dies are absolutely awesome to use! Quick, Clean & Elegant.

Start with an A2 card base in white, layer red foil cut down 1/4" on all sides.

 Cut a 4" x 3" piece of white cardstock, using "Party" sheet of paper from KaiserCraft's Tropical Punch Collection, cut out panel of choice and trim to fit the 4"x3" white cardstock.

Cut the Asian Screen Card Panel from Gold Foil, layer over the red foil, then adhere the above panel.

Cut Good Luck from Green Foil. Adhere the words and a small bow!

Voila, couldn't be easier!


*** Materials for this project are available at www.franticstamper.com.

Frantic Stamper Products Used:

Saturday, November 15, 2014

Reverse Cut Triangle Christmas Tree (Jen Carter)


Reverse Cut Triangle Christmas Tree
by Jen Carter


The cold weather has moved in and with the cold blasts of air is the reminder that the holidays are right around the corner.  I know a lot of you are working on making your Christmas cards and so today I am going to share an easy Christmas card with you that I recently made.


Jen Reverse Cut Triangle Tree woodgrain CLoseup

This card was so simple to put together!  I started by cutting my white glitter mat to the size I wanted it and then rounded the corners with a corner rounder.  I really like this die by Frantic Stamper called Reverse Cut Triangle Christmas Tree. I lined it up on the glitter cardstock and die cut.  The cool thing about this die is you can use it two ways.  You can use it how it is intended like I did here or you can use the negative pieces that cut out and piece them together to create the tree also!

I wanted to keep the card soft so I chose a soft turquoise pattern paper to put behind the die cut tree.  I popped the white glitter piece up with dimensionals and added some clear sequins for just a touch more bling.

Jen Reverse Cut Triangle Tree Side WM

To finish the card I cut a little banner and added a button with some floss.  I almost always add a sentiment to the front of my card, but this one just didn't seem to need one.


One more thing before I go.  Did you know that Frantic Stamper now has a Flickr gallery!?  We'd love to see what you've been creating using the Frantic Stamper line of Exclusive Precision dies!  You can join the group and see what others have been creating or you can upload your own creations by clicking here.


Thanks for visiting!


*** Materials for this project are available at www.franticstamper.com.

Frantic Stamper Products Used:

Friday, November 14, 2014

Believe (Kathy Berger)


Believe
by Kathy Berger


This card beckons back to a special time of youth when believing in Santa Clause made Christmas morning simply magical, with family all gathered, a feast being prepared, decorations of green and red throughout the house, and gifts appearing from seemingly nowhere to fill the the space under the tree...


All this card required was some festive holiday paper, red, white, and black card-stocks, a scrap of craft foam, glue, and a white gel pen. I simply cut the card-stock with the dies, added white trim to Santa's suit with the gel pen, and assembled the bow, stacking the swirl bow atop the solid bow. The "Believe" was cut out of the craft foam in addition to the card-stock, stacked and glued together.

Everything was then simply glued in place on the festive layer on the card front... this card took mere minutes to make, but I think it will give more than minutes of pleasure to the recipient! Hopefully, it will bring back some memories of those magical Christmastimes of his or her childhood, as well...


*** Materials for this project available at www.franticstamper.com.


Frantic Stamper Precision Dies Used:

Thursday, November 13, 2014

Christmas Tag (Sharon Jeffs)


Christmas Tag
by Sharon Jeffs


I think the thing I like best about this tag is how quick it was to create!  Using the patterned tissue paper layered over the tags surface instantly gave it the feel of a stamped surface without having to plan out any placement. 

Once the tissue paper was dried to the tag, I added layers of Distress stains until I liked the result then I edged the whole tag with Walnut Stain ink using a blending tool.

The lamp post diecut and the words were all painted with the Black Distress Paint then a layer of the Brushed Pewter Distress paint was dabbed over the surface of the lamppost to give it a metallic look!


Frantic Stamper Products Used: