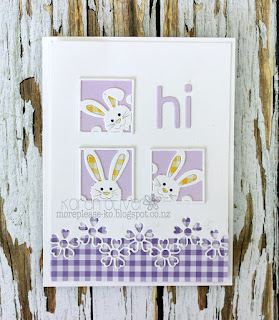
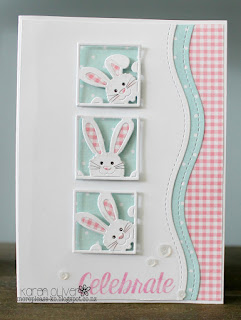
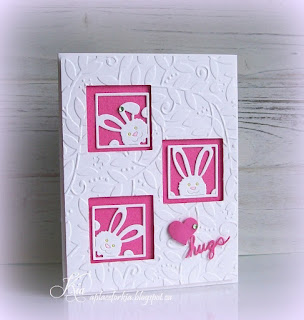
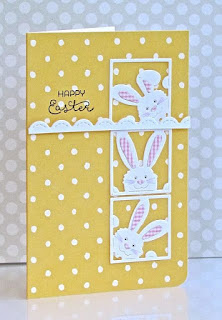
Wednesday, May 22, 2013

Warehouse News (Memory Box Exclusive for Frantic Stamper)


Last week we shared the wonderful news that Memory Box has released some dies exclusively for Frantic Stamper. When we did, we promised that samples using these dies would be coming soon. Today we'd like to share the first of those samples with you.


Point Light
by Kathy Berger

Kathy Berger saw the dies and was reminded of her wonderful summers spent on the beach in New Brunswick, Canada. She couldn't wait to create a scene that would represent those warm family times, and to share that scene with you.

On an 8"x10" sheet of watercolor paper Kathy sketched a quick little scene of ocean, rocky shore, and sky using pastel pencils. Kathy then die-cut the balloons out of patterned papers, and glued them (Zig 2-way glue is fabulous for this) to white card-stock and trimmed. She glued two directly to her scene, but used pop-dots to attach the third. She die cut the lighthouse and sail boats and colored them with Copic Markers, and glued them into the scene. She then mounted the whole thing to an 8 1/2" x 10 1/2" sheet of navy blue card-stock.

All that is left to do now is put it into a frame!


Thinking of You Tree
by Kathy Berger


Kathy Berger used the new Memory Box Exclusive for Frantic Stamper Christmas Tree die to make this masculine Thinking of You card. She die cut the pot and the tree from papers by BoBunny, from the Anthem Collection, and mounted them onto a piece of paper from the same line, and a piece of navy card-stock, and finally onto a kraft card. Kathy added only stars to the branches because this is a card that will be sent for Memorial Day, and she wanted to have a patriotic feel to the card. The star on the top was created by punching a larger blue star and coating it with Glossy Accents. A blue satin ribbon knot finished off the card.

Here is a closer look at the tree and pot:


Tuesday, May 21, 2013

Bonjour Card (Sharon Jeffs)


Bonjour Card
by Sharon Jeffs


After getting a set of the new Frantic Stamper dies, I couldn't wait to have a play with them.  They all cut beautifully and cleanly with a wide variety of thicknesses of card stock.

For my card, I wanted to try and go for a clean and simple feel, something I find challenging!!  I think it worked out and I absolutely love the way the Ivy Scroll adds to the punched Trellis Border - something I intend to do a lot more now!


Sunday, May 19, 2013

Sketch Sunday, May 2013


Here is the sketch for this month. We hope it will give you some inspiration for a project of your own. If it does, please share with us by leaving a link to a photo of your project in our comments.


The design team used this sketch to create some cards for you. Here they are!


Kitten in a Bowl Card
by Sharon Jeffs


Sharon used the Kitten in a Bowl that she colored for you yesterday in this sweet interpretation of the sketch. Don't you just love the paw prints in the lacey edge? And we think all the polka dots are the cat's meow!


Happy Happy Birthday Card
by Lis Whiting


Lis created a bright and cheery birthday greeting for you today. With a happy birthday greeting and a whimsical birthday card, this card just shouts out its warm wishes. And then there is that FABULOUS double bow; what a perfect finishing touch!


Whimsical Thank You
by Jennifer Willis

Jennifer loves the new Prima Art Journal Paper Pad and decided to create this card with it in mind. After stamping the Frantic Stamper Fuschia Fairies image in Memento Black ink, she colored it with Copic Markers and Decorating Chalks. After putting the card together, she stamped and attached the Frantic Stamper Merci sentiment. She distressed an Ivory Flower on Ivory Oval with a Copic Marker for a touch of color and to continue the grungy theme.


Holly-Jolly Card
by Kathy Berger


Kathy is trying to stick to her plan to make at least one Christmas card each month to ensure a start on her holiday card needs. Today she used the sketch and the new Flower Scroll Precision Die from Frantic Stamper to create her card. She layered a plain white card with some forest green card-stock from Bazzill, then added a layer of paper from the Authentique Festive 6x6 pad, trimmed in a strip of white lace paper. Onto that she layered the Flower Scroll, with the flower cut off, and several punched holly leaves. Three shaped punched holes were then attached, and coated with Glossy Accents. Kathy stamped the saying with Hero Arts Forever Green ink with a stamp from the Penny Black Holly Jolly set. She then trimmed the saying to fit the card, and added a spiked circle, punched from one of the Authentique papers, with a pop-dot.


Products used:

Saturday, May 18, 2013

Coloring a Kitten in a Bowl (Sharon Jeffs)


Coloring a Kitten in a Bowl
by Sharon Jeffs

I adore this stamp and not just because my favourite animal is the cat!  I love the sweetness of the image, my cat loves to climb into any little container and make it his bed for the afternoon - just like this little kitten in the image.

I began my stamped image by stamping it with Black Soot Distress ink then slowly coloring it in using the following Copic markers ...

The Kitten
  • - E15 Dark Saturn
  • - E11 Barely Beige
  • - E51 Milky White
Inside of the cup AND the leaves Teacup
  • - Y38 Honey
  • - Y21 Buttercup Yellow
  • - Y17 Golden Yellow
Flowers on the Teacup
  • - V06 Lavender
  • - V17 Amethyst
  • - BV17 Deep Reddish Blue


Thursday, May 16, 2013

Tarot Cats - a Card (Lis Whiting)


Tarot Cats - a Card
by Lis Whiting


I really like how this card came out.  I kind of worked backwards to get the size of the card right, starting with my tarot cats.  I backed them in different colors of foiled card stock.  Then I chose a pretty royal purple (shows that you can use Christmas papers year round!).  I wanted to do something with the stars so I used silver glitter paper.  I backed it all on black card stock.  I added a strip in the middle to place my tarot cats on.  I decorated the entire card in crystals and pearls, including my elegant cats.  I made several stampings of my tarot cats so that I can make a couple more different cards.  This was a lot of fun to make! Here are some close ups!


Thanks for stopping by!


Products used:
  • Frantic Stamper Cat Stamps
  • Ranger Distress Markers
    • Junon: Old Paper, Faded Jeans, Fired Brick, Bundled Sage, Spun Sugar, Dusty Concord, Vintage Photo, Tumbled Glass
    • L'Imperatrice: Tattered Rose, Wild Honey, Barn Door, Tumbled Glass, Worn Lipstick, Scattered Straw
    • La Justice: Dried Marigold, Pine Needles
  • Ranger Distress Stains
    • Tarnished Brass was used on each stamped image
  • Graphic 45 Nutcracker Sweet
  • Kaisercraft Pearls and Crystals

Wednesday, May 15, 2013

Warehouse News (EXCLUSIVE Memory Box dies)


I’m so excited to announce a collaboration project between Memory Box and Frantic Stamper is finally complete!
The resulting 9 set of dies are beautiful, detailed and so versatile. These exclusive dies are available ONLY at Frantic Stamper!

First, we have a gorgeous Paris Landscape (Paris-scape) featuring the popular landmarks. This die is 5.8” long, so it’s a great size for making larger cards as well as for scrapbook pages. It’s also designed so you can cut it at different spots for use on smaller cards if you wish. The die cuts only the top part of the cityscape, allowing you to create a layer of any height. Detail features on the monuments are embossed too!


Next is a set of 3 embellished hot air balloons. The largest one is 1.5”x2” and the smallest is 0.8” x 1.1”. Having the 3 sizes gives you so many options. You can use them in a to create a sky filled with balloons (over Paris???) in a perspective. Couple them with Memory Boxes’ current 2 hot air balloon dies (MBC-die-98410 and MBC-die-98407) and you now have 5 to work with. I can’t wait to play with these!


Continuing on the “scene building” theme, next is a wonderful lighthouse and a set of mini sailboats. The lighthouse is just a bit over 3” tall. We left it plain so that you could add your own coloring details. The tiny sailboats are 1” and just over ½”, which again give you the ability to create perspective. All you need now are waves (think torn paper) and the boats are out at sea guided by the light.


The next die is one of my favorite motifs: A fleur de lis. I just love the elegance of this design. We made a nice large one to create elegant cards in a jiffy. This die is almost 3” tall and will work perfectly for all sorts of greeting cards.


Lastly, we bring you a fun, twiggy “Christmas Tree” and ornaments to adorn it. The tree measures 4.1” tall and comes with a flower pot. The flower pot can also be used with other flower dies available in our store (rolled roses for example). The ornaments are tiny and let you create a Christmas tree, a spooky Halloween tree or a beach themed tree. In addition, the little beach ornaments would look great for a seashore scene using the lighthouse and sailboats. I can’t wait to play with them!


We will be bringing you samples made with these dies in the coming weeks. We have so much to show you!

Hugs,
-Fran
www.franticstamper.com
541-826-2500

Tuesday, May 14, 2013

Belly Banded Card (Sharon Jeffs)


Belly Banded Card
by Sharon Jeffs


One of my favourite things about card making is the seemingly endless possibilities in card designs.  One of my favourite is the Belly Banded card because of its ability to appear formal, in fact I used this design to make my daughters 17th birthday party invitations!

Perhaps the best part is that you only require a single sheet of 12 by 12 card and scraps to complete it.

To begin I cut a strip of card that measured 5 1/2 inches by 11 inches.  I marked the centre of this, lengthways then folded in each side to meet the middle to form a gate fold.


Next I cut a strip of card measuring 12 inches by 1 1/2 inches and wrapped this around the belly of my card then creased each side and adhered the two ends together.


Finally, decoration time!  I used a series of die cuts from scraps to cover up the centre join and add a focal point to my card front.


One the inside of the card, I also added some additional features ...


Products used:

Sunday, May 12, 2013

Video Share (Hero Arts)

Happy Mother's Day! Today, Hero Arts and Julie Ebersole have a bright little spring card to share with you. We hope you will enjoy it!


Until the next time!
-The Frantic Stamper Design Team

Friday, May 10, 2013

Using the Scrolls, Part 2 (Kathy Berger)

Today I would like to share two cards using the last two of the Frantic Stamper Precision Scrolls dies. First is the Fleur de Lys Scroll.


Using the Scrolls, Part 2
by Kathy Berger


The Fleur scroll just seems elegant and formal, so I thought it would be perfect for a formal invitation to a graduation gathering for a young man. The Fleur de Lys Scroll was cut from metallic gold card-stock, then layered and mounted with foam dots. The embossed layer was made with the Cuttlebug Textile embossing folder, and then finger-painted with gold acrylic paint thinned with gel medium.


Next, I'd like to share a card that uses the Ivy Scroll Die.


I die-cut three Ivy Scrolls out of a paint sample that had three different shades of green on it. I layered them onto a lacy oval (cut with a Spellbinders die). Onto that I layered a rose I stamped with the Frantic Stamper Long-stem Rose cling-mounted rubber stamp that I had colored with Copic markers and fussy cut. The saying is a sticker from the Echo Park Sisters collection that I adhered to card-stock, cut out, and mounted with foam dots. The green paper is from the Authentique Cherish collection.


Products Used:

Thursday, May 09, 2013

Using the Scrolls (Kathy Berger)

Today I am going to share a few projects that utilize Frantic Stamper's new Scrolls and Squares Precision Dies. First up is the new Square Scroll Die.


Using the Scrolls
by Kathy Berger


On the front of the Bonjour Steps card that I shared on Sunday is the square scroll used as a frame for a lovely flower. The scroll was cut twice, once in green and once in pink. The center of the pink square, a part normally discarded, was fit back into the center of the green square, so the pink was perfectly framed by the green square. They were mounted together to the card front, and the flower was centered on them.


Another sample of the square scroll is found in this scrapbook page, which also uses the Eagle and America dies, from the USA set. On this page, the die was cut from navy blue card-stock, as was the photo. The center of the photo die cut (again, the part which would normally be discarded) was placed into the card-stock square scroll, making a wonderful and decorative frame for the photo.


The Flower Scroll is used in this card as the main focal point of the card. I cut the flower three times out of card-stock, using two different but coordinating patterns. I adhered two of the flowers directly to my card front, but I wanted more dimension for my third flower. So I cut the flower again, but out of craft foam. I adhered the paper flower to the craft foam flower, and then to the card, giving a wonderful lift and great support to my flower, and achieving just the look I was after.


That is it for my samples for today. Check back tomorrow for more samples using these wonderful new dies.


Products Used:
  • Frantic Stamper Precision Dies
  • Bazzill Card-stock
  • Bo Bunny Anthem Collection
  • Authentique Cherish Collection, 6x6 Paper Pad
  • Paper flower
  • Craft foam
  • Ribbon