Saturday, October 31, 2015

BOO Rosette Tutorial (Ann Greenspan)


BOO Rosette Tutorial
by Ann Greenspan


I used the Chevron Borders and Edgers  die by Frantic Stamper to make the pointy edge on my rosette. I also used the Round Scalloped Vignette
and the Round Vignette BOO Insert, also by Frantic Stamper, for the top of the rosette,

To make the rosette, I first cut a strip of paper that was 1.5" wide by 12" long.  I then cut along one of the long edges of the paper with the Chevron Edge die.  After that was done, I placed the paper on a scoring board horizontally (landscape) and scored every 1/4", scoring down in each of the valleys and at the very top of each of the peaks.  I had to reposition the paper every now and then so the peaks and valleys would line up perfectly with the score lines, but that was easy enough to do.


The next step was to fan fold the strip of paper along each of the score lines:


Bring the two ends of the strip together to see if the last section of each strip has a peak or a valley fold.  You want one of each so if you have two of the same fold, just cut one off along the score line.

Place a strip of double sided tape or use liquid adhesive on one of the ends of the strip and adhere it to the opposite end of the strip, overlapping the two so the folds are continuously peak/valley/peak/valley, etc.


Now you need to decide which side of the rosette will be the top side that will show on your card and which will be the bottom.  You want to take a punched out circle that is about 1.5" diameter (or hand cut one, it doesn't have to be perfect) and hot glue it to the center of the side that will be the bottom of the rosette.  Push down on the "bracelet" ring until you have a flat circle, then adhere the punched out circle with hot glue:


While the glue is drying, flip the rosette over carefully, trying not to let it pop up, and press down on the good side, making sure it lays flat on the table.  It will look like this from the good side:


Now you can cover the center with whatever you choose.  I used the Round Scalloped Vignette on mine.  Here are some other rosettes, all with the pointy edge from the Chevron die:


I filled the center of the Round Scalloped Vignette with the BOO Insert.  I love the drippy goo look to this die:


*** Materials for this project available at www.franticstamper.com.


FRA-Die-09157
 
FRA-Die-09608
 
FRA-Die-09606

Wednesday, October 28, 2015

LOVE (Karen Letchworth)


LOVE
by Karen Letchworth


I've been SO blessed to have this opportunity to Guest Designer for Frantic Stamper.  Using their sweet Precision Dies and products is such fun, and I've been able to create so many great projects.  The card I'm sharing today uses lots of great new Crate Paper products that you can find in the Frantic Stamper store.  The sentiment on the card (love) was created using the adorable Big Handwritten Love Die which I cut from white paper.


I simply layered the patterned papers and embellishments together, and then added this sweet sentiment.  Frantic Stamper has LOTS of great sentiment dies, as well as all sorts of shapes and fun designs to embellish all your projects.  I hope that my little card has inspired you, and that you will stop by Frantic Stamper today and treat yourself to a sweet new die-cut (or two).....LOL!   I'm sure you will LOVE them as much as I do!  

You're welcome to stop by my blog, My Cup Runneth Over, to read more about this project.

Thanks for visiting us today.  We're SO grateful to have you join us and get some inspiration here on the Frantic Stamper Blog.


*** Materials for this project available at www.franticstamper.com.
 
FRA-Die-09398


Monday, October 26, 2015

My Copic Storage (Kathy Berger)


My Copic Storage
by Kathy Berger


I have something I just couldn't wait to share! Don't you just love it when you fix a problem that has been bothering you for a while, and not only did it work for you, but it wasn't expensive, and was really simple to do? Well here is one of those problems, solved!

I recently completed my collection of Copic Sketch markers (YAY!!) and faced the daunting task of storing them all (BOO!!). I had bought the Copic Carrying Case thinking it would be a great solution because it is compact and portable, but when I got it I realized the six little mesh bags for holding the markers that were included with the bag were far from perfect for me. They tipped over if they weren't full, they made organizing by color family impossible, and they didn't allow me to have my markers organized numerically, either. I really needed something different.

First I tried the plastic lighting grate used in plastic boxes that I saw on Pinterest as a solution, but it didn't work with the Carrying Case because 1) it is rectangular but the case has rounded corners and 2) if I cut the grid so it could fit in the box it wouldn't hold all the markers.

Next I tried putting in some large plastic tubs to hold the markers but that didn't work out either. Because they were tapered to be smaller at the bottom they didn't hold as many markers as I thought they would, and I still couldn't organize the markers by numbers.

Then I thought about what made the plastic light grating be such a good solution, and I realized it was all about the grid. (Now I have a song stuck in my head...It's all about da grid, about da grid. No worries. Lol.)

How could I get a grid that would be a perfect fit for the case while still holding enough markers? Thinking about grids brought netting to mind. If only I could find a mesh with just the right sized gaps, I thought it might just work. But then I couldn't find any nets with the grid size I needed.

And then came the AHA moment! I suddenly remembered that I know how to crochet, and that I knew a few different patterns that would make lovely meshes. Ta duh da dah... within an hour or so I had crocheted the PERFECT (for me, anyway) solution!

I used a very simple square mesh stitch to create the perfect "netting" for my markers. And better yet, I sized it so I could velcro it into the carrier so if I ever need to remove it I can! For those of you who crochet, click for my pattern.


Once I had my grid piece ( 17 or 18 posts across and 26 rows long) I simply wove a piece of Velcro One-Wrap™ through the first row, up the first column, across last row, and down the last column, with the hook side to the outside.


I then affixed it to the inside of the carrying case, which is lined with a perfect fabric for the Velcro to grab!

When I started putting my markers in (in VIBGYOR and numerical orders, of course...I am a bit OCD that way) I found that the rows of markers were not staying straight, making it hard to see the organization. SO... I cut 23 pieces of very heavy black card-stock (poster board would have worked well, too) to 8.75"x 2.75" and "laminated" it with clear Contact paper. I inserted the card-stock between the rows.


PERFECTION!


I have room on top to carry a refiller for my clear marker, a small spritzer filled with blending solution, my ring of textured fabrics, etc. for adding texture to my colored pieces, a set of Spica glitter pens, and a set of .3mm Multiliners. Not only do they store perfectly, but it is all super portable so I can take them to stamping get-togethers.

I can't tell you how tickled I am with my solution! So, how do you store YOUR Copics? Please share!


*** Materials for this project available at www.franticstamper.com.
 
COP-Case
 
Sketch Markers


Sunday, October 25, 2015

Rustic Rudolph Tags (Michelle Leone)


Here we are on the 25th of the month again. Today we have some holiday tags to share. Enjoy!


Rustic Rudolph Tags
by Michelle Leone


Oh, how I love making holiday tags! And... I love having them coordinate with my holiday color scheme (which may be dependent on the HL seasonal wrapping papers!).  However, since I haven't chosen those colors yet, I've used a neutral kraft, rustic cream and red combo.  The two layered Pinprick Ovals and negative portion of the Snow Globe Deer die (which cuts beautifully, even with those lovely, swirly antlers!) make an amazing duo. The sparkly nose is the finishing touch!


*** Materials for this project available at www.franticstamper.com.
 
FRA-Die-09670
 
FRA-Die-09644


Friday, October 23, 2015

Happy Haunting (Tracey McNeely, Guest Designer)


Happy Haunting
by Tracey McNeely


Today for my first post at Frantic Stamper as Guest Designer I thought a Halloween card was in order. I love how dramatic Halloween cards tend to be using bold colours which stand out so well with black and white.

To make this card I started with a white card base and then cut a black panel to cover the front.  I embossed a sentiment from Halloween Greeting Lines in white on the black panel and adhered a 2 3/4" wide panel of my patterned paper to the right side. After the panel was complete I adhered it to the card base.

Next I used the Large Ghost Die to make two ghosts and adhered them to the front panel, on an angle, with foam tape for a bit of dimension.


*** Materials for this project available at www.franticstamper.com.
 
FRA-Die-09582
 
FRA-CL-020

Tuesday, October 20, 2015

A Thankful Scene (Jen Carter)


A Thankful Scene
by Jen Carter


Hello! Happy October! Today I wanted to share a card appropriate for the Autumn/Fall season.

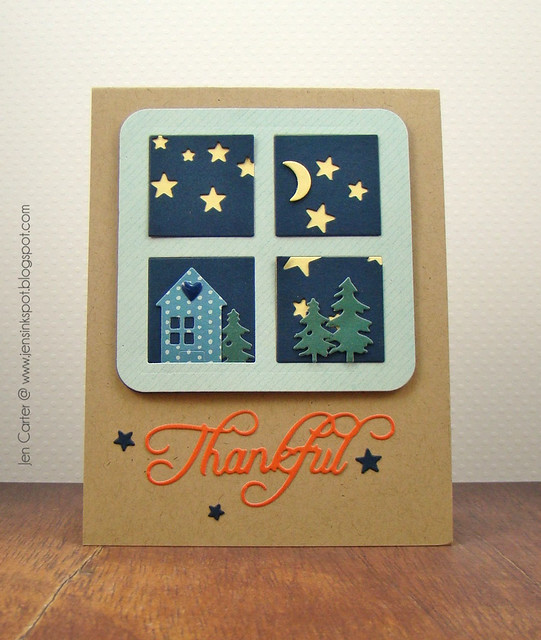
For this card I started with the new Framed Four Square Windowdie from Frantic Stamper.  I used that die to cut the blue striped patterned paper to create the windows.

Jen Carter Thankful Night Scene 2

I knew that I wanted to create a scene with some of the dies from the village set.  I took a piece of navy cardstock and first die cut it with the Starfall Reverse Cut die (probably one of the dies from Frantic Stamper on the top of my LOVE list, as there are just so many ways to use it!).  Then, I again used the Framed Four Square Window die to cut the navy windows.  I backed them with yellow cardstock to make the stars pop. 

Jen Carter Thankful Night Scene Closeup 1

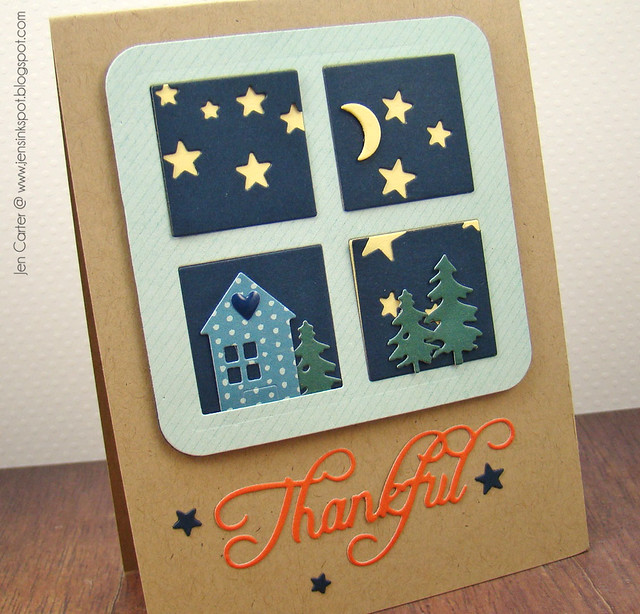
I positioned the navy pieces where I wanted them and then cut the moon with the Village Sky die set.  I cut two sizes of trees with the Village Trees & Shrubs die set.  These dies are perfectly sized to create scenes using this square die!  The house is from the Suburb House die collection.  You've seen me use it before, I really like it! :) I added a little puffy blue heart as an accent on the house. For the sentiment I die cut the beautiful Thankful with the Thankful word die.  I used some of the stars that were cut when I die cut the navy cardstock as accent pieces to frame the Thankful sentiment.

Jen Carter Thankful Night Scene Closeup 2

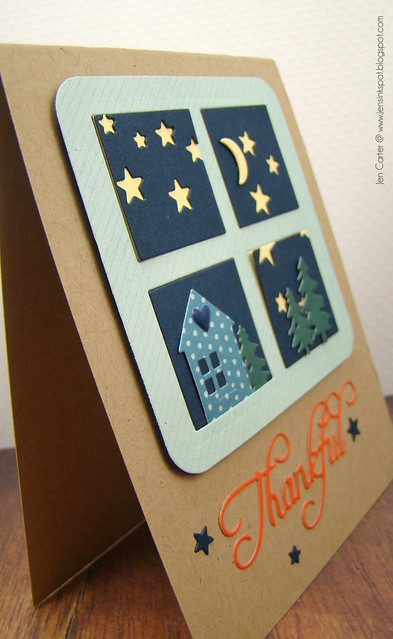
Here is a side angle.  You can see the dimension (and a loose corner on the bottom piece...oops!).

Thank you for stopping by the Frantic Stamper blog!

We'd love to see what YOU are creating with the Frantic Stamper line of dies and stamps. Join us on Flickr and upload your creations to share with the Frantic Stamper community. We do ask that your projects include dies and/or stamps that are from the Frantic Stamper line.


*** Materials for this project available at www.franticstamper.com.
 
FRA-Die-09634
 
FRA-Die-09614
 
FRA-Die-09549
 
FRA-Die-09550
 
FRA-Die-09095
 
FRA-Die-09605

Monday, October 19, 2015

All White Sympathy (Kathy Berger)


All White Sympathy
by Kathy Berger


My husband lost two of his cousins in just over a week, and I am making Sympathy cards like a fiend, in between taking two days of Copic classes and working for the National Lab, and drawing the January die and stamp release. I probably should be making something more simple, but I saw this card in my mind's eye, and I had to make it.

For this card I used the Coved Labels and the Elementals #7- Coved Labels dies to cut a window in the card and to make the frame for the front of the card. I used the Vine Card Panel to fill the space in the window, and then I embellished the vine with the Petite Layering Posies that I had shaped with a stylus. Tiny pearls in the center of each blossom finished the card front.

I used a folded panel of vellum on the inside of the card, using tiny blossoms to hide the dots of glue to hold the insert in place. I stamped the inside with an appropriate Sympathy phrase, softened by the vellum layer.

Here is a closeup view of the front of the card.


I hope you like my card, but I sincerely hope you don't have a need to CASE it.


*** Materials for this project available at www.franticstamper.com.
 
FRA-Die-09373
 
FRA-Die-09128
 
FRA-Die-09200
 
FRA-Die-09193