
by Lis Whiting

Sun
Materials
-
Paper and Cardstock
-
Manila Cardstock – 8 ½ x 5 ½
-
Bazzill Basics Monochromatic 5-color packs
-
Browns, Walnut (
BB-MC-BRN
$11.99), cut to 5 1/4" x 2 1/8"
-
Yellows, Lemonade (
BB-MC-YEL
$11.99), cut to 5 1/4" x 4"
-
Greens, Aloe Vera (
BB-MC-GRN
$11.99), cut to 5 1/4" x 2"
-
Best Creation Sunbeam Glitter Cardstock (
BC-P-GL037
$2.59) about 2" x 3"
-
Vintage Reminisce. Stonehenge ( (
COR-Pk-VRemin
$10.99)
(I used Chocolate Box by Core-dinations, but it is not currently available)
-
Inks and Embossing Powders
-
Embellishments
-
Tim Holtz Tissue Tape, Symphony (
ADV-TH-92829
$9.99)
-
Prima, Say it In Crystals, Large clear Swirls (
PRI-CRY-522766
$7.99)
-
Prima Flowers, Essentials 8 Strawberry Kisses Patterned, Large (
PRI-ESS-539771
$5.99)
-
American Brads, Medium, Neutral,Brown (
AMC-BR-neutral
$3.49)
-
Basic Grey Cappella Micro Mini Alphabet (
BG-S-CAP-2414
$1.59)
-
Wilton Cake Decoration Gold Leaves
-
Tools
Instructions

-
Fold your manila cardstock in half making a card base (5 1/2" x 4 1/4").
Card will open on the bottom.
Set aside.
-
Run the core-dinations through the cuttlebug using Script.
Sand the raised parts to show the inner core of the cardstock.

-
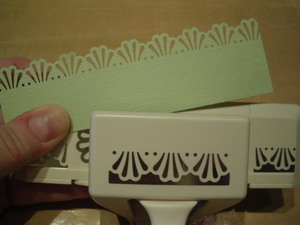
Punch a border on one of the long sides of the green cardstock.
-
Attach the green cardstock to the back of the embossed brown.
You want just the punched border to show.
-
Attach brown and green to the yellow cardstock.

-
Add tissue tape from the edge of the brown.

-
Using an ink blender, blend color along all edges of the card so far with frayed burlap ink.

-
Punch out two photo corners from yellow glitter cardstock.
Add the two photo corners to the bottom of your card.
-
Mount all of this to your card base.

-
Take out your Say it in Crystals and cut off a few curls for your card.
Attach them.

-
Take a large green flower and a smaller light pink or lavender flower and attach them together with a brown brad.

(flower is not attached to card yet)
-
Place a square of mounting tape on the back of your flowers.
-
Add the gold leaves to flower. Use the mounting tape to secure them.
-
Mount the flower in the middle of your crystals with mounting tape.

-
To make your tags:
-
Punch out three of the smallest tags from walnut Bazzill.
-
Add your letters, one to each tag.
-
Use your ink blending tool to add frayed burlap around the edges of each tag.

(This pic shows two tags edged and one not edged so that you can see the difference)
-
Rub lightly your ink blending tool across each letter to add just a touch of color.
-
Mount your tags to the card with mounting tape

-
Place two small and one larger crystals on the top of the brad.
(Makes it look a little like an antique button!)
I was serving jury duty when I took out my paper and started sketching some ideas for a book I’m doing. I thought about this card and came home and made it! Just shows that jury duty isn’t all that bad!
 by Lis Whiting


nice project!
ReplyDelete