Sunday, September 01, 2013

Eiffel Tower Card (Sharon Jeffs)


Eiffel Tower Card
by Sharon Jeffs


I liked the idea of this amazing Eiffel Tower die and wanted to have a go at creating a card with a shabby chic kind of feel.  I kept everything relatively simple, layering a mixture of oval die shapes with gathered lace to create a base for my Die cut Eiffel Tower to sit upon.


Products used:

Saturday, August 31, 2013

Cat Willow Card (Lis Whiting)


Cat Willow Card
by Lis Whiting


I used two stamped and colored cat willows for my card. Both were matted to dark brown card stock. To accommodate both stamped images I used a 5 1/2 x 5 1/2 inch sized card. I used some very lovely Authentique papers (collections listed below).  I punched a border for the bottom of my card and decorated it with red crystals. 


I punched a leafy vine out of green foiled cardstock and used that as decoration at the top of my card.  I added a butterfly as a final touch.  This stamp would look good cropped to a square and tiled on a card also!


Products used:

Friday, August 30, 2013

Cat Willow - a Coloring Project (Lis Whiting)


Cat Willow - a Coloring Project
by Lis Whiting

I love this Cat Tails Stained Glass stamp.  It reminds me of when I was a child and my sister and I looked for cat tails (or cat willows as we used to call them).

To begin, I stamped on white card stock and embossed in copper.  I decided to do a watercolor technique and paint my colors in rather than color them in with my Distress Markers. To do this, I used Distress Stains.  I placed the colors on my craft mat and picked them up with a small paint brush.  See below for the colors I used. Although this stamp is simple, wait until you see the card I made with it!

Products used:

Wednesday, August 28, 2013

Warehouse News (Auction Sites Buyer Beware)


Buyer beware ….. You could be buying stolen property on online auction sites!

Remember back in November when we were hit with 7 large fraudulent orders (purchases made with stolen credit cards)? We were never able to get any police or other authorities to help us track down the thieves…. And we lost over $6,500. I thought this sort of thing was behind us. I was wrong.

Last week, it happened again. We received 3 orders on back-to-back days for large die cut machines. Each order was for 1 machine, ordered from 1 address, shipping to another. On the 3rd one, my little heebie-jeebies started flaring up. I should have caught it on the first one. I contacted our credit card processor and gave them the info, and sure enough, there is a 99.99% probability they are fraud. Let me rephrase that, one of the orders is 100% fraud, and I found out with a little bit of internet sleuthing.

The story goes like this. An order came in last week for a Sizzix Big Shot Pro machine, purchased by someone in North Carolina and shipping to another person in Illinois. I *should* have known better….. but we shipped it. Yesterday morning, as we are discussing (ok, fuming) the thieves being at it again with fraudulent orders, I exclaimed “I bet you anything that Big Shot Pro is on ebay right now”. Acting on this, I searched ebay, and sure enough, I found a seller selling a Big Shot Pro for $100 less than our price with the location listed as the SAME small town in Illinois where I shipped ours. The name of the seller was also the same as the recipient of the machine. Too many coincidences. I contacted Paypal right away and they did some research. Turns out, the guy selling is a “broker” whose business it is to sell items for other people for a 30% commission. He’s been an ebayer with a HIGH approval rating since 2002. Paypal immediately took his side telling me he’s not the crook. OK, then, why is he selling my machine!!

After much back and forth contact, everyone (Paypal and Ebayer) is in agreement that he has my machine, and that it was purchased with a stolen credit card. The Ebayer insists he didn’t know it was stolen, and that is was commissioned by one of his clients to sell the machine. He promised to find out info about his “client” and share that with Paypal/Ebay, and to ship my Big Shot back to us. We shall see. At this point, I’m not really believing anything until I see that package come back. I’m still out $75 in shipping (because of course, the crook chose Priority Mail shipping…. He didn’t care, stolen cc!)

Moral of the story is: BEWARE what you buy on Ebay !!! It could be stolen merchandise!!! Had someone bought this machine, they would have gotten a very good deal: $250 for a Big Shot Pro that we sell for $350. (by the way, $250 is less than what Sizzix allows AUTHORIZED Sizzix stores to sell it for, so you won’t find it cheaper in a store or anywhere else) A very good deal indeed for STOLEN property!!! Meanwhile, a small retailer is out a $350 item + $75 shipping + the service fees that will be charged to us when the credit card bank claims we let a stolen credit card number be used (yes, that’s called a “chargeback” and they charge us $25 for that privilege.)

The 2nd fraud order from last week is an Ebosser. I can’t find it on Ebay (yet), but I see a lot of brand new Ebossers selling on Ebay for cheap too….. wouldn’t surprise me if some of those were stolen in a similar manner.

Hugs,
-Fran
www.franticstamper.com


Monday, August 26, 2013

Shabby Tag with Violet Suede Paper (Lis Whiting)


Shabby Tag with Violet Suede Paper
by Lis Whiting

I've been having a lot of fun working with suede paper lately.  It's a beautiful paper that actually has a very soft tactile feel - like suede.  It comes in some beautiful colors too!

I started with a Sizzix TIme Holtz die for my tag and used the movers and shapers to add a cut out of a Victorian lady cameo (also Sizzix).  My tag base is ivory cardstock and the entire front is covered in violet suede paper with the cameo cut out.

Following are close ups of the tag in sections with comments.

I used stick pins at the top. It makes the tag a little longer but I thought it needed something.  What better to go with a Victorian cameo than stick pins!


I had a little brass key that I looped the ribbon through.  I also wrapped a single paper flower around the key.


For my cameo, I took some images (color) and collaged them to fit behind the opening.  I then cut a piece of acetate to fit.  I glued the acetate to the collage art with Glossy Accents and glued the whole thing to the back of the suede paper so it would show through.  Then I glued the suede paper to my tag base. (I added a single pearl to the "hairpiece" - looks good!)


I have three layers at the bottom of my tag: lace, ribbon and pearls. All three birds are wood, and adhered with mounting tape.


Here is another view so that you can see the dimension of the tag,


Thanks for stopping by!  I hope you try out some suede paper on your next project!

-Lis

Products used:

Friday, August 23, 2013

Magazine Storage Box (Sharon Jeffs)


Magazine Storage Box
by Sharon Jeffs


One thing I seem to have amassed this year is tonnes of magazines, ones I can't bear to throw out because I love the ideas in them.  Thats why I decided to create a storage box to put them all in.

I began mine by finding an appropriate sized cardboard box that I cut to the right size then covered with patterned papers.

Along the front I added a strip of lace and ribbon, then I added a hinge to each of the front edges since I didn't wrap the ribbon all the way around the box and I wanted to hide the edges.


On the front I added various die cit frames that I created and inked.  At the very centre of these I placed a stamped panel that featured the awesome stamped image "Paris on the Mind" stamped over the top of the "French Newsprint" stamp.


To finish off my box I added a few Ideology embellishments as seen in the photo above. Finally, I added a ribbon bow to the right side of this panel with a wishbone added to the centre of this.


Products used:

Thursday, August 22, 2013

Graduation Card / Gear Up For Success (Rozy Smith)


Graduation Card / Gear Up For Success
by Rozy Smith


I started with a 6 1/2" x 5" card base (I used white and stained it as I went along, but you could start with any type of card base you would like).

Next I cut a 4 1/2"x 5 1/2" mat from My Minds Eye Life Stories paper of my choice. I ran that piece of matting through my embossing machine (mine is a Craftwell eBosser) using the Tim Holtz embossing folder "Gears". Then I distressed with the Tim Holtz Vintage Photo Distress Stain. I adhered this mat to the card base and framed it with American Craft White Glitter Tape.

I created my own tag using a blank white tag from Frantic Stamper, stained it, and typed "Gear Up For Success". I added a few Tim Holtz Chit Chat Stickers, then I made another background tag, slightly larger for matting purposes, adhered the two together and placed stitching all around the edges. I adhered it to the card front.

Using my die cut machine, I cut the gears out of Shimmer Sheetz, then placed various brads in the centers and mounted with dimensional dots for depth. I adhered Dazzle "Turquoise/Silver" dots on some of the gears and used some Tim Holtz Metal gears.

The back of the card is distressed and the inside of the card has more Minds Eye Life Stories paper. The tag on the inside was created from the same paper.

I used my Ranger Large Craft Mat to keep the mess to a minimum! Although that is half the fun, right?

Decorate and always have a good time and make it your own!


Wednesday, August 21, 2013

Video Share (Graphic 45)

Graphic 45 shares an easy technique for creating a very dimensional rolled rose flower. The video is a little long, but we think it is worth watching.


Happy crafting!

-Frantic Stamper Design Team

Monday, August 19, 2013

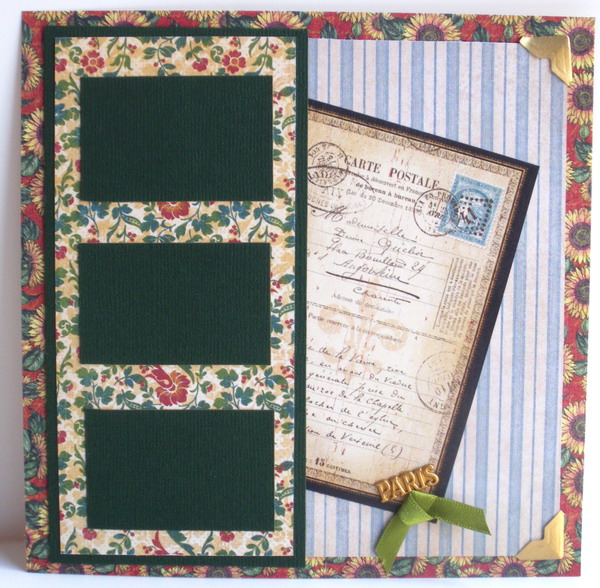
Paris Mini Scrapbook Page (Lis Whiting)


Paris Mini Scrapbook Page
by Lis Whiting


I really like mini scrapbooks and brag books.  I like the smaller size because I can complete the pages a little faster and because I love to use smaller sized pictures. 

For the mini page above, I started with the 6 x 6 daisy sheet from the French Country Collection by Graphic 45. I added some dark green card stock at my mat where my pictures will be.  Don't you love the blue stripe paper?  I thought it was just perfect for this page.  I added a couple of gold photo corners, my ribbon and a Paris brass charm I had. 


The gold photo corners are already adhesive-backed which was nice.  There are several different colors which I like.  The "Carte Postale" is a piece that I cut from one of the other papers from the collection. 

I hope you enjoy my page!
-Lis


Saturday, August 17, 2013

One Tree, Two Ways (Kathy Berger)


One Tree Two Ways
by Kathy Berger


While I will be sharing the cards that use these trees in the near future, I thought I would give a preview and share the two very different looks I got from this one tree die.

I cut both trees from white card stock using the new Leafless Tree die from Frantic Stamper. After cutting them, I used the eyes and mouth dies that came with the tree to cut a face in one of the trees. I coated a small scrap of black card-stock with glow-in-the-dark glitter glue, and glued it in place behind the tree's face.

I colored both of the trees using Copic markers. I chose warm and cool grays for the Halloween tree and warm browns for the other. I carefully blended the colors to give each tree shape and shadows, but the embossed lines from the die helped to give the trees texture. For the warm summer tree, I first added a swing from the Leafless Tree set, then I cut three cloud shapes using My Favorite Things Die-namic Cloud Trio dies and colored them with various shades of green, and attached them behind the tree tops.

The Leafless Tree die set is wonderfully versatile because of all the accessories that are included, but color can make a difference, too!

I can't wait to share the rest of these two cards, which use more dies from the fabulous Frantic Stamper Precision Die line!


Products used: