
by Lis Whiting

Visions & Dreams Mini Album
Materials
-
Paper and Cardstock
-
Melissa Frances Album Small Scalloped Circle (
MFR-ALB-112
$1.99)
-
Die Cuts with a View, My Home (substitute DCWV paper of choice)
-
Die Cuts with a View, Taj Mahal, 12"x12" Stack (
DCWV-Pad12-042
$19.99)
-
Basic Grey, Motifica (substitute BG paper of choice)
-
Graphic 45, Hallowe'en In Wonderland, Curiouser (
G45-P-0251
$0.99)
-
GCD Studios Papers, Cosette Asian Lace (
GCD-P-050
$1.19)
-
Selection of
Handmade Papers
of your choice
-
Best Creations Glitter Cardstock, Sapphire (
BC-P-GL055
$2.59)
-
Shimmering Metallics Cardstock, Silver (
shimmer metallics silver
$0.50)
-
Inks and Embossing Powders
-
Ranger Distress Inks
-
Krylon Leafing Pen, 18K Gold (
KRY-18kgold
$6.99)
-
Embellishments
-
Graphic 45 Renaissance Faire, Tags (
G45-DC-0117
$1.59)
-
Tim Holtz Tissue Tape
-
Tim Holtz Idea-Ology
-
Mays Arts Leaf Trim, Olive (
MA-BY-16
$0.99/yd)
-
Fancy Pants Artist Edition, Safety Pins (
FP-Pin-106
$4.99)
-
Gary Burlin Gold Paper Charms, Heart Keys (
BUR-E7527
$6.95)
-
Prima Flowers Mini Roses, Coral Rose (
PRI-ROS-535506
$2.99)
-
Maya Road Trinket Blossoms, Velvet Puff, Orange & Cream (
MR-FL-TK1231
$3.59)
-
Ribbons
-
Solid/Diamond White on Black (
MA-AD-10
$0.59/yd)
-
Check Metallic Turquoise (
MA-EB-04
$0.79/yd)
-
Basic Grey Micro Mono Alphabet,Olivia (
BG-S-VIA-2660
$1.59)
-
Brads Medium Brads Neutral (
AMC-BR-neutral
$3.49)
-
Kaiser Craft Pearls, PEARL (
KAI-PRL-713
$1.99)
-
Kaiser Craft Acrylic Gems, Rhinestones, SILVER (
KAI-RH-700
$1.99)
-
Paris Flat Back Epoxy Clock, Small (
Paris Flat Back Epoxy Clock
$0.49/each or 10 for $3.95)
-
Tools
Instructions
-
I love making books and albums. There is something fascinating when I create a page. Sometimes I don’t know how the page will look until I’ve completed it. Other times I have a sketch.
I think the biggest thing is to have an idea or theme for the book. Sometimes making a book can feel overwhelming. I divide it up into pages then I work on each set of pages.
This keeps me consistent with my theme and the smaller projects within the book don’t seem so big.
This small album is just right for a cute book or even a small brag book or scrapbook.
The title of my little book is “Visions and Dreams”.


-
The first thing I did was choose a "thoughts and ideas" theme for my little book.
-
I cut one page from the book and used this as my template for my papers.
(I bet you wondered how I was going to add papers to a book that had scalloped edges!).
-
Though the individual pages are already cardstock so they are not thin, I like to use a lot of 3-d charms and such and I wanted the pages to be strong.
So, I glued two pages together to make them stronger.
I also only wanted a certain number of pages to my little book and this was one way to reduce the number of pages.
There was one single page left over which was fine.
-
I chose my papers for the pages of my book.
I took my template and traced it on the back side.
Then I cut out the papers.


You will notice that I decided to cut down the side of my template so that it was a straight line.
This made it much easier to cut out my papers.
-
For each paper that I cut out, I edged it in either Aged Mahogany or Vintage Photo. This gave my edges some depth.
-
After I glued my papers down, I edged them with a gold pen. This way if they didn’t match up exactly, it wouldn’t show.
-
When I got done with my little book and each page had been decorated and glued in, I added two ribbons to the spine.
I wove them in a out so that the binding would help hold them in place.
I wove both at the same time in and out of the binding. I skipped two loops for every one that I went under and tied a knot at the top.

-
Here is the finished book. I am holding it so that you can get an idea of the size.


-
Now let’s go through the pages:
-
Back and front of book
-

The back of the book is on the left. I used Tim Holtz Tissue Tape to cover the back.
I cut about 1/8” from the scallop so that I could fold the tissue tape over the edge to cover it.
The front of the book was fun to decorate. I added everything to the paper BEFORE I glued it to the book cover.
I wanted a lock and key (like a diary) so I used some of Tim Holtz Idea-ology and used a green leaf ribbon to wind it behind the keyhole with one leaf poking through.
(I LOVE this ribbon.)
I hung the key from a memo pin and a garment pin.
I added a red rose, a velvet flower, a chipboard clock and game spinner.
You can see from the picture that I edged my pages in gold.
-
Pages 1 & 2
-

I stamped and embossed in gold a small (unreadable) message.
I hung a pair of scissors charms on a piece of wire that I added to the back of the embossed message with mounting tape.
I used the micro mini stickers to spell out Visions.
I cut out a torso from asian washi paper and added a red rose.
-
pages 3 & 4
-

This paper is from Fran’s handmade paper.
I used the Vintage die from Provocraft to cut out the key and the ticket (on same die-I also used the small hand on another page)
I used aged Mahogany ink direct to paper to color the embossed parts (already done from the die). I hand wrote my message on the ticket.

I shaded the edges of the paper with aged mahogany and an ink blending tool.
I edged all my pages with gold after I colored them.
The picture and the two coins both come from the Renaissance Faire tags.
All I did was mat the picture and mount the coins with mounting tape.
-
pages 5 & 6
-
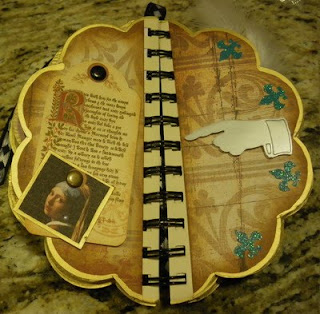
I used a basic grey paper and blended vintage photo on the edges.
I then edged this with a gold pen. I edged all my pages with gold after I colored them.
I punched out 4 fleur de lis in blue glitter cardstock and attached with glue on the right.
I also used the small hand from the provo craft die (in silver glossy cardstock this time).
On the left (page 5) I took two tags fro Renaissance Faire and attached to the paper with brads.
I added a small 3mm pearl to the “Girl with Pearl Earring” picture.
Both pictures swing freely.

-
pages 7 & 8
-

I took a circle punch and punched out some clocks from a DCWV paper sheet (My Home) and glued them around.
I attached another Renaissance Faire tag with black ribbon to the left side.
I used paper clay and a mold to create the Paris shield which I then painted purple.
I added some gold rub on to the word “paris’.
I got a white feather and attached it first with double stick tape to the paper.
I then attached the shield with glue to the paper.
I added another small Paris clock at the bottom right. (I love these Paris clocks!)

-
pages 9 & 10
-

I used the fancy square punches to punch out the Alice in Wonderland characters and mats.
I added blue, yellow and clear gems to this page.
I added the words “and dreams” with a pink rose to this page.

-
pages 11 & 12
-

I left these pages undecorated. I love the way it looks just plain. These two pages represent the future.
-
A couple of thoughts: After I wrote this up I looked at the items needed to make this book.
They looked daunting! I had a whole page of “ingredients”. I realized that I use some leftover items from other projects in my books.
There are new items I use also but mini books are a great place to use up stuff that’s just hanging around waiting for the right page too!
You might have noticed in the pictures that I didn’t color in or cover up the inner parts of the pages where the binding and holes are.
I thought about it and decided not to. If you use ivory colored papers with patterns (see page 10) you don’t see the edge.
You can also stamp your designs directly on the papers themselves. Another idea: you can take some thin 1” ribbon and thread it through the binding between each page.
This will cover up the space and shouldn’t add too much bulk to the book.
I do hope that you will try one of these little mini book projects too. They are fun!
 by Lis Whiting


J'aime énormément cette réalisation !!!
ReplyDelete